Leaderboard
Popular Content
Showing content with the highest reputation on 05/24/2020 in all areas
-
Some cracking stuff here, glorious I posted these up on the Pete's "Look what I found lying about looking sorry for itself" thread, but thought I'd put them up here too. It's not exactly a Tonti but sort of resembles one in spirit and is contemporary. First pic as it was after the refurb the solid discs warped and the pods were too long Second pic before I threw it and me into a wall, which rearranged the fairing somewhat Third is how it currently looks (never bothered replacing the fairing decals, which I should) I'm not a fan of exhaust wrap but I orignally got the pipes Cermakromed, which looked shit, then I had a rethink when I added the cast wheels, so the system went to black. Problem was because of the Cermakrome, the black never keyed properly and started to flake on the headers. By this point I was sick of the whole thing and just thought "sod it" I'll wrap them and its been that way ever since.4 points
-
This was my first thought. You said that you had the heads off? I take it you replaced them using new head gaskets? When this is done the engine should be warmed up and then left overnight and when fully cooled the rocker gear removed and the heads re-torqued by cracking the nuts loose and then re-tightening them. The valve need re-gapping after this and then the bike should be heat cycled a few times, (Ride it for say ten trips and allow it to cool completely between each trip.) and then the re-torqueing procedure repeated. After that you should be right pretty much forever! The thing is the kingerlite gasket will compress during their initial few heat cycles. As that happens the valve gaps will close up. Re-torqueing will exacerbate this compression and the caps will close up more. After a series of heat cycles the gasket's limit of compressibility will be reached and the clearances will stabilise and cease to change very much.4 points
-
If the valves are tightening up, yes. The only other thing I know of is the valves are stretching. That isn't common on the big blocks as far as I know. I just never imagined that the base circle wouldn't be on the money. Grinders are very accurate machines by design. Maybe a case of a little knowledge getting me in trouble? Forget everything I said last night.. Set them at TDC and forget them, Onibaka.. don't worry, be happy.3 points
-
4corsa, You need to put more oil in your gearbox, I put 850 ml in mine. The diff holds 370 ml. Rob3 points
-
This could be a "Ted Talk" at the 16th Southern Spine Raid on tech (bourbon) night?2 points
-
That would be a personal opinion . I do know I would like to have one with Ohlins suspension to see if they are all that . There is one thing I KNOW , every time I get near my bikes , I cannot see why these bikes are not in everyone's garage .2 points
-
The best component on any Guzzi is V11 Sport candy apple green paint.2 points
-
The fact that the gap may increase at other phases in the cycle isn't much of a worry unless it is extreme. My guess is that if other people tried it they'd find that exactly the same thing. All it means is that the base circles aren't ground perfectly which doesn't really matter as long as the clearance doesn't shrink to nothing over the greater part of the base circle. The whole point of of having a clearance is to a.) ensure the valve is allowed to close fully when it's supposed to be closed and b.) to allow a film of lubricant to enter between the cam and lifter to cool and clean during the unloaded part of its work cycle. If your engine's top end has become suddenly more rattly I'd suggest checking the rocker bushes and spindles and ensuring they are getting sufficient lubricant.2 points
-
You are too kind docc, and you have awesome emojis! I have no excuse, I lived in Florence for 2 years where I contracted this terrible disease that makes me love everything Italian (Guzzis, Ducatis, Alfa Romeos, Sofia Loren, Prosecco...), and speak Italian reasonably well. I should cross-checked with the original Italian instructions 🤪 Anyway, filled it up to .850 and the good ol Redline is right in the middle of the glass. Glad the Pawl Spring job is done, and can't wait to ride her tomorrow!2 points
-
Which-ever shocks and forks, I would wager a more significant difference between the short and long frames (along with the difference in rear rim width), as "components" go. (Never thought of the frame as a "component" before . . . )1 point
-
...having owned a Scura with Ohlins, and now a Le Man's with Marzocchis, I can say they are both very good when properly set up. The Ohlins are maybe marginally more compliant over bumps while remaining firm under braking and cornering.1 point
-
Guzzi spec Ohlins are the same quality as Ducati,Honda,Yamaha spec Ohlins. They are obviously better quality than the original equipment Guzzi suspension its just they arent really any better than the std late model sports bike suspension from the big Japanese 3 or 4. The Japanese and Ducati fitting them is more a marketing exercise than anything else as it aligns with their WSB's and as far as the V11 goes they are an upgrade. I've just mentioned in the past that the Ohlins obviously aren't bad units but forget all the hipe the Journo's and others go on about with the std spec Ohlins. If you're going to upgrade your suspension esp the shock dont bother waiting around for a good second hand Ohlins shock to appear on the market and pay a premium for it. You can buy better quality now cheaper. As far as the forks go apart from the ease of conversion from the std to Ohlins OEM for a V11 there are way,way better late model japanese oem forks around than the original oem Ohlins on the V11. Ciao1 point
-
1 point
-
If you want a short shift that clicks like a Japanese crotch rocket , this is the device for you .1 point
-
Really interesting to ponder (of the V11 series) "So, what is best?" Many would naturally select the models with Öhlins suspension, yet I've heard it said that the Guzzi spec Öhlins is not really up to what we might expect from that esteemed maker. Plus, Öhlins was never offered on the ShortFrames (my preference) and only came on handlebar V11 with the stand-off headlamp/instrument mounting or the Corsas with the sad tank decal failures. Then there is the matter of full faring, bikini fairing or nekkid. Lately, I been diggin' nekkid, but that may be sharing too much. So, @Calijackalbob , best monochromatic (Designer Marabese would heartily approve! ) might well be the 2003-2004 black or red LeMans if you're in for the full faring and willing to set up the suspension. If you can tolerate the stand-off headlamp/instrument mounting and like the bikini/flyscreen then it is, hands down, the 2005 Scura R.1 point
-
I would suggest liberally greasing that needle cage, its race, and the washer to help resist water infiltration. I ended up with a ruined bevel box/reardrive from a PO neglecting this simple task. Repeat at every tire change . . .1 point
-
Thank you Pete.THat's where the IPC shows it and that's where i put it.It just didn't look right to me.And thanks Weegie.The more i thought about it,it can't be a differential,lol.Thanks for your Quick response and clearing that up for me1 point
-
IF you are adjusting these correctly and you know it , don't worry about it .1 point
-
We are installing a part that will make the shifter require less movement . YOU WILL LOVE IT !1 point
-
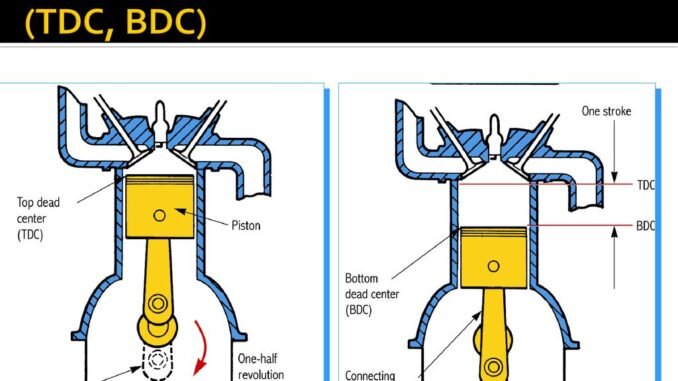
Guys, I’ve been trying to explain many times that adjusting valves for me is not a problem . I am sure that the piston is in the DTC position. I see the movement of the piston in the hole of the spark plug, I see the mark D (for the right) and S (for the left) of the cylinders. The piston during DTC is in compression. Both valves have a gap and I can adjust them. All the same, I have my Guzzi for the 8th year and I have done this procedure many times. doсc understood correctly. This is my question, I noticed that the valve clearance in the TDC position is not the largest for the entire crankshaft revolution cycle. That is, if the intake valve clearance in the TDC position is 0.15 mm, then with further rotation of the flywheel, when the piston leaves the TDC and the exhaust valve opens (exhaust stroke from the combustion chamber), the intake valve clearance increases to 0.20 mm. This is also true for the exhaust valve. That is, on the injection cycle (when the injection valve is open), the clearance of the exhaust valve is greater than in the TDC position I hope you understand me. I am sure that I am not confusing TDC. I just accidentally decided to measure the gaps in other positions of the piston (not in the TDC) and they turned out to be larger. Maybe it's me having some problems with the camshaft. Or maybe this is normal? I just want to understand this issue. Yes, I decided that there should be something themed1 point
-
Makes me want to try and say something Italian, translated three-times-sideways (as always):1 point
-
Thanks guys, .850 liters is what I thought I recalled from my old Scura. So here's where I got the info in the manual. On this page it says "transmission box" at 0.37 liters. Then I flipped to the previous page where it of course states "Rear transmission box". Doh!1 point
-
1 point
-
Got it It was a balance problem Twinmaxx, Techmate, or electronic balancers are shit, Got Carbmate or tune and it showed they were out. Dont waste your money on electronic buy ananalog they are much more accurate in my opinion. Running like a scalded dog.1 point
-
"If" the camshaft were wearing , or any of these components were wearing , the clearance would be opening instead of closing . The only time clearance closes , is when the valve stem height goes "up" or gets taller . As when valve seat or valve face wears . Don't worry about this for now . Please make sure you are taking these measurements at TDC compression . Remove the spark plugs so you can rotate the engine . If you have a bike stand , get the bike up on the stand and put the transmission in high gear , use the wheel to rotate the engine to get the piston on TDC . One TDC will give you valve overlap , the other will give you what you are looking for . Adjust these valves and go to the other side and repeat the procedure . When you are finished , Take a break , then recheck your work .1 point
-
Alrighty now.. I'm beginning to count parts. Here's what I have: Kelly White Paul Beingessner Brian McReynolds (2) Kevin Trapp Tommy Allison Phillip Larsen (2) Ian Griswold (2) gene stallons Tom Christiansen Kosta Suli Dave Swanson Nick Looijen Brian Boles Tim Scudder Jamin Horner Randy Minton James Ferrell1 point
-
1 point
-
Checked both cams yesterday, this is for a non US RS, the US RS and Centauro have different cams, see Lucky Phil's build thread page 7. https://www.v11lemans.com/forums/index.php?/topic/20664-v11-daytona-project/page/7/ Had to do a bit of mental arithmetic and thinking (not my strongest suit). The left side was a breeze but as I just kept the degree wheel zeroed on the LHS TDC, had to turn the crank 270 degrees (clockwise facing the front) direction of engine rotation, then set up the gauge onto the lifter and zero it for the RHS. After that I turned through 90+(90-63.5)=116.5 degrees to arrive at 63.5 degrees before BDC on the RHS. A lot of degree wheels including this one have their scales laid out as before and after TDC/BDC. So instead of looking for 63.5 after the 90 on the wheel I needed to obtain 26.5 after the 90 as the wheel is numbered from BDC counting towards the 90 degrees It's hardly rocket science, but it's easy to get confused especially if the scales aren't numbered 0-360, but 0-90 (after TDC), 90-0 (before BDC), 0-90 (after BDC), 90-0 (before TDC) as you rotate the wheel. I turned the nut on the service shaft to rotate the crank and it turns in the opposite direction. Some notes on my experience doing this. As long as you have a degree wheel, a mag base and a dial gauge it's not difficult. I used an adapter to screw the dial gauge into the spark plug hole, alternatively the dial gauge could be used without spark plug adapters if you have extension shafts for the gauge and then set it up on a base above the plug hole, or simply a positve stop tool. I bought a solid wheel which could also be moved using wing nuts. Like this https://www.ebay.co.uk/itm/200MM-ADJUSTABLE-3MM-ALUMINIUM-CNC-ENGRAVED-ENGINE-TIMING-DISC/233567512922?ssPageName=STRK%3AMEBIDX%3AIT&_trksid=p2057872.m2749.l2649 The thicker wheel makes it a lot easier IMHO, to mount and obtain accurate readings and being able to rotate it really helped without having to mess with the mounting nut. I don't like undoing the mounting nut or bending the pointer as I can never get it accurate. I drilled the center of the wheel out to 16mm to mount onto the crank. When the belts are tensioned and the valves are being operated, the engine gets pretty hard to turn against the springs. It's a lot easier if the rockers are removed first so as you don't have to turn against the springs, besides you need to remove the rockers to check the cam follower lift. It also negates the danger of the piston flying up under valve spring pressure and whacking the positive stop if you're using that method to find TDC I found using the dial gauge easier than using a positive stop, but either way is fine. Using the gauge find TDC, then rotate the engine clockwise and anticlockwise 3mm either way and check the readings. When rotating anticlockwise go past the 3mm then bring the crank back to 3mm clockwise. That equated to 20 degrees crank rotation in each direction, when I did it the figures were spot on. If not TDC needs to be adjusted on the wheel. Lots of videos on YouTube showing how to do this. If you use a positive stop then you just bring the piston up GENTLY until it contacts the stop in either direction then do the arithmetic to find TDC again YouTube has lots of videos After that the base is set so the dial gauge reads the cam follower. Set the engine at TDC LHS and zero the gauge on the LHS exhaust follower. Rotate the engine to 63.5 before BDC then check the dial gauge to ascertain the lift. I did this with the verniers (gears) in place, as I didn't want to mess with them unless I really had to. As both were spot on I didn't need to. To check the other side I then just did the arithmetic I've already mentioned and rotated the crank to 270 degrees, zeroed the dial gauge on the RHS lifter then rotated a further 116.5 degrees and checked. I'm no mechanic but you really don't need to be, just go slow and think about each step.1 point
-
1 point
-
On the 18th of April we got the good news in the German Guzzi forum that Paul recovered (after 16 days in coma).1 point
-
1 point
-
I finally own a 1000S! It needs a thorough going over, which I am happy to give it. It came with the side covers, so no worries there. The toughest part to find will be the black plastic shroud for the instruments.1 point
-
...I rotated that plate fully counter-clockwise and re-assembled everything. Bike seems to shift well (at least 1st, neutral, and 2nd gear in the garage). Raining so will test ride tomorrow. One odd thing, I filled the gear oil with 0.37 liters as prescribed in the manual, and not showing up in the site glass (yes, drain plug in and bike vertical. I put in a little bit more, and still nothing, even after tilting the bike to the right of vertical. Will take it for a ride around the block and check the site glass tomorrow.0 points


