Leaderboard
Popular Content
Showing content with the highest reputation on 07/29/2020 in all areas
-
Tighter than a camel’s ass in a sandstorm. Joking aside, got no time to miss Greenie today. 11 hours work on «Temple of the Guzzi». Timber framing and truss is finished, so a good day. Now, IPA-time. Sent from my iPhone using Tapatalk3 points
-
Here is a similar thread that appears to have the same info... And here's a nice summary post: And here's the thread where I learned to no longer take the fairing apart piece-meal2 points
-
Hrmm, I thought there was a FAQ for this, but doesn't seem to be. I'm sure there was a thread eons ago, but it may have been lost with the upgrade from the original forum soooo long ago. Who knows All true as reported above.... comes off in one big piece as described once the hard mounting locations and turn signal wiring are disconnected. Be careful as the fairing is a little "floppy" once you pull it off, and you have to expand it a bit to get it past the valve cover mounting brackets to pull it forward and off. But once done, you'll see it's not a big deal But as an alternative, if you ONLY want to get to the headlight wiring for example, you also can just remove the small piece of the fairing up under the headlight. I think it is held on with four bolts.2 points
-
The fairing is not a solid independent piece. The red painted portion of the fairing on your bike is held on by the bolts from the mirrors and bolts for the turnsignals. I believe there are wiring connectors for the turn signals to unplug. Then you remove the "skin" - the painted portion of the fairing as one piece. All the black panels you see while seated on the bike stay fixed to the bike. When I first did this to my Rossa Corsa, I was shocked to see how easy it was and how it was constructed. Its really not a fairing in the Windjammer style of construction. Frank2 points
-
2 points
-
I’m having my carbon cover re made in 3k twill. I can ask if they can make ones using as close to the factory fabric as possible. If you guys are interested, let me know.2 points
-
I used mine today and it worked! Fork leg is as dry as my humor. Yours went out in the post today @docc2 points
-
You are very welcome. Had to do exactly this when I swapped the footpegs out on my V11. There have been reports of heavy rear brake drag after removing and re-installing that rod and the lever. Just a bit of wiggle room in the rod and you will be golden. Still, after a ride, you might check the rear wheel for free rotation (well, as much as that term applies) as well as the disc for temperature. If you are a regular user of the rear brake, understand that it will be warm. If it is too hot to touch, recheck the linkage for some free play, and consider that the caliper pistons could also he dragging. If so, a caliper rebuild is the solution to that - but one thing at a time.2 points
-
Now that the V11/Daytona assembly is all but finished I decided to take a break and re group my thoughts and have a good tidy up before I get onto running it and figuring out the EFI. The process unearthed some old friends that engendered some memories and reflection. Principle among these was my grandfathers mechanical tachometer, such a lovely piece in its velvet lined box replete with various drive adaptors. I guess he used it for setting engine idle RPM on cars, dont know but it makes me think of him and holding in my hand something he used and valued is a nice feeling. I also came across this I made about 30 years ago to remove Ohlins fork caps. I am slightly impressed with myself as I remember machining this piece up including filing the 1/2 inch drive section by hand at my friends workshop The actual memories of that day and the people present come back to me as a pleasant time indeed. More than just tools........old friends and valued memories. And here's my next project, a tool to remove the oil pressure switch on the Daytona engine. A long socket is too long and a short socket is too short so I'll make my own extended short tool. Just need to weld it together. Ciao1 point
-
This has come up before, but it's been a while. For my Sport, it last happened in 2009 and I couldn't save the stator just reattaching the wire. This time, I removed the stator and made the repair on the bench after eleven years/ 45,000 miles/ 72.600 km and it appears to check out. That is, the resistance through the windings, AC output, and DC charge values all check out. (MΩ from yellow wire to ground is suspiciously low.) The wiring, mounting points, and strain relief are immensely brittle from the heat making the repair more difficult. I suspect my removing the alternator cover to access the nut to position the motor for valve adjustments every 5,000 miles has contributed to the failure. I simply must be more mindful and less careless about this in the future. Otherwise, when you have your alternator cover off, be certain to inspect these wire connection very carefully every time . . .1 point
-
@docc Have you pulled the dust seals down and noticed any crap? When I pulled mine, I found some dirt and debris. I was amazed.. Blasted it real good with brake clean and wiped out that inner dust seal. Also noticed my fork oil looked like spoiled ambrosia mixed with a little corn starch :/1 point
-
These would be new pieces made and they will be shiny just like the tail on my bike. I spoke with them a few minutes ago and they will make starter covers and chin pads. They do have the same fabric too.1 point
-
Rats, You'll be missed. I was going to press you pretty hard to buy the Ballabio this year1 point
-
V nice temple, it still will be crowded ,,, they all do. 50cm roof insulation I woud think. Well done. Cheers tom.1 point
-
Memory,, no panel,, still say it's a quick job. Bolts for mirrors, bolt above head cover, long bolt a bit further ahead, and was it more actually. Service friendly and one piece. Cheers tom.1 point
-
Very simple actually, in 1 piece, wiring to turn signals, and a few bolts. Cheers tom1 point
-
On my Lario you have to pull the fairing to access the headlight bulb as I recall. It comes off in one piece. It is likely the same on a Lemans.1 point
-
1 point
-
1 point
-
I have seen that P-38, Glacier Girl, back when she was home in Middlesboro, Kentucky. I always loved the P-38, and it was amazing to see that plane in person. I had seen the Nat Geo special on pulling it out and restoring it. So, while we were on vacation riding down the Blue Ridge Parkway and back we swung by Middlesboro (back when that was where she lived). We also saw a B-24 down near Knoxville Tennesee called Aluminum Overcast.1 point
-
Iceblue. He hasn't posted on WG for some time, though. There *is* a small block forum on groups.io.. but they seem fairly needy to me. I don't know if there are any 4V guys there or not. Martin's fix here: https://wildguzzi.com/forum/index.php?topic=98265.01 point
-
Yes as a matter of fact I do................they're all 1/24 scale or smaller tho . My real connection to them is my Father designed and built the sighting tube and rangefinder for the photo ships for aerial reconnaisance . Paul B1 point
-
Took the Scura out for a ride around what Zonies call the Salt River Canyon (SRC) Loop. Ultimate social distancing. Just over 300 miles worth. From my home in Mesa, AZ to Globe, across the Salt River Canyon, Show Low, along the rim to Payson and back down into the desert and home. Lots of traffic in the Payson area. In these days of C19, lots of folks going camping for weekend fun. Caught a few monsoon sprinkles along the rim. I would say that the Guzzi purred like a kitten, but that big twin sound is much more like a flatulent Italian grandpa who ate too much spicy Italian sausage.1 point
-
The issue with the throttle bodies leaking fuel is that on a Guzzi the throttle shafts are vertical and any fuel that pools in the throttle bodies like when you cycle the ignition and it squirts a prime shot into the inlets or if it doesn't start, sits there and leaks down the shaft through the worn shaft bushes and onto the worn seals. Most engines dont have their throttle shafts vertical so it's not as much of an issue. The solution is to replace the shaft bushes which I have just done and replace the seals which I'm waiting to show up in the post. I managed to source the original brand and type of bush Weber used and the seal is a part from another motorcycle brand. Ciao1 point
-
loosen the air filter to throttle body hose and push it back into the air cleaner housing . Open the throttle body to wide open . Turn the key on to pressurize the fuel system . watch to see if the fuel leaks from the injector or the injector to the throttle body seal . Then decide what to do .1 point
-
Cali1100i, The CalVins were one of the bikes with the dissolving fuel lines inside the tank; usually that issue should have been addressed by now, but if it's been been neglected and just parked, it could be the source of fuel delivery grief. Make your mechanic aware that it may be an issue at play. It sounds like there may be a bit of corrosion, a good methodical clean up of wiring connections, grounds etc with deoxit and a dab of vaseline should help things in the long term. Good luck with it Kelly1 point
-
Not exactly a newer model but hey So it's a smallblock 750. 2 or 4 valve per cylinder. I can't remember. As for parts there is some communality with other models but stuff like bodywork and some engine bits will probably be difficult. Try TLM in Holland, Stein Dinse in Germany or Ago's in Mandello.1 point
-
i'm guessing there may be a thread on this but not seeing it.... My old Twinmax i've had since Y2K has been my sync tool. On the last go-around with the red v11 i noted that even on the most sensitive setting i wasn't getting much change as i adjusted things. In comparison, on the old oilhead i had for years that twinmax needle would bounce around soon as adjusting things out of the sweet spot on the sync in either direction. On top of that, at one point many tune-ups into owning the oilhead, i had the BMW dealer do a sync once, and it came back better than my previous sync's. Hmm...i had been confident in my technique and results, but now had a new standard. what was i missing, or did they just have a better/more sensitive sync tool? Not too long later, sold the oilhead, without resolving in my head what the bottom line was on all that. Fast forward to now, and i'm looking at comments (TomChri, etc) on the carbtune pro, and some other options, and generally see that folks tend to think the the carbtune pro might be more accurate than the twinmax, but thats really the question. I haven't ventured from the twinmax in 20-ish yrs, and love a good tool, so thought i'd fish about for input on whether to consider shelling out for a different sync measure tool. and no thanks for all the "just make it yourself" stuff. I know, those work, but I'm only interested in retail tools, and ones that are better than my old twinmax. And/or thoughts on what else i might be overlooking for why i'm seeing such little variation on the twinmax as i adjust the sync/white knob (yes, valves done, idle backed off, un-connected, etc.) Ciao1 point
-
Yep, "they do that." Made worse if we pressurize the system briefly (switching the fuel pump on and off, or brief start-ups). Otherwise, there are procedures to address the throttle shaft and sealing O-rings.1 point
-
In my opinion and experience in the field, anytime I do wiring work on my equipment I use marine grade tinned wire one size up. I have 100ft spools of of this exact stuff at my shop. https://www.fisheriessupply.com/marine-electrical-supplies/wiring?N=23064+4294967103+15560&Ne=10183&Nrpp=40&ct=4294967103 @docc have you thought about using a nice dollop of potting epoxy? Something like this? https://www.masterbond.com/tds/ep36ao1 point
-
Clean and lube the end of the rod and maybe Armorall the boot. Slip it back in and you are good to go. When adjusting the pedal, make certain that there is just the tiniest bit of slack in the system (pedal-rod-master cylinder cup). If there is no slack, you might be partially activating the rear brake. If you have a stand, you can check the free wheeling of the rear wheel once all is back in place.1 point
-
WOW! So jealous, that would be in the house with me and my wife would be in the back garage! Love that color too, congrats!1 point
-
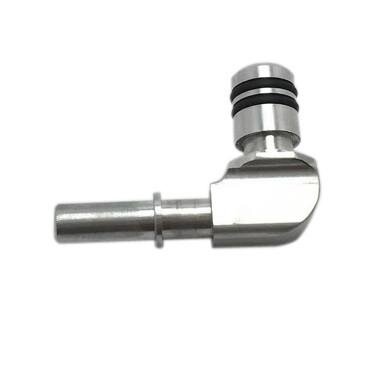
Since I went with the in tank pump, I wanted to make sure I won’t have issues with those plastic disconnects. I found these: https://ziptyracing.com/products/fuel-pump-elbow-oem-8000ah2930-gte-fi-husky?_pos=1&_sid=4604f34df&_ss=r you remove the plastic elbows, tap and thread the fuel pump base and screw these bad boys in.1 point
-
1 point
-
Here is a nice pic of the shift side of my Motobits controls. I modified then with adjustable and folding toe pegs.1 point
-
Those gears are coming from the U.K. Joe Caruso has them made and they are steel. heres the invoice from Joe this morning: CENTAURO LARGE STEEL GEAR 350.00 CENTAURO OIL PUMP STEEL GEAR 235.00 CENTAURO UPGRADE OIL PUMP 375.00 BRONZE THRUST FLANGE 90.00 CAM FOLLOWERS X 4 420.00 SHIPPING TO USA TRACKED GLOBAL PRIORITY 67.00 ___________________________________ TOTAL AMOUNT UK POUNDS £1537.00 I’m wrapping my wallet in asbestos....1 point
-
Hey , I am a member of i-atn and I had a guy piss me off so bad I wanted to drive about 600 miles and set his house on fire and shoot anyone that came out , I blocked him for a couple of years . Got to reading his responses to help requests and realized he was usually right . He just had an undiluted way of answering . He is now my best friend and I took up for him when he was gonna get barred from the site .1 point
-
For my light duty torquing (300 in/lb - 35 Nm), I use a Consolidated Devices Inc./Snap-On 3002LDI dial torque wrench. It does not ratchet. It is not ergonomic. It measures torque. They are not prohibitive to purchase, but as always, are far less expensive on the surplus market. Dual scale on both directions. Resettable zero. Had a nicer example, but some local meth-heads stole it.1 point
-
Hearing of the charging amperage requirements of the Odyssey battery, I did not want to lay out the bux for an "approved" charger. Ya' see, I had a perfectly good Schumacher rollabout charger that will do 2/10/40/200 amps. Not worried about the 40 and 200 here. 10A seems about OK. But, it has only those huge automotive battery clamps on it. So, I picked up an SAE connector w/10AWG leads and wired them to the output of the charger. They lead to a covered, polarized outlet that I mounted on the front panel for access. Now, amping up is that much more convenient. But 10amps through an SAE connector does have me wondering a bit. We'll find out on that. Will have to be used in concert with a volt meter to ensure staying at or below 15V. Got some leather tool holsters for the automotive clamps so as to avoid shorting. They'll go on the sides.1 point
-
What's a guy to do if his compression tester has only 18mm and 14mm threads, but his bike (Kawi 500) has 12mm plugs? Well, what fits better than a spark plug? Gutted the plug, squared off the top on my handy-dandy drill press, tapped 14 X 1.25, filled the cavern with JB weld and drilled through it, slipped a high pressure viton O-ring on and there ya' go.1 point
-
What realy excites me is to ride my bike 'on the cam'. And that applies to any bike at all. Its just that you cannot ride anything modern and powerfull in such way if you want to be back home for your supper and not ending in a box or in jail. I have a few small bikes like an Airone Sport or a Bultaco 350 and enjoy them immensely when i can wring them around coaxing every horse availlable to stay 'in the zone' and on song. May be i am old fashioned and missing something but the Airone at 60mph is more fun than my ex Stelvio at 130. Many customers aren't looking for silly power and over prepped steers, technology is a lure and progress an illusion, give me two valves and pushrods please. There wont be any need to rebuild the head at silly expense or to remortgage your house to reshim your desmo. So for me, guzzi is on the right track staying air cooled and pushrod , keeping production costs down , but with the added value of a shaft drive thus reducing maintenance. As a mechanic, i cannot but admire the skills of the creators of those super rockets but it somehow lets me cold.1 point
-
1 point
-
Colder ... Warmer ... And we have a winner! It is indeed a specialized impact driver. Depending on which way the sliding hammer is rotated with respect to the Delrin buttons, the tool may be used to either tighten or loosen screws or bolts. The degree of rotation will vary how much force is delivered to seat the screw or bolt and how much is applied as a torque. Once loosened, a fastener could then be unscrewed with the T-handle wrench. It was made about fifty years by Joe Bolger of Barre, Mass. I think it was about $50, a fair piece of change back then. What a "serious" rider would have in his kit, along with his safety wire twisting tool.1 point
-
1 point
-
As an aside and on this subject one of the best pieces of riding gear esp on a sports bike with a seat that's not built for comfort is pushbike riding nicks worn under your jeans or pants. You know those Lycra shorts of various lengths with the chamois gusset that provides padding and sweat absorption for serious cyclists. Anything that can make the difference between a day on a pushbike in agony and the same day as a total non issue comfort wise has to be good. So instead of wasting a small fortune on custom seats and lambswool covers or airbag attachments and other hideous looking stuff spend $50 on some riding nicks and ride in comfort. Ciao1 point
-
I thought it was cool to sneak hammers into Guzzi pictures and this man comes along with scythes in the background. That is totally badass.1 point
-
Our efforts tend to be more road orientated, (That's Beetle sticking the datalogging kit on his 1400.) Our mate Ron has a dedicated track bike though. (Both of these clowns had serious stacks last year but thankfully have recovered!)1 point
-
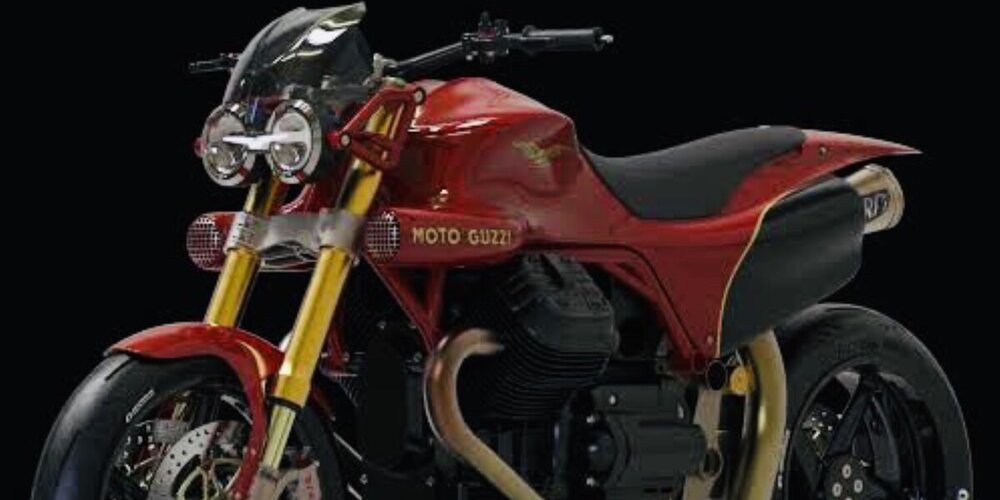
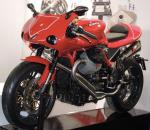
Guareschi Corse presents the Varano kit for Moto Guzzi A series of components designed to transform a Moto Guzzi 'big-block' mechanical base of the penultimate generation (Griso / Breva / Norge) into a sport suitable for the track A series of components designed to transform a Moto Guzzi 'big-block' mechanical base of the penultimate generation (Griso / Breva / Norge) into a sport suitable for the track On the occasion of the Motor Bike Expo in Verona we met the Guareschi brothers: Gianfranco (for his friends: the Guaro) is very well known among Moto Guzzi fans, he obtained the last official victories of the Mandello del Lario house, in the two-cylinder races Daytona Bike Week in the biennium 2006-07, on the saddle of the MGS-01, the last Lario twin-cylinder designed for the slopes. His older brother Vittoriano Guareschi (for all: Vitto) is known for his role as a test driver, and later as Sports Director of the Ducati team in MotoGP. The Guareschi brothers inherited the family business, a historic dealership and Moto Guzzi service center, founded in Parma in 1974 by his father Claudio, who died in 2013. At their stand at the Motor Bike Expo we were able to touch their latest creation, the GC Corse Varano: a kit designed to transform a Guzzi 'big-block' mechanical base of the penultimate generation (Griso / Breva / Norge) into a sport suitable for the track. Gianfranco and Vittoriano tell us that, since the Guzzi range has long lacked a pure sports car, many guzzisti ask to be able to transform their road bikes into track bikes. They thought of a modified chassis to improve drivability in order to allow all the fans to be able to race in the races reserved for the twin-cylinder. They have poured the baggage of experience gained from the races with the Guzzi MGS-01: not only the victories in Daytona, but also in the Italian BOTT championships. In this Victorian bike he transferred the knowledge accumulated in the early 2000s, when Ducati Corse participated in the development of the Desmosedici project, under the supervision of Filippo Preziosi. In fact, many of the concepts of these two bikes can be found in the Guareschi Corse Varano. Starting from the trellis frame that wraps around the upper part of the 90 ° V twin-cylinder engine. It is the engine that performs a supporting function, as the final transmission is pivoted, which adopts the CARC system (Cardano Reattivo Compatto) that has equipped all the most recent road and sports 'big series' and in the Varano it is called express its potential in a decidedly more driven use. The iron tube trellis is the result of numerous test sessions on the Guareschi 'home track', the Varano de 'Melegari circuit. For those who in the world Guzzi is not really first hair, this compact trellis reveals a familiar air: very reminiscent of the upper section of the historic "Tonti chassis", developed at the beginning of the '70s by Lino Tonti for the V7 Sport , and used on successive generations of motorcycles of the Casa di Mandello, whose stability skills were proverbial. Vitto Guareschi explains to us that the chassis equipped with the CARC transmission is rather stiff, so the chassis must have an adequate degree of flexion. For this reason they have discarded the CrMo steel tubes, lighter but too rigid. The mechanics is the tested one of the big Guzzi. Most associate the Mandello motorcycles with their imposing rod and rocker cylinders to the paciosa cruisers of the California series. Yet, without needing to go back too far in time, there were examples of two-cylinder Guzzi that have trod the tracks: not only the MGS of Guaro in Daytona, but the V11 that took part in the English road races, including the TT, and the uphill races like the Ballabio-Resinelli. Over the years the Guareschi brothers have developed considerable experience in the development of Guzzi engines, based on special parts and refinement of existing solutions. With an adequate processing of the thermals they have managed to get up to 160 hp, with a very strong torque that makes one of its strong points. Without ever neglecting reliability, they point out: as Father Claudio has always recommended. The line of this motorbike represents a modern reinterpretation of the stylistic features of the MGS-01: an aerodynamic body and very enveloping, with a front that privileges the degree of protection. The mechanics are left completely visible, as was the last super-sports produced in Mandello. The seat is a single seat, the tail is truncated and slender, as suggested by the latest dictates of motorcycle design in terms of sports. The Guareschi brothers intend to leave complete freedom for the client to define the characteristics of the final result according to his specific needs. The kit can be mounted on a mechanical base with 2 or 4 valves per cylinder, supplied by Guareschi or already held by the customer. There is a wide choice of materials and components, you can proceed to various degrees of mechanical processing and equip the bike with lights, arrows and mirrors, for road use (especially for those markets, such as Germany, where it is relatively easy the approval of special in single sample). In their understanding it is a niche motorcycle, aimed at Guzzi admirers with sports ambitions. So a sport declared, but all-round: with a degree of versatility sufficient to get on track as well as being at ease in the hike on the Apennine pass. Thanks to a very vigorous delivery, to a stable and manageable chassis and to a limited overall weight (from 176 kg in running order - depending on the equipment and materials used). The kit including chassis, tank, bodywork and components can be purchased in a mounting box, at an estimated price starting from 7,930 euros; or complete motorcycles will be offered for sale. The 2V road (which you see below) displayed on their stand was for sale at 17,500 euros turnkey. https://www.motociclismo.it/moto-guzzi-guareschi-corse-presenta-kit-varano-720381 point
-
Even without the poison dart of Piaggio ownership Guzzi seem to perennially shoot themselves in the foot. Why abandon the four shaft gearbox for example? While the six speeder in the CARC bikes is a good box and absolutely bulletproof, (In ten years I've never had one apart because it was broken!) it is longer and not as slick as the four shafter if set up correctly. Then they poisoned the reputation of the 'Nuovo 8V' with the flat tappet fiasco! They even tried to destroy the reputation of the smallblocks by producing a run of them with no crank thrust bearings! Now the styling and development is all being done by talentless spivs I hate to think what they will try and foist on us next! That's OK though, at least they did get to build the CARC bikes and they for me will remain the pinnacle of development and my muse. I'll be retiring ASAP once we have Michael set up to continue working and I can become a cantankerous old suspender-snapper and spend my time talking about the 'Good Old Days'! My arse.........1 point


