Leaderboard
Popular Content
Showing content with the highest reputation on 04/17/2021 in all areas
-
Just re-discovering this Audioslave album. It is so good. I had it on CD back when it came out (2002). If you don't know... Audioslave is Chris Cornell (of Soundgarden) singing with the entire band Rage Against the Machine (after their singer left). So there's the whole album for you... The reason I "rediscovered" it is that I was helping my daughter dig through my old CDs to find some of best full-albums - not best songs, but the kind of CD where you are amazed that all those great songs are one CD and you don't want to skip anything. Other CDs that fit the bill (and this search was focused on hard rock and metal, not all genres): Dirt by Alice in Chains Master of Reality by Black Sabbath Van Halen's first album Sad Wings of Destiny by Judas Priest Master of Puppets by Metallica Led Zepplin's first album She played Dirt first, on her drive to school. That afternoon she told me "I didn't even need a second cup of coffee."3 points
-
At least one time in your life , listen to the Docc, get the best relays available. Is there any better around ?, bet it woud be mentioned here on the forum. And your saying your bike were running with those relays, just wondering how they woud fit the base. Just curious I quess. good luck. Cheers Tom.2 points
-
5th character: KRAKR changed to KRAKS probably sometime in 2002. AFAIK, no one has discerned exactly what the change indicates. If anything. Page one of this thread appears to demonstrate that most of the 2002 Scura (Long Frame) were KR, but there was one KS reported. Our member @tommaso is asking about which might be correct for the Scura he is looking at in Italy.2 points
-
2 points
-
Here's a list of things to inspect, clean or lubricate while the wheels are off for a tire change: (The wheels don't have to be off to do all of these maintenance points, and not all need to be done every time) >Check the wheel bearings for smoothness and play. >Clean and check the brake pads for wear; polish and grease the pin(s) very lightly with a silicone based grease.. >Clean the brake pistons and restore their motion in and out of the calipers evenly. This involves blocking every piston but one and moving it in an out of the caliper all the while cleaning it with brake cleaner. > This good advice from gstallons on brake drag: http://www.v11lemans.com/forums/index.php?showtopic=20133&p=225343 >Bleed brakes, especially the rear brake while you can turn the bleeder to the top. > Clean the fork seals with a "SealMate", or equivalent, including the dust seals. Performing this simple task routinely may extend the life of your fork seals impressively! >Remove the top and bottom rubber caps from the rear brake master cylinder and inspect, clean, and lubricate. Use only silicone based grease around brake parts (under the master cylinder, inside the rubber cap). Make sure there is good electrical connection to the switch at the top and avoid the silicone based lubes (dielectric) on electrics - simple petroleum jelly (Vaseline®, or better: Caig DeOxit Gold®) will keep the moisture out. Grease does not conduct electricity - it's just to keep the moisture out. http://www.v11lemans.com/forums/index.php?showtopic=18158&p=192643 >Clean the rear brake carrier pin and block; lube lightly and be certain the pin threads are clean, lubed* and well torqued. (later V11s have a retaining clip on the inboard side). *Consider a thread locking compound. Allowing this locator pin to fall out can be catastrophic! On the early V11 (1999-2002), some have decided to torque the pin in place and only use the sliding block to remove the rear wheel, perhaps reducing the chance that the pin would not be reinstalled correctly and safely. >Bleed the clutch. >Clean the gearbox vent and the rear drive vent. >Locate, inspect, groom and otherwise secure the wiring and connectors from the Side Stand Switch. This is how your V11 gets electrical power to the Run Switch while you are riding along. Without it, you will not be riding along. Might as well have a close look at your side stand mechanism: pivot bolt, backing nut, springs, and foot "lever"(wire loop). Make certain the sidestand bracket fasteners are secure to the timing chest and sump spacer. The main, large fastener here is torqued to 70-75 Nm! Loose fasteners here could contribute to a broken sump spacer. (no need to have the wheels off for this one!) >Inspect the rear exhaust crossover hanger and both of the canister/passenger peg subframe supports. >Clean the wheels and rotor carriers ("float buttons") and lube the front carrier buttons (a drop of Breakfree CLP (or equivalent) works well, but don't let it sling out on the rotor surface. Bumping the rotors around with a mallet helps keep them “floating.” Even out the spacing of the rotor on the carrier by tapping evenly around the perimeter of the rotor with a soft mallet. >Check the torque reaction rod (chassis rod) rubber bushings for deterioration and play. With the rear drive removed and driveshaft separated, service the pivot bolts . Clean the pivot bolts and apply something reliable for corrosion resistance, especially the front pivot that has been reported to break. >Check the rear drive bearings; clean and grease the outboard needle cage and its sleeve with a good waterproof grease insuring that you rotate it to a new position. Here is an excellent thread, by Bjorn, with lots of great pictures of this bearing, the swingarm, and the bevel box internals. [edit 26 April 2018: It has come to light that keeping moisture out of the right side needle bearing protects the "nose" of the crown wheel and the inner drive seal. Once pitted, the crown wheel is difficult to restore.) >Clean and grease the drive splines for the hub. Use something super-sticky, like Klüber Staburags or a dry-film moly coat. Avoid over-greasing (it will just sling off). >Lube the driveshaft and its U-joints. Don't put too much grease in the splined connection or it will trap air and not go back together. Before you take the two halves apart, make sure there are clear alignment marks. Consider verifying the Driveshaft Phasing. >Carefully inspect the driveshaft yokes for signs of looseness, fatigue or cracking. Verify the pinch bolts are torqued and the the yoke collars do not slide on the output or input shafts. >Inspect the shock eye connection to the swingarm. The early V11 white spring/blue collar Sachs-Böge are prone to crack. Grease the pivot bolt and junction of the steel bushing and alloy shock eye! >Service the cush drive. The button head screws will not likely come out willingly, so expect a fight (heat and penetrating oil/solvent) and replace with new fasteners. >Clean and lubricate all the fasteners. I use a small wire brush and anti-seize paste. >Inspect, clean and seal the main ground(earth) cable to the back of the gearbox. You have to remove the seat latch release to get to it. If you find the cable is not directly to the gearbox, move it there, but be careful if you remove the bolt entirely as there has been a report by SeanP61that it might not just go right back in. > Mounting the front of the battery carrier basket beneath the subframe adds considerable clearance for the battery under the seat pan. The front tabs of the basket must be slightly contoured to fit between the frame tubes. > Remove, clean, lubricate, adjust, and shim (if necessary) the foot shift lever and mechanism. They get sloppy, loose, crudded-up, and misaligned. So much better with no play, sticking, or striking the frame side plate on the down stroke. > Clean and lubricate the sidestand mechanism; inspect and secure the wiring to the switch; tighten the vulnerable lower bolt (circled in red) and torque the important upper mounting bolt (70-75 Nm!) [edit 22 March 2021]1 point
-
That's flattering, but a lot of smart, experienced, and dedicated members contributed to the Best Relay derivation. @Kiwi_Roy, @Ryland3210, Bruce Lawson (R.I.P.), and more than few of us in the Beta Testing Department. “I have learned throughout my life as a composer chiefly through my mistakes and pursuits of false assumptions, not by my exposure to founts of wisdom and knowledge.” - Igor Stravinsky1 point
-
Re check your work esp the filter fitment. The 5W-40 isn't too thin as the CTS at 100deg C is still the 40 weight equivalent which is adequate. I've run my bike on 0W-40 Mobil1 for 10 years with no issues. Other things to consider, an oil pressure relief valve that's not seating correctly(you can disassemble it insitu and clean it) the a LOP switch that's not the correct part (they differ in their thresholds) although they fit and maybe your engines close to the lower limit on oil pressure at hot idle. As Pete pointed out it's probably time to swap out the switch anyway. Having said all that I had a friend years ago that had the same issue on a Mk4 Le Mans after changing to a lower grade oil and he solved the problem by going back to a 20W-50. It shouldn't really be necessary but the 20W-50 can band aid over other issues and if the bikes running ok then that's fine for some people. The 50 weight gives you a little more hot oil pressure headroom on the switch setting. Ciao1 point
-
Replace the oil pressure sender switch, they are always suspect. Drop the sump spacer and the carrier for the filter, thermostat and OPRV, check OPRV is working correctly and replace gasket, (Also a good time to fit a sloppage sheet if you haven't already.) raise the idle to 1200+/-50.1 point
-
Ah, yeah, sorry for my oil weight comment. I recall now that Moto Guzzi changed the spec on the later V11. Your Motul is likely just fine. Personally, I'm a RedLine fan; true Group 5, full ester base oil. Awesome stuff. Oil? we can go on-and-on, of course. footgoose makes a good point about idle speed. The tachs can read high (early Veglia as high as 300-500 rpm) which could lead us to try and idle at 700 rpm - not good. That, alone, might save you pulling the sump! If you still have the filter you took off, you can inspect it for the seal.1 point
-
Also what rpm do you have at idle. Don't recall what's called for 1100?1 point
-
There have been instances of the old filter gasket staying on the motor when the filter came out. Absolutely worth checking! 5W-40 seems a might thin for a motor that commonly runs on 20W-50, but I can't imagine that could be the source of low pressure at idle . . .1 point
-
He plays around here in the Bay area semi regularly..they had a big benefit for him here just before covid....some medical issues I believe. Great talent!!1 point
-
1 point
-
I take it that jagged line on the flywheel in the bottom picture is not what it might appear to be?1 point
-
Even better. " Air miles are owing but they dont come for free, and they don't give you any for pain" Brilliant. This ones a "motorcycle" song. Ciao1 point
-
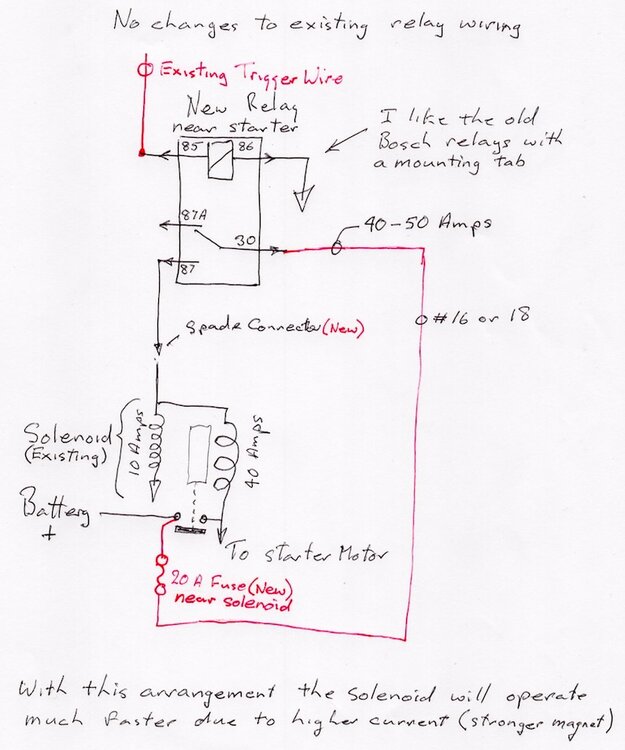
Tom, when I drew the Simple Wiring Diagram I was using my 2001 VII Sport, it had a direct feed to the Start Relay, unfortunately a couple of years later the Guzzi factory switched the Start Relay feed to the ignition switch causing untold grief for owners. You can see the difference here. http://www.thisoldtractor.com/guzzi007/schematics/1999_V11_sport.gif 1999 era with a direct feed to the relay. My 2001 never had a problem with cranking but the regulator Voltage reference was the pits (through two sets of relay contacts). http://www.thisoldtractor.com/guzzi007/schematics/2004_V11_Sport_Catalytic.gif 2004 with the start relay fed through the ignition switch, I would like to believe the factory are ignorant of the high current the starter solenoid draws but you have to wonder why they haven't spoken to the manufacturer about it some time in the last 50 years. Note this year has a direct connected Voltage regulator, that' should be a plus. I assume you are having the dreaded click when you press the start button, that is caused by too much Voltage drop through the ignition switch, the starter solenoid is designed to pull at least 40 Amps while it is moving the gear into mesh, once engaged with the main contacts closed it drops to 10 Amps. The Guzzi schematics never show the double coils in the solenoid, they are both about the same number of turn but one is of heavier gauge wire and draws 5 x the current, thats the one missing on the factory drawings. All Guzzi starters have this double coil even today. You can probably improve things for a while by cleaning the ignition switch contacts but the real answer is to change the start relay feed from through the switch to direct but that involves changing the headlight relay wiring as well. Another easy method is to add a new relay to the existing solenoid trigger circuit to boost the signal the trigger wire is removed from the solenoid and now only picks up the new relay coil, a fraction of an Amp, the new relay contact is fed from a new fuse direct from the battery, it can now provide as much current as the solenoid needs. You will probably hear about the MPH solution, I don't think that will work with your bike, it would result in the headlight staying On. I have never actually done one adding an extra relay but it has the advantage in that the original wiring remains the same. The current of 40-50 amps will only last for about 20 milliseconds (as long as it takes to close the main contacts) then it will drop to 10 Amps while cranking. The current through the motor of course will be 150 - 200 Amps, no change there. No need for a relay socket, just use spade lugs right on the relay pins.1 point
-
Yet, I never really thought about short tanks on the first long frames of 2002. This must be true of Scura and Tenni, as well.1 point
-
I'm sure I have a thread on here somewhere about the external pump and internal pump tank capacity and dimensional differences when I was chasing the vapor lock issues and finally just went out and bought a used 2003 internal pump tank and retrofitted it to my 2002. Although I obviously had to modify the fuel lines and electrical connections, which was trivial, the tank itself dropped right on with no modifications. So although I doubt the 2003+ tanks will fit a short frame bike, the 2003 tank will fit a long frame 2002 bike with no problem. What I also noted back then, even before the swap, was that the 2002 tank looked a bit too short at the nose on the bike to me, especially when looking at earlier bikes. This turned out to be because the long frame extension apparently was done at the head tube, and created a larger gap between the nose of the tank and head tube than was present on the short frame bikes. When I installed the longer 2003 tank, that unsightly gap between the nose of the 2002 tank and head tube closed up and looked better, more like the short frame bikes.1 point
-
I bought five OMRON G8HE-1C7T-R-DC12 but they don’t fit. What is the generic relay for the V11 Lemans?0 points


