Leaderboard
Popular Content
Showing content with the highest reputation on 07/21/2021 in all areas
-
Hello from the Sunshine Coast (Canada!) I love these bikes and have just acquired my second, an '01 greenie. Looking forward to the ample TLC she requires and then riding! cheers!7 points
-
4 points
-
Hello Wee Robbie, your Greenie will no doubt thrive in the green of BC! I have the same, ‘01 Greenie, and she’s a rough and rowdy beauty. Always puts a smile on my face. She’ll need some TLC, but not too much, and will pay you back in spades. This be the place, your new home-away-from-home as a V11 rider. Great folks and a wealth of knowledge generously given. Cheers!4 points
-
3 points
-
I hope that I am not going to offend anybody.... This is an old "for adult cartoons" French magazine, which only cost six Francs, so a very old one indeed. As you can see, the choice of the bike and individuals correspond; Prolo is short for Proletaire or Proletarian in English... the guy wears an overall, which symbolized that.3 points
-
3 points
-
Back in the day I bought a new Centauro. Like most at that time, it barely ran except at WFO. I made it my life's work to sort it, and it took 2 years of trying everything on the COG at the time. I got it running beautifully.. all the little glitches they came with *except* the very occasional miss around 3400 or so. The final solution for that was the brass temp sensor holder to replace the plastic piece.2 points
-
I can relate to "home made" special tools. I was in the battle tanks industry, and a lot of the stuff we had to tear down after the tank had been used in the field could no longer come apart as described in the service manual. So we had to devise our clever ways...2 points
-
Yes I'm aware of the this and it's all largely correct, the valve spring returns SOME of its potential energy back to the camshaft after it's compressed but it's a matter or proportion. From memory it can only return around 80% or maybe less on average due to friction, and other dynamic losses such as having the task of reversing the valves acceleration and pulling the valve back onto its seat so the net result is still not a reversal it's only a lessening of torque in the same direction. There is no perpetual motion machine you don't get all the energy back at any point so the net result is always an input to a greater or lesser degree which keeps the force in one direction to a greater or lesser degree. A multi valve/cylinder engine with more lobes smooths this sine wave energy action as does greater rpm. If it was some sort of single cam lobe mechanism with little or no frictional losses and little work to do I might be convinced but for a typical engine running in typical circumstances I don't think so. I think I dispelled the theory of the cam drive and wear/play and inadequacies/wear/spring fatigue in the tensioner causing the hiccupping when I went to the gear driven cams. It made no difference at all I'm disappointed to say, it still hiccupped as before in the same particular circumstances. Ciao2 points
-
2 points
-
.....a variation of the musical relay game. Next time remember to dance around the bike rattling chicken bones. Good MoJo.2 points
-
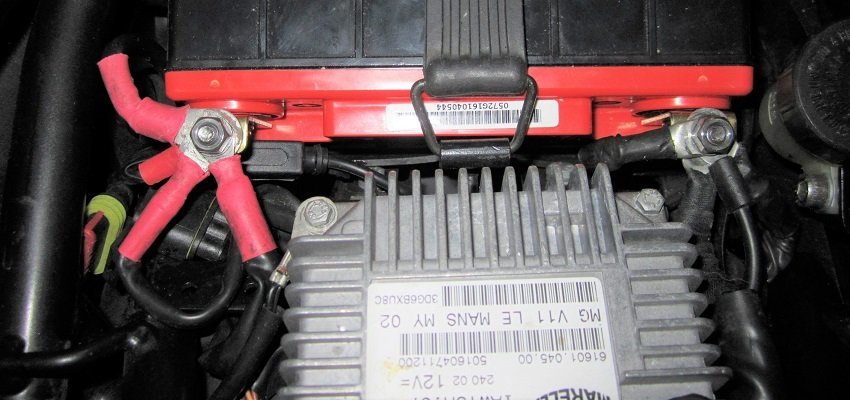
I was at a gun show, and someone was selling "genuine copper commemorative coins" for something or other for like a dollar. I thought, "Hmmmm, those look just like some 90 degree battery connections for the Mighty Scura." Some sawing and bending required.1 point
-
I can't upload photos here and it's now taken apart and put away, sorry. To get it to fit onto my grease gun, I unscrewed the coupling from the end of my grease gun leaving a npt ? male threaded end; I then unscrewed the straight pipe/spring assembly npt? from the 180 swivel; the female npt? threaded swivel then screwed right onto my grease gun. Does that make sense? I needed to remove the little pipe (both ends were male threaded) so the female threaded swivel could easily attach to the grease gun male threaded end, that the original coupling had been attached to.1 point
-
1 point
-
I danced around that one hidden grease fitting forever, I had slim couplings, 90 degrees, side fit 90 degrees, 360 swivels,needles, etc, etc. I bought every possible coupling fitting I could find locally. Nothing worked. Here's the one that finally worked for me. It's a very cheap made in China 180 swivel, I had to disassemble it, and only used the swivel part on my grease gun, but very gratifying instant success. I'm sure that your local Harbour Freight or similar store probably has something like this, fwiw fyi https://www.canadiantire.ca/en/pdp/motomaster-180-degree-swivel-grease-gun-coupler-0282760p.html1 point
-
The mirrors installed on the Sfidas are different spacing, so unsure if this applies to the Sport or not. I certainly had similar problems on an early Daytona with stock OEM mirrors The mirrors used on the Sfida and Australia are Vitaloni and the biggest problem with them drooping at speed is due to the ball joint nearest the fairing, there are two, one at the fairing and another where the shaft installs to the mirror head. I tried a damping grease but that didn't work, so after some googling and a look at the mirrors. The ball joint nearest the fairing consists of a plastic ball with a large hole in the middle, a cup on the mirror shaft with a threaded section in the center and another metal ball which has a hollow shaft up the center. The metal ball with the hollow shaft sits into the plastic ball, that in turn mates to the cup on the mirror shaft. The whole lot is held together by a phillips screw. The main problem seems to be that the hollow shaft bottoms on the inside of the cup of the mirror shaft it's there to allow the correct spacing and prevent overtightening of the screw, I think. Grinding the hollow shaft down to make it shorter allows the screw to be tightened a little more, increasing the clamping force. Roughing up the cup and ball and a split washer on the screw to prevent it loosening off also help I managed to get mine a bit tighter, but it's a horrible piece of design and would still probably loosen off over time. Although I don't really like the look of the barend I have installed on the 3 bikes, I'm just going to have to stick with it for now as at least I can see behind me and know it will stay put.1 point
-
Looks good! It’s a Hornet screen! Sounds better than a flyscreen.1 point
-
Yep, it's a skill getting all those wires on the bolt including the battery tender wire and threaded onto the terminal. Imagine casting aspersions on Italian electrics! Ciao1 point
-
Or on the grounding side. So many ring terminals, so little space. So easy to drop one on a battery change. Very happy the "revisit" yielded the desired outcome, @Taxguy1 point
-
Or maybe, just maybe, you missed connecting one of the hot side battery wires. Like the one that powers the ECU through fuses F1 and 2. Ciao1 point
-
So, is it lifting from the foot peg anchor? Or actually from below the bike ? (I could not tell from the video). Such that the "footpeg" attachments are only to prevent tip-over?1 point
-
1 point
-
Good catch Docc! I watched their bracketing system again, and the only way it could work, is if they would lift from the pivot fixture, and not on the collapsible foot rest. I am going to ask them to comment on that. Since he quoted they sold about 65 of those lifts to V11 owners....1 point
-
That our V11 footpegs are folding would not be compatible with lifting through them?1 point
-
Here are the two images Joe Caruso sent me relative to this comments about the Camshaft Thrust Flange and its potential wear: "The other important items to check before fitting the Timing Gears is the Camshaft Thrust Flange as in the photos attached. As it wears the Camshaft Gear moves closer to the pick up sensor. Depending on the mileage of your bike then If your Flange has worn a ridge as in the second photo attached then you might possibly have too much Camshaft end float . They should be flat and measure 7.0 mm thick when new. If yours is within measurement and Flat you could add the 3 x oil cutouts in yourself to your existing flange and i could send a sketch with measurements. The new CNC replacements have 3 x oil cut outs and give better lubrication to reduce wear in this area and so these wear a lot better and If required these cost £90 each. These were fitted by the Factory as standard on some later models like the V11 and Daytona."1 point
-
What with it being an early ShortFrame, I would be surprised. Do tell if you can find some way to make that happen short of pulling the swingarm or . . .1 point
-
The Camshaft Thrust Flange and the desirable relief cuts are discussed in Lucky Phil's "Joe caruso timing gear install" thread. I am unclear if any of the relief cut Camshaft Thrust Flanges were fitted to any V11 motors?1 point
-
I am seeing there are likely some other costs to include: a cam bush with the additional oil reliefs, fresh seals, and perhaps oil pump bearings depending on the accumulated miles/kays. Here is a reply from Joe Caruso regarding the current availability and advice regarding his timing gears for the V11 Moto Guzzi. (Posted here with his permission.): Hi Docc Thank you for the email and comments regarding Timing Gears for your V11 it is appreciated. It has been a very interesting learning curve getting the gears made for the various models and there is more to it than meets the eye so i really can understand why no one else bothers as it is very easy to get it wrong especially regarding the tooth clearances. I looked into first getting them made as i wanted steel straight cut for all my own bikes which are all 70s Guzzis v7 sport lm1 and t3 and because i previously had personal very bad experiences with the aftermarket Aluminium gears that were available at the time. The Timing Gears are all made to order in batches and do take a long time to get them made. The Gear Manufacturer has only just started working again after a long closure due to the Covid situation and so is very busy and also has a back log of work from previous orders. I have 4 valve Daytona models to make next and then V7 so it will be later in the year before anything might be ready. The Total current price for 1 x set of V 11 Steel straight cut Timing Gears, including Tracked Postage to USA, is £675.00 UK pounds . Out of interest The combined weight of the new 3 x Steel Gears is about the same if not a bit lighter than the combined weight of the 3 x Chain Sprockets and Timing chain that you are removing. _____________________________________________________________________________________ The other important items to check before fitting the Timing Gears is the Camshaft Thrust Flange as in the photos attached. As it wears the Camshaft Gear moves closer to the pick up sensor. Depending on the mileage of your bike then If your Flange has worn a ridge as in the second photo attached then you might possibly have too much Camshaft end float. They should be flat and measure 7.0 mm thick when new. If yours is within measurement and Flat you could add the 3 x oil cutouts in yourself to your existing flange and i could send a sketch with measurements. The new CNC replacements have 3 x oil cut outs and give better lubrication to reduce wear in this area and so these wear a lot better and If required these cost £90 each. These were fitted by the Factory as standard on some later models like the V11 and Daytona. The Oil Pump Bearings also need to be checked to be in good condition so the pump Timing gear runs true There is no deposit required or any payment until the gears are all ready and with me and i will update you nearer the time but you are on the next V11 order for sure. Payment by Bank Transfer is probably the best and cheapest when the time comes because if Payment is made by Paypal i would have to pass the Paypal charges on which are quite high. Thanks for the order Best Regards Joe1 point
-
Found and fitted this screen, not sure. I'm going a bit further and wanted something to keep the wind off on the motorway. It's a Fabbri 3021, meant for a Honda Hornet. I had to try the mounts in every orientation before getting something close to fitting. There's a bit of a gap at the top of the light, but I guess it's by design, as the bolt is going to be half way up the headlamp on most bikes with a round light, so the hight would have been no different on the intended Honda.1 point
-
I replaced mine with Honda CBR600F4 mirrors as suggested here: https://www.motorcyclelife.eu/bikes/past-projects/moto-guzzi-sport-1100i/ They are much better than the originals.1 point
-
The V11 factory stand only lifts the rear. Awkwardly. Once on the factory stand, the front can be lifted with a platform jack under the sump. PLEASE be certain the platform is fully seated under the sump, not lifting from an edge or a corner. And PLEASE either tie your V11 down to the lift or to joists above ("chain fall"). With both wheels off the V11 on the factory stand and sump on the edge of a platform scissor jack, you are halfway to a bad day. Don't ask me how I know.1 point
-
I dunno. The Kid, when he had Low's Greenie said he couldn't grease the front U joint. I took my rig that I'd been using on the Centauro and the Mighty Scura for years to his place. Tackled it with a grin. I couldn't do it, either. *Something* is different.1 point


