Leaderboard
Popular Content
Showing content with the highest reputation on 08/09/2021 in all areas
-
[I've posted this elsewhere, so, obviously, apologies if you are sick of seeing it. Still, I thought it might be interesting to CARC'ers, if not others.] The short version. Wait. Issuing “short versions” is not my specialty, as, even tho a retired word merchant, I stillprefer TLDR to PowerPoint bullets. That said, I’ll try — tho I'll make up for it in the pix. A local friend's very-low-mileage (as in 3500!) 8v 2014 Norge leaked — make that gushed — oil. The whole story is pretty much here: https://bill-and-kathi.smugmug.com/Mikes-8v-Norge-Exxon-Valdez/n-6gDHbq/ If you care, hover cursor over pix for captions. I spent today down there cleaning the mess this project in the Moto Grappa, but there are far worse ways to spend a day ... assuming beer is available! Bill2 points
-
Interesting. Nord-Lock made a video that compares various anti-turn locking solution against their own design. Are they really objective? are those results shown telling the truth? I cannot tell. I can only say, that we installed lock washers of the Grower type on the road wheels, support wheels, drive sprocket, tension drive. Then we drove the tanks in terrain to test components. Sometimes we sent vehicles to be tested by the military for different environments. If anything, the bolts were more difficult to remove after the trials. And we also received field used battle tanks for upgrading. I did not once come across a loosened fastener. However, there is a small difference with the video shown above. We did not have nuts on our bolts. The bolts were screwed directly into threaded holes in the chassis, and the Grower washers on top of flat washers would be situated underneath the heads. The threaded part of the bolt is much longer than that of a nut. As far as vibrations though, if you have been in a continuous track battle tank before, in terrain or on asphalt, vibrations are constant. Conclusion: I would probably agree that a Grower washer underneath a nut is not very effective. When we had nuts to secure, we would have a hole drilled through the nut and the bolt, and a spring pin would be inserted and lock secure the nut onto the bolt. Those pins we called Mecanindus Pin. And the company still exists! http://www.mecanindus.fr/en/2 points
-
Heh Scud I hope no offence is taken, not dumb merely a slip I wouldn't even have mentioned it, had p6x not agreed with your post and I thought it might confuse the OP I'm the last one to "cast a stone" when it comes to dumb, I still cringe at my "howlers" and maturity has done little to improve the situation John2 points
-
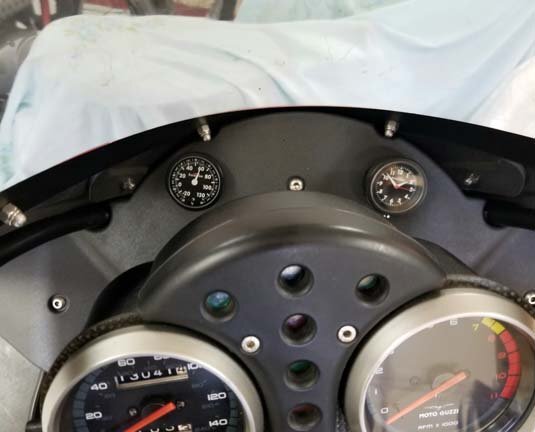
There is no need to use a Helicoil if you drill and tap the Triple Tee (as you call it) or Triple Clamp as I call it if I'm understanding you correctly. I think from memory the thinnest section of the top clamp is around 4 mm so a 6 X 1 cap screw/bolt will be fine into that section with 4 threads when it's only holding a small clock if you are realistic about the torque you put on the bolt and use a little blue Loctite. There are thicker sections in the top clamp if you choose and once again no need for a Helicoil. Forget about the spring washer, there're horrible things and dont work anyway. Ciao2 points
-
This might be of interest to some here. I have heard reports of people being asked to pay outrageous money to have the tappets inspected on their early 8V motors. I made this vid several years ago but it recently got taken down off YouTube for a 'Copyright Infringement' that apparently related to the fact you could hear songs in the background from the shop radio! Anyway I did a voiceover and it's back up. https://youtu.be/MzAO_JV4gU4 [docc-edit: embedded the vid. Thanks, again, Pete!]1 point
-
Well I understand your suspicions living is the USA but the Europeans can't get away with Bullshitting the facts as they have extremely strict independent accreditation criteria's such as the TUV, and have had for decades. Nord lock are TUV certified. As I've mentioned before I've never seen a spring washer used in aviation in 40 something years and have considered them to be "lawnmower technology" for pretty much all of that time. I'm just posting to make people aware/re aware of technology and engineering that's available out there they might not otherwise know about or have forgotten. Ciao1 point
-
1 point
-
I only say that because I changed my flat lens sheet that sits in front of the indicator bulbs from the early flat style to the 2002 "jeweled" style that @footgoose showed me. Much easier to see when lit. So, the 2002 indicator layout is the same as the early V11 with a battery/charging light and a single turn indicator. Early flat style lens sheet: Later "jeweled" style, style based on the single turn indicator and still with Battery light:1 point
-
1 point
-
Ahh my bad then if it doesn't apply. Took a look at Carl Allison's diagram for a V11 Sport Catalytic (whatever that is) and it shows both left and right indicator bulbs, in that case an LED would work as both the bulb warning indicators are simply tied to a common ground/frame on the neg side.1 point
-
Good point on the single turn indicator as on the earlier Sports. The later V11 (starting when?) eliminates the battery warning and features separate left/right indicators. LED indicators would work in this case?1 point
-
I agreed with the principle " since you are there, you may as well". Since he had the lower part of the sump already out, it seemed reasonable to check as much before bolting everything back. This was the line of my thinking; in principle. Obviously you guys know much more than myself about the inner works of a V11, as I have never done anything on mine, and it does not look I will any time soon.1 point
-
Not answering you're question @Grim, but does the indicator warning LED light for both indicator directions? I ask as it looks like the V11 wiring uses the same half assed indicator wiring as on my Sport and installing an LED without bi-directional circuitry won't work (I think). With the OEM setup the current direction through the warning light, reverses with the physical direction (i.e. Left or Right) selected. The setup relies on earthing the warning light through the other indicator circuit. As the current through the warning bulb is low it's not sufficient to light the indicators on the non selected side. As an LED can only pass current in one direction, unless it has additional cricuitry installed, the indicator warning light will only work for one direction. There are LEDs that have additional circuitry built in to cope with this, but you need them if you want the indicator warning to work for both left and right sides Just a thought1 point
-
I picked up a 3/4 helmet with face shield and sunshade at Cycle Gear for $39. I don't recommend extended use for 3/4 or open face but hey can come in handy for retro gatherings, like DG, and casual rides in the heat. I sometimes wear my Shoei Neotec modular open when in town, or at stoplights when I need to some air.1 point
-
1 point
-
My fault - I was describing the removal of the oil filter housing, which also has the pressure relief valve in it. What I wrote earlier has nothing to do with removing the pump itself. I'll go back and edit those posts - cuz that was a dumb thing I wrote.1 point
-
Thank you but if I had to do it again, I'd do a few things differently, but (touches wood) the bike has been reliable and nothing has melted Just Google Magni to find out about the family and the bikes, based up near Milan, produce small numbers of bikes in their own custom frames. Their most succesful partnership was with Guzzi, who provided all the engines, transmissions, running gear and electrics and then placed them in their own frames and restyled the bikes to their own design, with an MV influence. Arturo Magni's history was as the race engineer for MV. Magni is best known for the parallelogram swinging arm, which elimates the shaft jack or crawl on the Tonti bikes. TBH you have to be really hammering them to notice any difference, but they do handle extremely well, considering the weight. http://www.magni.it/ As Marty said that bike uses the LM 1000 running gear, I've added a few farkles and reduced its value, but I don't really care as I love to ride it, it's a lot of fun. There's a pic of the bike in the "Show us Yer Tontis" thread https://www.v11lemans.com/forums/index.php?/topic/6494-show-us-yer-tontis/page/17/ As far as the alternator face in the video it's using a PUREG system developed by Volker Sachse https://www.elektronik-sachse.de/shopsystem-3/en/ his family I believe have kept the business running. Volker was killed in a motorcycle accident a good few years back and is sorely missed by me. The PUREG is a Reg/Rec placed onto the face of the Bosch alternator and is slightly more efficient than the OEM offering. In addition the PUREG has the ignition system combined into it, that's the plate you can see spinning and the flashing LEDs. The trigger is an optical system using a wasted spark, the wasted spark occurs 360 degrees out of phase from when the cylinder needs a spark, so little chance of blowback into the carbs. There is a second box buried in the frame tubes, which controls the advance and contains circuitry for the ignition and coils. Its been very reliable and I've never required to retime it after initial setting, except once but that's because I was doing something else and had to remove the trigger. Nuff about me, I only posted to show that a complete numpty can do it, it's not hard BACK ONTO TOPIC!!! John1 point
-
My Formotion gauges are 10+ years old on my 03 Rosso...... have held up well even with just stick on tape and velcro mounts on my fairing inner. I have to change clock batteries about every 12 - 18 months and I just recently had to refill my thermometer with silicon oil, which was easy to do, and recalibrate the temperature. Quality stuff! Andy1 point


