Leaderboard
Popular Content
Showing content with the highest reputation on 02/09/2022 in all areas
-
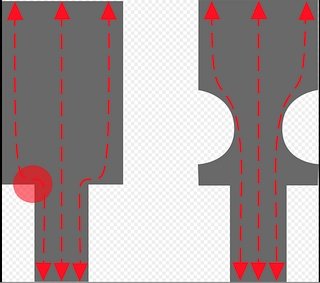
This theory's been mentioned before and I'm not convinced this is the issue. I believe it's a micro crack initiated when the casting cools and is due to the sharp edge at this point and the large cross sectional change which causes a differential cooling rate. The crack then propagates over the miles and heating/cooling cycles. Yours is way worse than mine and well beyond any JBweld temporary solution. You may as well get it properly repaired because the chances of buying a second hand one that already has a latent crack is high. Part of owning an old classic like a V11. You need to do some "engineering" eventually and more often than not on a few different areas. To effectively repair this you need to chase out the crack with a die grinder and get it welded by someone that knows what they are doing. The idea is to heat the case to around 150 C before the welding starts and in your case half way through the weld repair stop and peen the weld to stress relieve the area and then finish it off and peen the finishing weld. It's not a complex scenario to someone that knows what they are doing. My gearbox mount showed no signs of any cracking, I just checked it because I'm a physco and knew of the issue. Seems it was a good decision. My original gearbox needs the same done to it as well. Ciao6 points
-
Yeah, the cutter should have had a radius. Luigi must have been promoted to manufacturing processes.3 points
-
Anyone with a red frame V11 Sport should get the the brace kit from Don at Motiv. I think I bankrolled much of it from my repair. He traced out the brace from a rendering of the factory part (no longer available), made a run of them and includes the bolts and fasteners. I think he still has my can of red paint. Contact Don here. https://www.motivcycleworks.com/3 points
-
thanks Eric from Brisbane Australia - fitted the plate up the other day. Just to let everyone know that through some quite wild troubles Eric was amazing to deal with. 5 stars.3 points
-
Sorry to Laurent about your transmission, but thanks for posting it so we can all get a free lesson in mechanical engineering. In retrospect, it seems Moto Guzzi solved this problem by stiffening up the subframe and adding the arms to the block. But it could have been solved with a change to the mold for the transmission case, and changes to the final machining of the contact surfaces. Interesting. And lest we forget, this was Moto Guzzi's first 6-speed, and it was the best transmission they had ever built at the time.2 points
-
I just requested 2 rooms and 4 garage spaces. we'll see how it plays out. Lost year I stayed up the road at the Mountain View cabins. As nice, better view, same price. No garage tho so you'll have to ride back...safely http://www.tellicologcabins.com/2 points
-
2 points
-
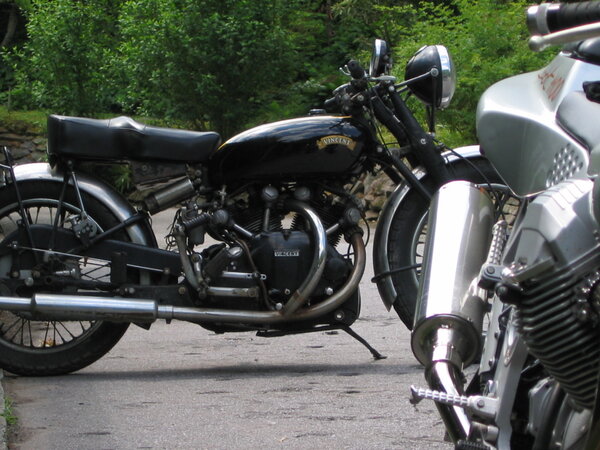
Someone here owns a Vincent? Wow...that's been a closely guarded secret! I'm 50/50 for this year's...wanted to make last years but time off didn't work out. Of course, there is also the possibility we may be in Italy at the same time...will have to monitor and see which one pans out. I was not far from you guys over New Year's, as we went thru Birmingham (Barber museum and all), and up thru Lynchville (Jack Daniel's distillery) and then to Nashville for a few days...just a hop, skip and a jump over to Tellico from there!2 points
-
I love learning "local" pronunciations! "Ta-PO-ka", then. It is interesting to look at the Native American place-names that are, seemingly, along the same vein: Tellico, Telliquah, Tallulah, Toccoa, Tehachapi to Tonopah . And, yet, "Tapoco" is an "acronym" (portmanteau-style blend? ) attributed to the builders of the adjacent Cheoah Dam, built 1916-1919. Also known as "The Fugitive dam" for its role in the popular Harrison Ford/Tommy Lee Jones movie. Ta-Po-Co = Tallahassee Power Company South'n SpineRaiders first visited the Tapoco (before this latest and most excellent remodel) in 2009, the year before we started staying at The Lodge at Tellico. (In case you are wondering if it's okay to bring your Vincent to a Spine Raid) . . .2 points
-
D'oh! Reverse engineered the price! Still pretty fair. I pointed it out to DW and she said "You already have a red motorcycle"2 points
-
Free interessting lessons are great,, +1 to the forum, Thanks gents. Cheers Tom.1 point
-
Yes Chuck on the LHS mount you're right. My repair was to the RHS mount so thats where my head space was. I removed this sharp corner on mine with a small round file wrapped in and wet and dry to finish it off although mine wasn't cracked here. It did undercut the mount a little but the trade off was worth it in my view. I also dressed the radii on all the sharp corners with the die grinder and a tiny ball shaped cutter as well which you can see in the images. I also did the same on the RHS mount although this isn't where mine was cracked. I'd have prefered to do it with a small Bull nosed cutter in the mill but I didn't have the facility. My repair looked a lot nicer before I peened and dressed it back. It's rock solid now though.1 point
-
That crack quite visibly runs along the hard machined corner. Poor machining practice in a stressed area. It should have a radius in the fillet.1 point
-
Guzzi did offer a brace at one time. It wasn't installed on the bikes originally and is no longer available. Don at Motiv made a batch after repairing my bike. It's a pretty simple "crescent moon" brace and a few fasteners.1 point
-
The torque of engine mount bolts has been suspect in cases developing cracks in some Ducatis. I have heard that the area that cracks on V11 transmission cases is thin walled, and the top mounting bracket should help. It’s a bummer this happened, especially on a newly acquired bike. These old bikes are great and worth sorting out. I would definitely pull the gearbox and have it welded. It’s also an opportunity to rebuild the tranny and, as was previously mentioned, have it freshly sealed as after 20 years the old sealant will fail and cause more leaks. Fresh sealant for your gearbox will be good to have!1 point
-
You're lucky to be in Australia......I would already be on your doorstep harassing to buy your other gearbox HaHaha1 point
-
1 point
-
The gearbox repair information you need is here including the repair and gearbox re assembly. To me it was just an engineering thing but to others probably more scary. You need a good welder whos dedicated to getting it done without distorting the case sealing face which wasn't a problem with mine. I'd suggest an licenced aircraft welder. Mine now stronger than a std one and I also run the additional frame support. Ciao1 point
-
I had two starting issues with my 2004 V11 when I got it. First one turn the handlebars to the right lock & no instrument lights, nothing. Turn the bars to the left lock everything worked. Turned out under the tank were two bullet connectors that when the bars were to the right pulled apart enough to stop everything. The second issue which might be what you are experiencing, although my cylinder was still tight, the wiring was not supported going into the cylinder & one of the soldered joints broke but didn’t come away. I took the cylinder out & had enough play in the wiring to re-solder all back where it should have been. Added a physical support to take the tension off the wires going to the lock cylinder & all has been good since. Luckily for me it wasn’t beyond what was easy to see.1 point
-
My "hot stuff" is Hylomar . This was included in an upgrade for a Massy Ferguson tractor engine . I use it a lot on special occasions . It is GREAT ! I will go to Fastenal today & check out this stuff .1 point
-
The Tapoco is awesome! I've never stayed there, but their restaurant is our Saturday lunch destination/ re-gather place!1 point
-
1 point
-
We are all in luck. Tellico Plains, Tennessee, features the Trout Mountain Coffee House (and Inn)! And also the Telliico Grains Bakery. Expect good coffee, and some great food. More great food in Tellico Plains, Tennessee, for the South'n Spine Raid at the (long running) Tellicafe. Otherwise, we'll huddle in the garage and scrape burnt toast into hot water. And rejoice!1 point
-
Such reverence. Just and endearing. R.I.P. Dennis. We are all better having been touched by his spirit.1 point
-
Thank you for your kind words. Dennis was one of those unforgettable characters. I went down to the gate to take in the flags there — Germany and Thailand, with mourning streamers — and raise the U.S. to full staff. Life goes on, as it always does, but Dennis will be a missed companion on rides and more. Bill1 point
-
I just picked up a 1989 LeMans 1000. It's a well-loved rider with extensive upgrades... full Zard exhaust, Caruso timing gears, electronic ignition, seriously upgraded suspension, etc. It was previously owned by a local guy who is an excellent rider. I've chased this bike on my Scura and had a hard time keeping him in sight. Just took my first short ride and loved it. Though I must say... there is a big difference between 1989s LeMans 5 speed tranny with manual clutch and 2000's 6 speed with hydraulic.1 point
-
So it's been a while since I updated this thread, but I've been doing stuff. Not "Chuck" type doing stuff but chipping away. Firstly I had a very minor oil weep to sort from the head oil feed banjo on the cases and replace the oil pressure switch where the gauge was fitted. The oil feed banjo was a real bastard to do and necessitated making 2 special tools. I hadn't really done it up tight enough due to the head being so close to one part of the cases you couldn't get a ring or socket on it and even an OE spanner had limited movement. Anyway finally sorted that and used my other special tool to re fit the oil pressure switch. The other issue was of course the fuel tap and I've covered sorting that elsewhere. Its now lovely to use and doesn't leak, hooray. I've got a new one on the way and I'll mod it as well. The biggest issue was the mapping and I spent many hours getting up to speed on Guzzidiag including reading every post on the Guzzi.de forum going back 9 years where Paul Daytona and Meinolf and Beard the Wizard behind diag along with Paul live. This is the home of Guzzidiag and there's a ton of info there. I'm amazed that Paul and Beard got the first iteration up and running in a few months, impressive. With my rudimentary understanding of the system my thoughts were to obtain a .bin file from a Centauro which has a 16M ecu and simply transfer the mapping info into the 15M. Gritman in England you may remember did the same engine swap and kindly sent me his map and I tried that. It didn't run that well and from the fuel map 3D it looked very rich. It ran better than the std V11 map but wasn't ride-able except around the block. I hadn't seen a std Centi map at this point so I had nothing to compare with. At the same time thanks to audiomick one of the mods at Guzzi.de and a fellow Aussie living in Germany I was put in touch to Karsten who also had some Centi .bin files and generously sent them to me. I now also had a couple of enhanced Centi bins to compare. All this is extremely useful if you actually want to learn and see whats safe to do. It gives you known references. I also had to buy a brand new ECU as the original looks like it had a failed baro sensor. It worked ok but I suspect it had reverted to a default baro setting. So today I loaded the new bin with the Centi mapping ( which has different load and rpm break points) into the new ecu and fired it up. A little ropey to begin with until I got the balancing and idle sorted and then took it for a ride. Straight away it worked really nicely, only complaint was very minor popping on the overrun. I tweaked the CO up a little from 0 and got that eliminated and it runs and rides like a champ. So time to put some miles on it and see whats what. Big thanks Paul, audiomick and Karsten for the assistance as well as Beard for Guzzidiag and the guys that helped it evolve into what it is today. It's a really good tool and in my case has been totally faultless to use. Ciao1 point
-
It lives! Long day today. The last pieces showed up yesterday so I got them fitted and installed the tank ready to start the bike. I've been talking to Paul Minnaert about fuelling stuff which has been great and informative. Pauls still recovering from the Covid-19 although he didn't go into details he still has a bit to go.Many things affected and it takes some time. Apparently my 15M is an early one and there may be an issue with it's pressure sensor compared to later units which affects the maps you can run. I've also been getting great help from Gritman that was on here a few years ago and has done the same thing. He sent me his bin file which is a really nice of him and much appreciated. I need to see if my 15M and its differences will be ok with this bin. Hopefully it will be usable. Anyway to business. Paul and others reccon the std V11 map isnt a bad starting point anyway so I decided to just try and run it on the map in my ecu and confirm the mechanical stuff and then move onto the tuning. The bike fired up after a little cranking but was only running on the right cylinder which was a bit disappointing The other think I was keen to check was the oil pressure after my relief valve spring mod so I was watching it like a hawk ( I'd hooked up a remote gauge). The oil pressure was too high at 100 psi cold idle so I wasn't keen to to run it too much until I'd fixed that. The issue with the left cylinder was my bad. I had to extend the left injector harness and for the first time I used those new all in one solder and heat shrink joiners. In the middle of a fitted wiring harness you cant use a heat gun so I tried it with my soldering iron which is how I usually do heat shrink in these situations. I wasnt entirely happy with the outcome and went back to the tried and tested process for everything else however I put a meter across the joints and they had continuity so I left them. Bad mistake, feeding and flexing the left injector harness into place dislodged the wires. When I saw then the ends didn't even have any solder on them,DOH so back to the old way, problem solved. I then dropped the sump off and pulled the relief valve and fitted the original spring and shims and threw it back together and cranked it over with the plugs out to get some oil pressure which came right up anyway. Started it up and away it went. Cranking oil pressure cold was 50 psi as was cold idle. Once the oil got to 45degC the idle pressure dropped back to around 43 psi. I blipped the throttle a few times to 2750 rpm and got just under 60 psi with oil at 45 deg C. I was conscious of keeping the engine temp within reason as I didn't have any fans set up. So a bit of fiddling with the balance and idle screw and it sat there idling at 1100 rpm fairly happily. I haven't even checked the CO setting on the ecu so the next job is to hook up the Guzzi Diag and see what we have. No images as for some reason the site isn't happy with the formatting all of a sudden. Ciao1 point
-
So I decided to defer the tuning fuel tank job, just a bad time to do it really when you need to ship stuff and fitted up the fuel tank instead to do a leak check. Popped the injector connectors off and did repeated pump primes to pressurise the system and fill the lines. All good except for an externally leaking fuel tap when in the open position. These thing really are a POS. My original one jammed in the open position and this one inexplicably decides to leak from the shaft seal when open. Anyway I got my old one that had jammed open which I had after that event reworked somehow and fitted that. Hopefully it wont repeat the same defect. I then moved on to fitting the airbox so I could attack the side covers. The side cover fitment really is horrible on these bikes as they eventually crack due to the poor fitment strain. Need to have a think about solving this as I have 1 brand new cover to fit and one reworked one and I dont want them cracking. Couldn't resist fitting the tank and tailpiec to get an idea what its going to look like. Ciao1 point
-
So I thought I'd have a play around with the throttle bodies and TPS sensor and also confirm my wiring for the PF09 TPS was correct when fitting the old style plug to the V11 loom as the colour coding is different. I made up a 5V power supply and some flying leads and confirmed the TPS read outs were correct and thought i'd do a preliminary set of the TPS which I can confirm when I power up the system on the ecu. bearing in mind that I have no idea how this engine ran or the mileage originally the TPS condition could be anything and I want to eliminate as many variables as possible. mechanically the Throttle bodies are acceptable from a wear perspective although I replaced the plastic connector rod ball assembly. Unfortunately I couldnt get the TPS reading below around 200MV unless I tapped it with a screw drive handle and then I could get it to around 140MV with the throttle blade completely closed which would work if evertime you stopped you tapped the TPS. I ran out of TPS adjustment so I decided to see if I could pull it apart and see what was happening. Although this isnt really relevant to the V11 as it uses the later TPS it might be to anyone following in my footsteps down the track. The PF09 TPS is held together with small metal press rivets so I used a box cutter blade into the joining line and gently twisted the blade to get the rivets to release. Going from one side to the other slowly slowly until I could get a 0.020" feeler gauge length ways into the gap and use those. It helps if you use one on each side simultaneously to prevent the halves rocking as it separates. The whole process took quite a while like 15 minutes but it came apart without looking like it had been apart, ie not butchered. This is the process. And this is what it looks like apart. Note the crud and rubbish on the wiper fingers and also the foam seal and rivets. Also note the strong return spring and wiper faces. Here it is again after cleaning with a very small paint brush and contact cleaner followed by contact cleaner and cotton wool buds. Here you can see the closed stop screw assembly. So after cleaning I hooked it up to my 5V supply and checked the operation. Still not able to get it below 190MV but it was stable now. So next step was to adjust the stop screw. Nothing magic here just adjusted it until the reading bottomed out at 14MV and left it there. Not sure why this was the way it was, dont think wear was a factor, maybe it wasnt adjusted properly from the factory. Dont really know. , Wide open throttle, 4.76 volts which is the nominal voltage of my power supply. Anyway re assembly is simple just put the halves together and use a small tool to press the securing rivets back in place.I also changed the securing screws over to the Torx type I had off another set of Ducati throttle bodies as my original straight slot fasteners were a bit ropy. Ciao1 point
-
I like Todd too. Don’t get the hostility towards him. But this general trend of tail-less modern Manx-style motorcycles leaves me cold. The proportions are all wrong. Some of them are so extreme as to look ridiculous. Look at pipeburn.com for some really bad examples.1 point
-
I dont believe the cracking is due to any torque related issues or even transmission/engine support. The engine and trans assembly are supported at 3 main locations (front timing cover, upper and lower gearbox mounts) which from my experience is plenty for an old 2 valve engine of this torque and weight etc. I also dont think its from rear mount bolt crush either as the webs between the upper lugs on the rear mount seem adequate. There has been a suggestion that the later cases are cast from superior material but unless someone can show me some specific data I doubt this. The cracking simply wasn't any sort of issue when the bikes were being produced and Guzzi aren't the sort of company that reacts with any kind of haste even if it was. By the time Guzzi would have reacted the gearbox would have been 10 years out of production. I still know people that have been dealing with Guzzi's for 30 years and have never heard of gearbox case cracking on 6 speeds. I believe the cracking is initiated during cooling after the casting process. The areas where the cracking occurs is at very tightly cast corners where the casting transitions from a thin to a very thick section. I think that some castings suffer from this and some dont and the cracking propagates over a period of time for the ones that do. This I believe is why some bikes suffer and some dont. Of course there is also accident damage as a possibility. I have fitted the extra gearbox mount plate but frankly with the bike stripped down and looking at it I dont see the necessity for it. I'll continue to run it for the belt and braces feel but I dont see it as necessary. I'll also dye check the original gearbox case when I get a chance. Ciao1 point
-
1 point
-
Anyone have a picture of the needle bearing? I may have greased it already but not sure Thanks Michael PS Toby if you do take the rear end out be sure to support the bevel box and shaft as thats waay to much weight to dangle there And before you touch the swing arm the two threaded shafts that go through the frame and swing arm should be measured .You back those out to release the swing arm but want to restore to those measurements when re-installing as in photo In post#33 http://www.v11lemans.com/forums/index.php?showtopic=17074&st=01 point
-
Wrong in what way? The fact that the incredibly conservative motorcycle market couldn't accept something so radical? Yup, I suppose so. If you imply that the Convert itself is *wrong* in some way I suggest you actually ride one before making any sort of judgement. They were, and remain today, a superb tool for their purpose and are more fun than a sack full of angry squirrels! pete1 point
-
0 points
-
0 points


