Leaderboard
Popular Content
Showing content with the highest reputation on 08/11/2022 in all areas
-
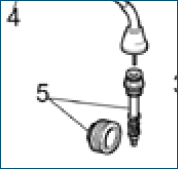
I recently bought plug wire replacement parts from these good folks: https://marxparts.com/spark_plug_wire_and_fittings.htm (Although, I bought my red 7mm ignition wire online from O'reilly's.)3 points
-
https://www.thisoldtractor.com/guzzi007/sportissimo.html Your wiring diagrams and Carl Allison's are both good. Thanks to both of you for your efforts 👍3 points
-
Yeah, man, the coil wire should have a terminal on it: That connection can be vulnerable to damage:2 points
-
latest incarnation has labelled instrument panel and relays in bold. If anyone’s struggling due to the colours let me know and i’ll include a numbered legend.2 points
-
bike runs better with the new plugs, idles smoother, fewer sputters. old plugs looked dirty.2 points
-
2 points
-
@mikev Looks like you scored on the chinadian Omrons Otoh I'm not sure how the chinese made CIT A1 relays ever got the nod.. Afaik their continuous current rating has never been published.. Only Omron, Panasonic and Picker disclose that value in their datasheets. And althought Panasonic downrates their CM1 relays switching capacity(resistive) of 35A/20A-NO/NC to 20/10-NO/NC max. continuous current, Omron high current G8HN & G8HE report equal values for resistive and continuous at 35/20-NO/NC and Picker PC782 reported max. continuous current value of 35A is given indistinctive of NO/NC. Interestingly, Picker Components is a wholly owned subsidiary of CIT Relays & Switch.. Another relay option I found interesting is the japanese made Omron G8HN high current(G8HN-1C4T-RH) used by Suzuki. @docc Very compelling information on the different relays and their various functions. It would surely come in handy while chasing electrical gremlins that can affect the V11s. It would be worth assembling into a compelling spreadsheet or pdf..2 points
-
@stewgnu generated the 2002-2005 diagram without the gradient background color to make it easier to read: Thank you, Sir!!2 points
-
Relay 3 is worth understanding because 1) it is the least stressed relay (best place to pull a spare from the stack), and 2) while it is referred to as the Sidestand Relay, it is activated by the Neutral Switch (not the Sidestand Switch). This relay sends current to the Run Switch with the bike in neutral even if the Sidestand is down. When the Sidestand is up, it’s switch sends current directly to the Run Switch (no relay). Relay 3 would more correctly be called the Neutral Relay, IMO.2 points
-
Relay 2 (from the front)is a busy place. Sure, headlight relay, but as noted also the tachometer. Tach starts acting sketchy? Know that the headlight and brake light are also compromised, but more importantly: the charging system has lost its voltage reference and is not charging. This is why the bike will run progressively worse until the battery (and the bike) dies from a Relay2 failure. The power to the some of the Warning (“idiot”) Lights on the dash [ oil, battery, fuel] also comes through Relay 2. The Battery Warning Light (early V11 only) will not warn you of not charging from Relay 2 failure. Certainly, Relay 2 is another good candidate for a good quality high current relay.2 points
-
I guess there is a first time for everything. I don't see why they can't look. It's not a bomb for heavensake. Sorry for the late reply, I've been to the Wisconsin rally and just now catching up on what has happened on the innerneck.1 point
-
Because of that gearbox "cush drive" stack (not the one in the reardrive), the rear wheel has about 50mm/ 2 inches of rolling "freeplay" when the direction of rotation is reversed. This is normal. It also makes the V11 6speed very challenging to ride smoothly in and out of corners. Yet, I suspect you have solved "whatever" the original issue was, @Walterg. Also gained, and shared, significant V11 experience. Thank you for keeping us informed! And well done!1 point
-
You're right about that assembly dampening driveline shocks. The standard cush drive in the wheel is too stiff to completely do this by itself.1 point
-
By the looks of it part 15 is made out of rubber and sits between parts 13 and 17 to take the impact of sudden radial loads. The discs (parts 18) form a Belleville spring and catch the axial movements caused by the rear wheel going up and down and thus pushing the drive shaft into the gearbox. Right?1 point
-
The rattle disappeared after I screwed the gearbox back in the bike again the first time. Since I messed up he clutch the first time I had to take the gearbox off again. After putting everything back together again the second time the rattle is still gone but the clunking sound you hear when you push the bike back and forth and change direction from forwards to backwards (again with the bike in gear and my hand pulling the clutch lever in) seems louder. The bike rides lovely though. During the ride I don't perceive any weird sounds or unwanted movement in the drivetrain. Changing gears is fine like it has always been. Indeed I now understand that this and this should be in the same picture.1 point
-
The drive in the first two images looks identical while showing the lower thrust washer missing from my assembly image. The odometer drive from the lay shaft ("Transmission" shaft?) looks different from the images of the 6speed. I've not has eyes on this, but recall @Rolf Halvorsen helped me understand the odometer drive gear is captured on the shaft. Frustratingly, that drive gear is shown in the parts catalog as part of the speedometer assembly, not the gearbox!1 point
-
Disclaimer I only know the 5 speed box BUT that speedo drive assembly looks identical to the 5 speed. ASS-UMING it's the same then here are some pics from the 5 speed, if they are different I'm sure @docc will jump in The Worm drive that is turned by the layshaft is held onto the layshaft by a small steel ball, like a ballbearing. It sits in the longest groove in the layshaft and is held captive by the layshaft nut REMEMBER THIS IS A 5 SPEED THE 6 SPEED COULD BE DIFFERENT Did you remove the drive assembly, that bottom washer can get left behind and (if it's like the 5 speed) fall into the box and create mayhem Don't take any of this as correct until somebody familiar with the 6 speeder verifies that it's similar1 point
-
Thanks for the picture Docc. So far I haven't been able to find anything on how the wormwheel bushing in the gearbox that drives the spindle sits on the shaft. I unscrewed the speedo cable and found that it was just broken. Again no indication as to what is causing those sounds. I rode 120km today and I rode the bike pretty hard but no indication that anything is wrong with the gearbox.1 point
-
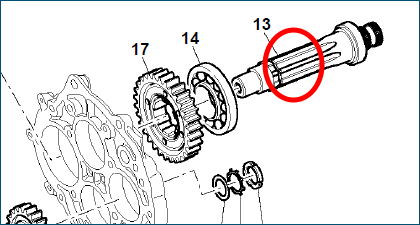
This image depicts the driven shaft system from the gearbox (as well as the early V11 external angle drive at the top). Notably, there is a second thrust washer (not shown) beneath the lower spindle/pinion/shaft . . .1 point
-
Since I seem to be going down the road of accessorizing with CF, I'd probably get in on an order from MDI. The matte will probably age better than the gloss, as nicks and scratches won't contrast so much.1 point
-
I fixed the slipping clutch. The cause was a big blob of grease that I somehow managed to get on the clutch plates and did not notice during assembly. I also fitted the rubber O-seal on the drive shaft. After I checked the gearbox a while back I have been riding the bike a few times now (about 300 km) and I did not come across any issues indicating there is a problem with the drive train / gearbox. This morning though my speedometer stopped working. The cable 'looks' fine but I will check it when I get home tonight. The idea that the issue is with the shaft that extends from the final drive shaft into the gearbox (Gearbox outgoing) is growing. Although at this moment I can't find any picture or drawing which shows which part drives the speedometer transmission. I have a one week holiday planned with the bike starting the 29th of August. I hope it will be clear and fixed by then.1 point
-
Picker had the PC686 Micro ISO relay rated at 40A continuous..! Unfortunatly it's not in production anymore. Makes me think they know how to build a high current micro relay though..1 point
-
That "Picker Components" high current relay @Speedfrog has sourced may be the best one available, currently . . . [haha - I got to say "current" and "currently" in the same post. ]1 point
-
So, more detail on relay function: Relay 1 is the Start Relay, but also sends all the current to (multifunctional) Relay 2 through its weaker Normally Closed contact. A cheap “10/20” amp relay in V11 position 1 is not advisable. Also, the 1999-2001 wiring uses the Normally Open contact for the starter while later V11 use the Ignition Switch. Take away: for early V11, use a high current relay in position 1. Later V11 can suffer Startus Interuptus and benefit from an additional (6th) relay for the starter. [next: relay 2 and 3 breakdown . . . ]1 point
-
1 point
-
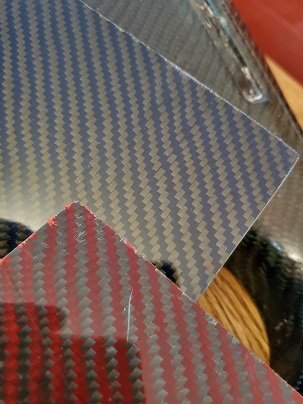
BTW, every other CF part on my Tenni is also 1x1 weave except for the hugger. 1x1 looks like a checker board. 2x2 looks like diagonal blocky lines. 1x1 is also called plain weave, and 2x2 is sometimes called twill weave.1 point
-
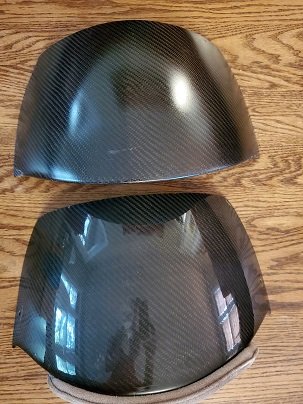
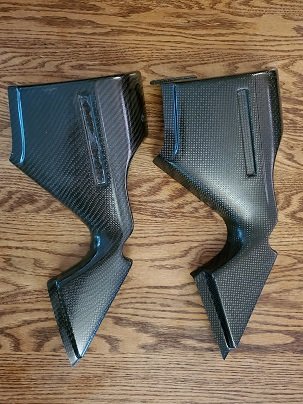
Note that these pieces are prototypes, not final product. There are a few rough edges, holes are not yet holes, and I presume the CF was laid a bit quickly. Even with the final product, you will know that this is hand-laid fiber. To me, that's a plus -- and similar to the rest of the CF bits on my bike. If you're not okay with that, walk away. First up, a pic of the humps: Prototype at north. Note that this was an attempt to replicate the more satin finish of the vacuum-method pieces. I am not a fan. Next up, the side cover. Original on right. If people want these, we should figure out what to do about the depression for the gummy stickers (wanted or not). Next, a close up of the samples of the Kevlar weaves. They are leaning against the prototype side panel with regular 2x2 CF weave.1 point
-
Color bands only signify resistance value. No directional requirement. Paul B1 point
-
I'm baaaack. Sorry for the long, long delay and being incommunicado. Summer seemed to have other plans for me. I did manage to get down to Gettysburg and talk to the CF guy. He's made a couple prototypes for me and I'll share some pics of what I've got in a follow up post shortly (it's really hard to get a decent photograph of carbon fiber parts). When I first went down there some months ago, I left with Greg three pieces: 1) a OEM plastic seat cowl to model, 2) my aftermarket (presumably) non-vacuum mold seat cowl for comparison to 3) my OEM vacuum-molded CF side panel. To clarify, as I understand it, there are a couple different CF processes, including: 1) where a vacuum is created that sucks quite a bit of the resin through and off the carbon fiber, leaving a thinner, lighter, less glossy finished product; and 2) a standard process whereby much of the resin remains on the finished surface, rendering a somewhat glossier finish and more robust piece. My Tenni, between the seat cowl, side panels, front fender, hugger, gauges thingy, and starter cover, has at least three different finishes. My initial hope was to match the seat cowl (tail hump -- what are we calling this thing now) to all of the other CF pieces (excepting the hugger). Unfortunately, that is not possible with the manufacturer. Frankly, it may not be desirable for the tail hump anyway, from a durability standpoint. Anyway, although I had only taken the side panel so Greg could see the finish I had originally hoped for, a little (potentially fortuitous) miscommunication resulted in him making a prototype of the side panel, too. I like the prototypes well enough to commission a better mold and a batch of tail humps. I'm not opposed to doing the same for the side panels. Cost is not going to be prohibitive, but it may change a bit with inflation, so I'm not going to quote any prices. I'm pretty sure I can make my initial outlay. Since I hadn't spoken to any of y'all about the desirability of side covers, I told Greg to go ahead with the seat cowl and that I'd get back to him on the side panels. So, let me know if you are gung ho on the side panels and I'll have those reusable molds made up, too, if there's enough interest. As for the options, I got a sample of the red and the blue kevlar weaves. I like them both. They are very understated and would only really pop in bright sunlight. Kevlar weaves will be about 50% more $$$ than standard 2x2 carbon weave. Photos coming shortly. Thanks for your patience and understanding that both the manufacturer and I have other things to do as well. For his part, Greg recently had a joint replacement and is still getting around a bit slowly. He and his family business have more than enough dragster bodies work and he only took this on because he thought it was a cool project. We are at least several months away from having finished products. He and his daughter are very nice folks and I know they will do their best to get us high quality stuff. Cheers, Frey1 point
-
Have you inquired about pricing? Price range from $30 to $100 on that Alibaba link you provided, probably depending on amount of units ordered. MDI sells them for 70 bucks a pop right now out of SoCal with a phone # and email you can reach them at. Unless it’s significantly cheaper, I would think twice about ordering from overseas...1 point
-
1 point
-
These kind of political comments are totally unnecessary and unwanted on this forum.1 point
-
Coppas have Öhlins. This one has Nöhlins. Wrong forks, shock, fairing, paint, handlebars. Other than that, it's fine. More questions than answers.1 point
-
Hey All, I've just picked up a 2000 V11 Sport with Magni fairing after lusting after one for years. I've been riding for 13 years, starting on a Honda CM400. I've had a VFR, KTM 640 Adv, Versys and Buell XB. The V11 joins the current stable of a 2014 Ducati Hyperstrada and 2022 Royal Enfield Interceptor 650 (My girlfriend's). Caught the Guzzi bug from my dad who's had an Eldorado, California, Convert, 750s, Breva, Quota, Nuovo Falcone at various times. Looking forward to meeting you all and plumbing the depths of knowledge and information archived in these forums. If you're in Eastern Ontario or West Quebec hit me up for a ride or a beer sometime, but never both together. Cheers, Sam1 point
-
0 points


