Leaderboard
Popular Content
Showing content with the highest reputation on 08/15/2022 in all areas
-
You need to Google/YouTube for a spray pattern , you should see a conical mist . the more fine / finer spray pattern is what you want . The finest spray is what you are after .2 points
-
Yup they used these POS's a lot, good design let down by inappropraite material. @Lucky Phil has thread where he tore one down then modified it to work properly. I think it's an O ring that the gas swells and makes the tap hard to use. It looks to me like that one is in the Open position, but it might not be fully open, they are a bitch to use and I end up using a pipe wrench on them to open and close. Clockwise to close and Anticlockwise to open as viewed from the floor looking up to the tank, obviously the opposite if looking from the tank downwards towards the ground Good catch @paulnaz I never noticed and checked my Sporti and HiCam (don't have a V11) and the fuel tap is on the left on both bikes looking from the rear of the bike towards the front)2 points
-
It appears that the petcock is on the Right side of the tank. If this is true where is the pressure regulator mounted, on the Left side? You may want to start with a fuel hose diagram and make sure everything is plumbed properly. The petcock turns anti clockwise to close, clockwise to open. ( when sittting on the bike) They do get stuck and may need removal and cleaning. Table 33.31v11_lemans-sport-naked_2001-2002 | Cadre Cycle Paul B2 points
-
Japanese translation from back in the day.. Italian isn't so bad..2 points
-
Wow, that is such a great question! As this is not an organized "rally" or actual "event", but only an "idea" - there really (really) is no schedule, locations, or prescribed roads or routes - yet, there are some historical commonalities . . . There tends to be a lot going on in the garage at TheLodgeatTellico all weekend, especially in the evenings. Folks tend to arrive Thursday or Friday, sometimes even Saturday. Most of us leave-out Sunday morning, but some stay on. Saturday invites us to ride as, and with whom, we see fit. Often solo, in pairs, or small groups will sally forth to engage the hills and dales (as well as the Appalachian Divide including the Cherohala Skyway and US 129 Deal's Gap/ "The Tail of the Dragon"). Saturday lunch at The Tapoco Lodge by the Cheoah ("Fugitive") Dam is very popular and we often find each other there, or another mile up US129 at the "Crossroads" (with NC28) that anchors the Tail of the Dragon. Y'all get familiar with the roads and places. Bring your maps and GPS routes to share and compare. Friday evening, under the pavilion at The Lodge at Tellico, will see some plans hatched and some alliances formed . . .2 points
-
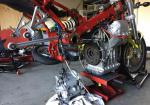
Here’s the basic process of removing, disassembling and resealing a leaky transmission. Two years ago, this was in the “do not attempt” category for me. But now that I’ve done a few with help from other members, I figured I should share what I learned – because the best way to really learn something is to teach someone else. Ready, set, remove transmission. Some pre-steps required. The frame is strapped to the ceiling by ratchet-straps (not shown) to enable “crabbing” the frame.1 point
-
The main issue with the crinkle finish is it's by nature quite thickly applied. I stripped it off a gearbox a few years ago for the V10 Sport and in some locations it was 2mm thick. Took a lot of work and many applications of automotive stripper of several different brands. personally I'd get anything with this finish professionally chemically stripped where they can leave it in a tank for a few days. Phil1 point
-
Your are in a manner docc reading the schematic wrongly. The tank and frame are ghosted out and not really part of the schematic and are just there for "context" not absolute indication. So as an example the pump and filter assy aren't really mounted on the LHS of the frame as the parts manual image tends to show by the ghosted frame. You also have the issue at times of the optical illusion problem of "which perspective you are viewing from. You need to be careful with schematic representations of parts orders as well. In aviation it wont save you in a court of law as they are legally "representations only" not absolute indications. Same for shop manuals that are often made with images of pre production bikes that change and often differ a bit from the production versions. Phil1 point
-
The tap should be on the left so the odd sized 12mm outlet hose is as short as possible directly into the fuel pump. There's limited room down there and the 12mm hose is quite stiff so you don't need it taking up more space than absolutely necessary and also putting unnecessary strain on the pump inlet with it looping around under there. The taps are a good design let down by cheaping out on the seal material. They can't be disassembled and re assembled without modification. I did a thread on the modification I came up with on these so they use Viton seals which don't swell in fuel instead of the std nitrile which do and it can be rebuilt in the future. The mod also means the tap doesn't jam after time when the original seals swell. using pliers to close them for tank removal puts strain on the fuel tank fastener inserts and if you damage one of these then the whole tank is junk. Phil1 point
-
A end of year is the expected release $16k base $19k for upgrades.1 point
-
yes, this is what I found, by far the most examples. However there seems to be stream style as well. Not sure what the V11 is supposed to be, but they are single hole, not multi-hole. After cleaning mine, both are single hole, with a sharp stream.1 point
-
Thank you for these replies. Yes, this is mounted on the left side. Are you saying it belongs on the right? I figured counterclockwise opened this, and yes I needed a wrench to fully open it, lol.1 point
-
Just to add that I don't think it'll make any difference on which side the Petcock and pressure regulator are, providing the tubing in the fuel system is rearranged to suit. However if the Petcock and pressure regulators have just been swapped over then I doubt the engine would start. You'll also be running the pump dry and that won't be doing it any good either. Line from the Petcock should run to the fuel pump inlet, the pump outlet then runs to the fuel filter, from the fuel filter a line runs to one of the injectors then the other after that a line runs up to the regulator on the tank (ASS-uming it's the same a HiCam or Sporti). I'd follow the Petcock line and make sure it's running to the pump inlet, if it's running to one of the injectors then you'll need to swap the Petcock and pressure regulator components around. Apologies if I'm "teaching my granny"1 point
-
I used Rust Oleum brand Aircraft Remover on two engines, trannies, and final drives. In some spots it just scraped off, but in others, it still took a lot of work.1 point
-
Aircraft stripper *used to* have methylene chloride in it. It *really* worked well. It is not in it any more for good reason.. and it doesn't work nearly as well, either I was involved with carcinogens in the tool room at GM, and it most likely didn't do me any favors. Here's what methylene chloride can do: Nervous system effects such as cognitive impairment, effects on attention Cancer of the liver, brain, and lung, as well as non-Hodgkin’s lymphoma or multiple myeloma Liver toxicity Kidney toxicity Reproductive toxicity1 point
-
1 point
-
Here’s that more video, Prince takes over at 3:30 at the 2004 Hall of Fame Inductions1 point
-
Yeah. It's about time Mr. Foale got the credit he deserved rather than the endless piffle spouted about the Spineframe being John Wittners brainchild. Not to take anything away from Wittner's input but the Spiney wasn't his idea. Not that Tony seemed to mind. When I spoke with him about it in the early/mid eighties he was unbothered by the adulation being poured on the transatlantic effort. He'd moved on to trying to get HCS to work by then. I used to work for the other *Arm* of Motomecca back then. An, errr? *Interesting* operation.......1 point
-
then try this, https://www.youtube.com/watch?v=X5OJOKpBtfg Follow that up with the Roxy Performances Live. https://open.spotify.com/playlist/1tHyviSivLr58P62XF7k7B?si=leXyErRVRvysXcRBRNrB6w1 point
-
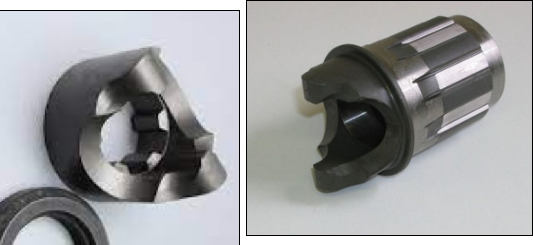
These "selector dog collars" are the "sliding dogs"/ "shift sleeves" (what the Parts Catalog calls "hoses" (2) and "moveable hoses" (8) ?), along with the "Cush-drive assembly" ("Bellville washer tower" and/or #15/#16?) that were the subject of the early 6speed gearbox recall?1 point
-
Decent shakedown ride today getting staged for the South'n SpineRaid. All is well . . .1 point
-
Wow!! Thanks for explaining Pete. Love the bit of history too! It's completely clear now. By the looks of the diagonal and rounded faces on parts #15 and #16 sudden rotational changes direct the energy into the spring washers which will compress and store the energy. When the rotational force lets off again the stored energy is released back to the drive shaft. I have to admit I love this stuff!1 point
-
Five weeks out to the Eighteenth South'n SpineRaid. Currently in Tire Preservation Mode. I don't wanna be "that guy" hanging out at Wheeler's waiting for The Spoon. If'n you end up "that guy", it's okay. Lots of SpineRaiders will hang there with you. And The Spoon is a good tech who's gotcha covered.1 point


