Leaderboard


Popular Content
Showing content with the highest reputation on 05/11/2024 in all areas
-
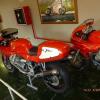
Hey guys! Very excited to be in this forum! I am simply fascinated by the enthusiasm you have here to help each other and to enjoy the ride flawless! Crazy! Huge respect! I am planning to buy a 2003 Le Mans all black with the rear suspension upgrade to Öhlins. New tires, new battery, new upgraded R/R and so on. The price is 5500 euros. and supposedly has 11.000 km on it. But we certainly dont know cause no history record. When i look at the bike, i can not simply find any, i am repeating this, ANY scratch or a sign of hard use even. But I am still hesitating to buy it cause really dont want to spend this summer to fix a spring issue in the gearbox. Edit: I forgot to mention that the bike has beautiful `titanium` oval Mistral pipes on it. But I dont know if its tuned for it. So can you give me some advices in advance? Very happy to be here and I hope we meet in person too! I am currently living in Finland. Peace!3 points
-
@Ali Fra I was at Imatra in the 70's, before getting my motorcycle's driver license. I was with a moped, all the way from Paris. Some unknown Finish enthusiasts boarded me during the Grand-Prix. I still remember them. This was fun because at the time, you could invite a stranger to your house without thinking twice. I have a little philosophy when it comes to purchasing a V11; you just go with it without thinking about what could go wrong, or not. If you experience a small disagreement, turn it into something positive. Riding a V11 will make you a different person. You only get it once it is your possession, not someone else's. Don't let anything stop you from jumping the gun. Let your passion lead you! all the rest is simply here on this forum, so you will have absolutely no pain or hassle to get everything together. I wish I was on your side of the earth, as I know my Quota would have loved to frolic in Finland. Welcome home!3 points
-
Great comment! In fact I am a poor man with lots of passion! My background is quite the opposite that this bike offers. I can be counted as hard enduro/Adv rider. My second dream bike is currently a Kove 450 Rally EX. So you can call my taste is a bit nasty. But I simply just simply fall in love with this bike. This state of me being fascinated and finding myself dreaming about cornering with this bike made me think maybe I can have 2 bikes. Really. I can afford only one for now, but this is the bike that made me wish to have a fully equipped road bike! First time happening. I have ridden the Fireblade, r1 even Triumph Daytona 675R (Probably the only competitive to Le Mans to my taste). So, having a 21 yo bike is still making me nervous, but I guess I will go for it! Cant resist!3 points
-
Done 500+km now with the yellow 1100Sport. Running perfect in the usual trouble area, a little fast idling, not perfect, but very rideable. Today I was going to adress that. Had her going perty good idling ++. Suddenly not running well on both cylinders, WHAT? More valvenoice on right cylinder, yes. Spark good on both cylinders. Of with right side headcover, extrmely intake clearance, didn't measure, but 50mm easly. WHAT? NOTHING LOOSE. Busted pushrod ? Took it out 1hour ago, after buddys left, friday here 🍻. Pushrod look perfect. Ok, valve seat/valve trouble ? Tomorrow another day, thoughts/ experience welcomed. Cheers Tom.3 points
-
Welcome. I have the springs, they are cheap, and you should have one on-hand just in case the one in your new bike fails. I send you a private message.2 points
-
Thanks for your opinion. I really need this kind of advices/opinions from you guys. I know very little about these bikes and especially in terms of reselling it without any significant loss. The seller is a very honest person. I trust him, and he said he really does not know the history. We assume that it is 11k regarding the speedo. But it can be replaced also. And considering the analog specs of it, there is no possible way to back track it. But the owner showed me the oil change photos, he is a professional motorbike dealer and knows how to deal with Guzzis since his father had 3 Guzzis at the same time. He told me that this bike is a trade-in and when he bought it he disassembled the gearbox bottom cover, just search for a metal or aluminium particle to be sure there is no scary scenario. And it was all clear oil. Not a single piece of crap metal. So this is the deal. I think i will go for it!2 points
-
On the German market, that would be an absolute bargain. I'd imagine the market in Finnland is fairly similar. I would certainly buy it. As far as the spring goes, if it breaks it wont take you all summer to fix it, I gather. Get in a replacement as soon as you get the bike, preferably one of the ones that were developed here, and change it at your leisure. As I said, if the bike is really as you describe it, I would buy it for sure, and worry about details later. You're not likely to find another one too quickly that is showing such a low mileage (assuming it is genuine...).2 points
-
Welcome! The gearbox spring may or may not occur. If it does, there may still be some improved springs available. These are rare and, in a sense, quite desirable bikes. I have an extra for my '04, just in case, but so far 18.4 kilos, no problem. These bikes do benefit greatly from owner involvement and maintenance. I do not think you will be disappointed, as on the right day and the right road, these are absolutely the perfect bike. I suspect that there are many such roads in Finland - except you can afford to speed only if you are a poor man!2 points
-
Ha ha, speaking of Nayook and Noojee! The planets have aligned and me and ole mate Dave are off on a wee jaunt to the high country again in about an hour or so and will be heading through here on our way out! Of course, after great weather the last 2 weeks it decides yesterday to turn to SHIT. It's been about 2 years since we got away and in fact the last time ( Xmas hols in Jan.) the planets aligned for a day out on the bikes ( and it takes a planetary alignment for such these days) the bloody breather hose called it quits and put paid to that idea...so heres hoping no such bs this time. Cheers Guzzler. Ps not to mozz it, but it's looking likely to happen now! Woohoo bikes got new shoes and Tank bags packed and ready so I'd best get togged up myself.2 points
-
Intake valve shows the reason for extreme clearance, and not running well. Cheers Tom. Sent fra min SM-S906B via Tapatalk1 point
-
To learn more about the shifting, and how to improve it while you are replacing the spring, go the How-To section of this forum. There are two pinned topics, one where you can see Lucky Phil's methods of polishing some key surfaces, and another where you can see this community in action and how we finally solved (re-engineered) the shift spring issue. Several years on, we have not seen even one spring fail due to fatigue.1 point
-
Welcome to this forum and good luck w/this bike.1 point
-
According to several people here, and information I have seen elsewhere, the tenth digit of the number is the year it was built, so that bike was built in 2002. The number you quoted in your post is identical to the number on my V11 Le Mans , except for the last three digits. Yours ends with 195, mine with 456, otherwise all the same. My V11 Le Mans was delivered and first registered in Germany in May, 2003.1 point
-
All of the racket now is manufactured , written , produced and the singers are selected and is AI generated crap. Yes there are a few genuine musicians in existence. I will go along w/your point about blues music too. Blues music is different . I don't think there are that many counterfeit blues players. You have it or you don't . Plus you have blues and or blues influenced music. e.g. 99% of British music from the early 60s - on . Me , all good music is from Hwy 61.1 point
-
Give it heaps, mate.1 point
-
I certainly do: 160/60. Not sure about the 160/70 on the short frame Sports. Pretty sure I've never heard of 130 on the front of a V11. Plus I'm really not convinced a bigger tire will automatically provide more longevity. (Just a reminder that all LongFrame V11, 2002-on, have a 5.5" rear rim that were delivered with a 180 while many find a 170 nicely suited to the larger rim.)1 point
-
Will indulge in some moto-modeling, since with Goldie finally back on-line, Greenie done, and Red in good shape per usual, was the 1st time the gaggle of geese could get dolled up for a family photo…
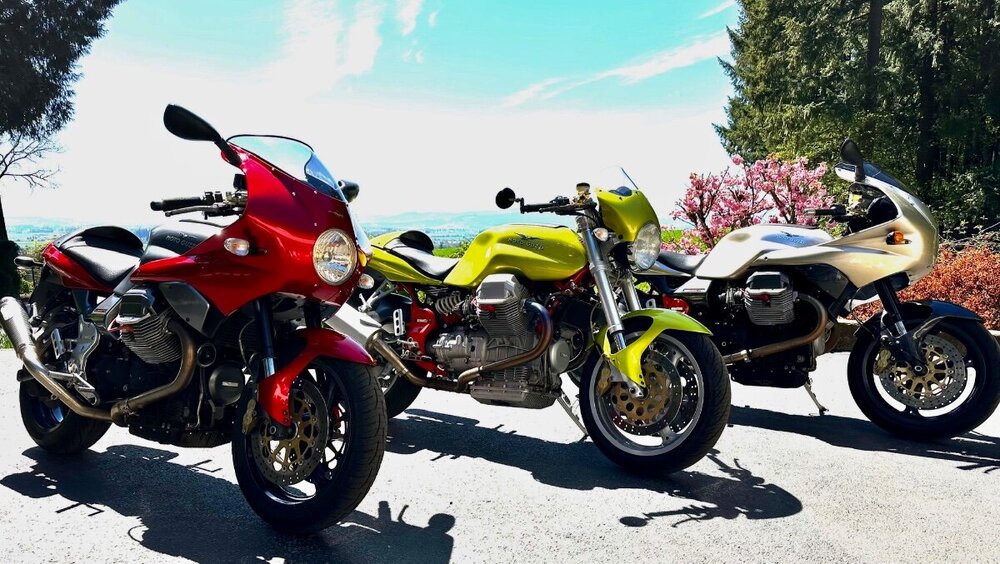 1 point
 -
Ok. Would have been nice to see them.1 point
-
Here's a list of things to inspect, clean or lubricate while the wheels are off for a tire change: (The wheels don't have to be off to do all of these maintenance points, and not all need to be done every time) >Check the wheel bearings for smoothness and play. >Clean and check the brake pads for wear; polish and grease the pin(s) very lightly with a silicone based grease.. >Clean the brake pistons and restore their motion in and out of the calipers evenly. This involves blocking every piston but one and moving it in an out of the caliper all the while cleaning it with brake cleaner. > This good advice from gstallons on brake drag: http://www.v11lemans.com/forums/index.php?showtopic=20133&p=225343 >Bleed brakes, especially the rear brake while you can turn the bleeder to the top. > Clean the fork seals with a "SealMate", or equivalent, including the dust seals. Performing this simple task routinely may extend the life of your fork seals impressively! >Remove the top and bottom rubber caps from the rear brake master cylinder and inspect, clean, and lubricate. Use only silicone based grease around brake parts (under the master cylinder, inside the rubber cap). Make sure there is good electrical connection to the switch at the top and avoid the silicone based lubes (dielectric) on electrics - simple petroleum jelly (Vaseline®, or better: Caig DeOxit Gold®) will keep the moisture out. Grease does not conduct electricity - it's just to keep the moisture out. http://www.v11lemans.com/forums/index.php?showtopic=18158&p=192643 >Clean the rear brake carrier pin and block; lube lightly and be certain the pin threads are clean, lubed* and well torqued. (later V11s have a retaining clip on the inboard side). *Consider a thread locking compound. Allowing this locator pin to fall out can be catastrophic! On the early V11 (1999-2002), some have decided to torque the pin in place and only use the sliding block to remove the rear wheel, perhaps reducing the chance that the pin would not be reinstalled correctly and safely. >Bleed the clutch. >Clean the gearbox vent and the rear drive vent. >Locate, inspect, groom and otherwise secure the wiring and connectors from the Side Stand Switch. This is how your V11 gets electrical power to the Run Switch while you are riding along. Without it, you will not be riding along. Might as well have a close look at your side stand mechanism: pivot bolt, backing nut, springs, and foot "lever"(wire loop). Make certain the sidestand bracket fasteners are secure to the timing chest and sump spacer. The main, large fastener here is torqued to 70-75 Nm! Loose fasteners here could contribute to a broken sump spacer. (no need to have the wheels off for this one!) >Inspect the rear exhaust crossover hanger and both of the canister/passenger peg subframe supports. >Clean the wheels and rotor carriers ("float buttons") and lube the front carrier buttons (a drop of Breakfree CLP (or equivalent) works well, but don't let it sling out on the rotor surface. Bumping the rotors around with a mallet helps keep them “floating.” Even out the spacing of the rotor on the carrier by tapping evenly around the perimeter of the rotor with a soft mallet. >Check the torque reaction rod (chassis rod) rubber bushings for deterioration and play. With the rear drive removed and driveshaft separated, service the pivot bolts . Clean the pivot bolts and apply something reliable for corrosion resistance, especially the front pivot that has been reported to break. >Check the rear drive bearings; clean and grease the outboard needle cage and its sleeve with a good waterproof grease insuring that you rotate it to a new position. Here is an excellent thread, by Bjorn, with lots of great pictures of this bearing, the swingarm, and the bevel box internals. [edit 26 April 2018: It has come to light that keeping moisture out of the right side needle bearing protects the "nose" of the crown wheel and the inner drive seal. Once pitted, the crown wheel is difficult to restore.) >Clean and grease the drive splines for the hub. Use something super-sticky, like Klüber Staburags or a dry-film moly coat. Avoid over-greasing (it will just sling off). >Lube the driveshaft and its U-joints. Don't put too much grease in the splined connection or it will trap air and not go back together. Before you take the two halves apart, make sure there are clear alignment marks. Consider verifying the Driveshaft Phasing. >Carefully inspect the driveshaft yokes for signs of looseness, fatigue or cracking. Verify the pinch bolts are torqued and the the yoke collars do not slide on the output or input shafts. >Inspect the shock eye connection to the swingarm. The early V11 white spring/blue collar Sachs-Böge are prone to crack. Grease the pivot bolt and junction of the steel bushing and alloy shock eye! >Service the cush drive. The button head screws will not likely come out willingly, so expect a fight (heat and penetrating oil/solvent) and replace with new fasteners. >Clean and lubricate all the fasteners. I use a small wire brush and anti-seize paste. >Inspect, clean and seal the main ground(earth) cable to the back of the gearbox. You have to remove the seat latch release to get to it. If you find the cable is not directly to the gearbox, move it there, but be careful if you remove the bolt entirely as there has been a report by SeanP61that it might not just go right back in. > Mounting the front of the battery carrier basket beneath the subframe adds considerable clearance for the battery under the seat pan. The front tabs of the basket must be slightly contoured to fit between the frame tubes. > Remove, clean, lubricate, adjust, and shim (if necessary) the foot shift lever and mechanism. They get sloppy, loose, crudded-up, and misaligned. So much better with no play, sticking, or striking the frame side plate on the down stroke. > Clean and lubricate the sidestand mechanism; inspect and secure the wiring to the switch; tighten the vulnerable lower bolt (circled in red) and torque the important upper mounting bolt (70-75 Nm!) [edit 22 March 2021]1 point
-
Richard, I think it is a 10mm hex that is needed. You should remove the rear wheel first and then the final drive assembly. To remove the rear wheel once the bike's rear is in the air, remove the rear brake bracket anchor from the left side of the swing arm. Next remove the rear axle nut. Now slide the axle out about 1/2 way. This will allow you to slide the rear caliper bracket down and forward to remove the caliper and bracket assy. from the rear brake disc. You can just let the bracket and caliper hang or tie it up out of the way. Now slide the rear axle out about 2/3 of the length. You will have to hold the wheel up to keep it at 90 degrees to the ground. Slide the wheel to the left and it should clear the final drive and rear axle. The small spacer is about 1/2 inch. long and goes between the final drive and wheel. It will sometimes stick to the wheel or final drive. Just look for it so you know where the little devil goes. Now to remove the final drive, just pull the axle out all the way while you are holding the final drive with the other hand. (this is easy since your drive shaft is not connected to your final drive anymore). Please note that the drive shaft has a mark between the two ends. This is a reference mark to keep the driveshaft in phase. If the drive shaft becomes separeted at the splines, just make sure the marks are lined up when the shaft halfs are slid back together. The mark is usually in white paint. Also when going back together, might as well grease the zirk fittings on the drive shaft. Make sure you get the driveshaft bolts torqued correctly, they have a tendency to work loose. I think I covered everything but if you have a question, just ask. Mike1 point