-
Posts
73 -
Joined
-
Last visited
Content Type
Profiles
Forums
Events
Gallery
Community Map
Everything posted by LangleyMalc
-
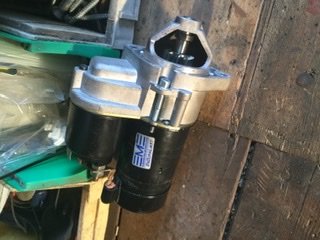
,Balabio will not start. Lots of volts to solenoid when you push the starter button, so pulled the starter and the solenoid is toast about 80% of the time on the bench. Pulled the solenoid off the starter and cleaned and silicones the plunger but no better. The starter motor itself works ok but can be reluctant to get going. seems tome that I need a new solenoid or a new starter or probably most safely both. Any suggestions and where do I get a new starter or solenoid?
-
Hepco Becker Bags + frame for a Balabio or other V11
LangleyMalc replied to LangleyMalc's topic in Personal Ads
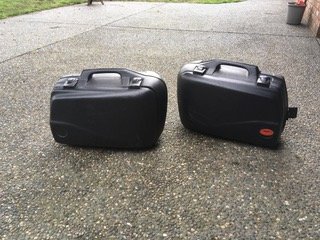
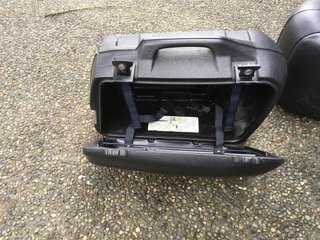
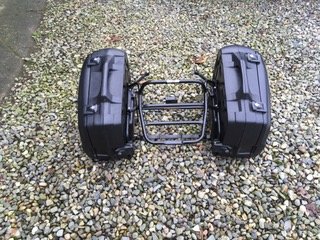
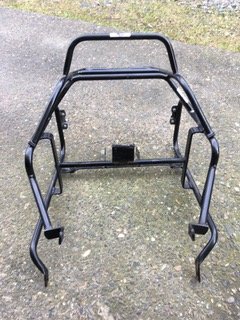
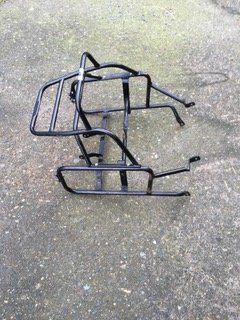
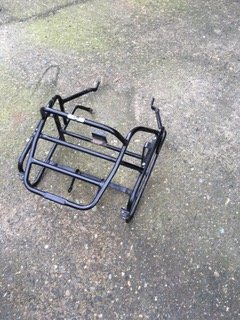
Here is the photos of the bags and the bags on the frame. Newell, let me know that you are happy and where you want them to go to and I will figure out what the mailing cost will be. -

Hepco Becker Bags + frame for a Balabio or other V11
LangleyMalc replied to LangleyMalc's topic in Personal Ads
Subject to agreeing postage and getting you photos of the bags they are yours. Thanks. I will hold them for you. -

Hepco Becker Bags + frame for a Balabio or other V11
LangleyMalc replied to LangleyMalc's topic in Personal Ads
Here is a photo of the frame - I dont have a photo of the bags right now as they are over at my daughter's place. Should get that sorted later in the week. Frame part # was 650 529 0001 Bags Part # was 03480051. They were specifically purchased for the V11 sport. The Balabio is an 04, so there should not be any difference with your bike, but someone on here will be able to tell us if there is a major difference. Mounting is to the rear footpeg mounts and the frame under the rear light, plus another bolted connection under the seat area and it is built German Solid! There is a large platform behind the seat between the two ABS bags. Bags lock and I have the key! -
I have a pair of Black Hepco Becker hard cases that were on my Balabio. Vintage 2015. Also have the bag mounting frame as I have just removed them. In excellent condition, but missing one small Guzzi logo - (Stolen!) US$250 for the lot, plus shipping via USPS. - I think they were in the high $800's when I bought them.
-
I have a brand new, never used, pair of Woodcraft black 3 inch riser clip ons to fit a 54mm fork. Beautifully manufactured in the USA! Was going to install on the Balabio, but I would have needed to fit all new hoses and move the instruments, plus lengthen the speedo drive. My cost last month was $215.96. Offered at US$150, plus shipping by USPS - estimated at $16 based on my cost.
-
I am falling back in Love with my Guzzi - this week. What I love about Guzzi’s apart from the fact that they are relatively bullet proof and at the same time interesting and different, is the need for a multitude of specialty fabricated tools to do routine maintenance. Based on Chuck’s last remark it now appears that I need to talk to “err indoors“ and justify the purchase of a small lathe to add to my wish list. (I have always wanted a lathe). the other thing that the battle against Luigi’s maintenance friendly engineering is teaching me is endless patience and the value of a good forum full of people who have been there before me and are prepared to answer dumb questions!😳
-
I am considering retraining as a gynaecologist. On the front nipple, after a cup of tea and some lunch I went back, removed the final drive and half the prop shaft (having first marked it) and could then just see the joint at the end of the tunnel through the swing arm. So lying on the floor i pulled of the red cover and then tried my right angle adaptor for the grease gun but that would not hook up. so. Got an old grease gun with a solid tube on it about 10 inches long and put a 45 degree bend in the tube at the delivery end and a flexible hose between the pipe and the gun. End result was that I could then get on the nipple (3rd attempt) and get some grease in. Last problem was getting the little red cap back but filled it with grease and then stuck it to my finger with more grease to locate it on the nipple and could then push it on. There goes two hours I will never get back but a side benefit is that I am draining the final drive through the level plug while it is off the bike! There will be more. You have been warned. Thanks for all your suggestions.
-
Thanks for the encouragement Chuck. 👍 I retired this year and was wondering somewhat aimlessly what I was going to do with my time. Now I know having discovered Guzzi’s answer to the Marquis de Sade which is motorcycle maintenance. while waiting for the arrival of my blind puller from Amazon, (2 day delivery even up here), I thought I would follow the tech list - things to do when the wheels are off. So on the final drive I checked and greased the needle roller which was in great condition and found the spacer and washer✔️ Then I decided to grease the prop shaft as I was on a roll. Got grease into the spline nipple and then with some difficulty greased the bottom UJ. Then went to find the top UJ nipple which, according to the diag. Is supposed to be behind the gearbox. Behind the gearbox is also behind the foot peg and rear brake hanger and under a shield plus blocked off from the bottom by the exhaust cross over. I tried to get the three bolts out of the cover over the UJ but could not easily get the third one. so before I disassemble half the back of the bike Am I missing something here or is this really going to form a large part of my winter retirement projects. Don’t get me wrong I am enjoying re-acquainting myself with the joys of bike maintenance, however it does raise two questions: How are you supposed to the top grease nipple? and if I had sent this to the dealer for service what chance is there that they would do this anyway? My guess is “no chance” as it would fall in the too time consuming and out of sight box.
-
Thanks guys, Ive ordered up a blind bearing puller and I shall see what that does before resorting to the welder! Will report back.
-
I just took a look and there does not seem to be a relief notch! The Spacer is very close to the diameter of the inside of the inner race and is very slightly lose and can be turned slightly: as a consequence it is very difficult to get decent purchase on the inner race with the drift. It just slides off and I cannot see how to get a regular-puller anywhere near it. I popped off a dust cover and the bearing was full of red brown crap so they have to come out. the next attempt will be with a little heat, but for that I will have to take of the discs. Is it possible to drive one bearing down to get the other side started?
-
I have just pulled the front forks on my 04 Ballabio and on checking the front wheel bearings found one was sticky and the other distinctly lumpy so they need to be replaced. Marked up as NSK 6205 DU. Is there an approved method or tool for removing them or do I simply beat them out? (The BFI METHOD). I presume the bearing is readily available, but would also appreciate sources or alternative numbers. Before I go to knock out the inner race etc, how do you get these things ou as the lip in the wheel is tiny?
-
Like KiwiDave I live in Langley BC and am going through the suspension on my 2004 Ballabio. It is a weather related problem as it has started pouring and is about 4 degrees. No real problems identified with the handling but forks and shock not touched since new, 15 years and 30K km ago. So I am just about to pull the forks and replace the oil, which seems relatively straight forward as per However, I cannot find anything about the rear shock specs or service/oil change. Nor can I find anything about adjustment. Everything on the rear shock is set mid run right now. That includes the spring, Rebound and Damping. So what I would like to do is service or get it serviced and then sort out the setup for a single 200lb rider including clothing. any and all suggestions gratefully received and if KiwiDave could contact me offline we could compare notes and sources for parts etc. Thanks.
-
Hi Guys, Mine is a 2004 in Silver. huddled in the workshop away from the rain in Lower Mainland, BC. ZGUKTC03X4M111184 - I have had it from new and it has about 35,000km's on it - relatively trouble free apart from one shift spring. My 41 year old daughter took it over about a year ago and as it is now in my garage for the winter I am going through it to sort out a few things and to ensure that it is in good order etc. I had Hepco Becker bags on it, plus the frame etc, but have just taken them off as apparently amongst my daughter's friends they are not stylish enough. She also wants me to put on some clip ons, so we shall see how that goes and how long it lasts, as I preferred the straight bars from a comfort point of view.. The list of jobs is relatively short, but includes a major service and change of fluids as I have not worked on it for a couple of years - hence my availing myself of the knowledge of the assembled masses on the V11 site. Luckily I retired last year so have time to take time, while waiting for the parts to arrive from various parts of the Guzzi universe. I also have a California 1400, which is a great touring ride but nothing like as much fun around the corners, hence the preservation of the Ballabio.
-

Rear brake Caliper carrier bolt rounded out
LangleyMalc replied to LangleyMalc's topic in Technical Topics
Can’t figure out how to post pictures. Age related complaint. thanks to you all for the help. -

Rear brake Caliper carrier bolt rounded out
LangleyMalc replied to LangleyMalc's topic in Technical Topics
So the bolt is out. I removed the Caliper and put a wood chock between the pads. I then Pulled to the rear axle, having had to make a large Allen key using a bolt welded to the same bar that has my oil filter dustbin lid nut welded to it; ( now a multi purpose Guzzi tool). At this point the Caliper carrier would rotate and I could remove it and the block leaving the bolt. However the rea tyre still fouled the bolt so it had to come out. so then drilled. a larger hole in the head of the bolt into which I could force a 13mm short bolt. Then welded the bolt shank to the head of the offending through bolt (carefully - the 13mm bolt gave me more space to weld to the through bolt head- I am not that good a welder). The welding puts heat into the through bolt, so I then sprayed on more PB fluid, tapped the end of the 13mm bolt to loosen and finally removed it as the bolt cooled. See below -

Rear brake Caliper carrier bolt rounded out
LangleyMalc replied to LangleyMalc's topic in Technical Topics
Hi Docc, as this suggestion is “non invasive” I’ll give that a go first. -

Rear brake Caliper carrier bolt rounded out
LangleyMalc replied to LangleyMalc's topic in Technical Topics
Thanks for the diagram. You are correct, The bolt is #34 in that diagram 01638630 and it must me made of unobtainium as it is priced at $46.90, plus shipping! ah well the joys of Guzzi ownership. Thanks guys I will report results. -

Rear brake Caliper carrier bolt rounded out
LangleyMalc replied to LangleyMalc's topic in Technical Topics
Hi Phil, thanks for the suggestion. The bolt in question is the one that stops the brake Caliper carrier rotating ny fixing the carrier to the frame. Assuming I drill off the head, will the rear wheel come out it the rest of the bolt is still in the frame, so the carrier won’t rotate? i will also probably have to remove the Caliper from the carrier to get some wiggle room before removing the axle bolt and thus getting out the rear wheel! -
I have a 2004 Balabio with the Allen headed bolt on the rear brake Caliper carrier rounded out. (The one with the R pin in the end that anchos it to the side frame). I therefore need to get the bolt out and my immediate thoughts are: 1. Drill out the head and then pull off with rear wheel and then remove body of bolt and replace. 2. drill a hole into the bolt head down the Allen hole and try to use an “easy out”. I have used them before, but think the probability of success is low. 3. weld a nut to the top of the bolt and then turn out the resulting mess. I could use some advice here, as I can’t be the first person with this problem, so what is the preferred method and finally where do as I get a replacement bolt or is there an alternative? thanks. LangleyMalc 2004 Balabio and 2014 Cali 1400


