-
Posts
87 -
Joined
-
Last visited
-
Days Won
2
Content Type
Profiles
Forums
Events
Gallery
Community Map
Everything posted by Ian
-
Apologies for the poor photo quality, I need to work out a better way of posting
-
-
-
-
-
-
-
-
-
-
Gents, thanks for the replies and the good advice. I’ve bought motul 7100 100% ester based oil for this service. Not sure if this is class 5 or not but I’ve used motul many times before back in the UK on other bikes as it’s widely available and it’s always been good. I plan on monitoring this closely once I start using the bike, because that much crud going into the motor cannot be good. If the oil and correct oil level doesn’t fix it I’ll need to find another solution. I do recall actually reading something a few months back on one of the specialist MG dealer websites about problems with oil foaming in these motors with certain oils and there was a recommendation on a specific oil that did not foam. I will see if I can find it again. Btw, I’m not convinced that it was condensed oil “vapour’ that was sitting in the air box / inlet tract. It looked like the product of something more like a dense oil mist.
-
Folks, I’m deep into a major service on my 04 sport. Today it was brake calliper cleaning, brake fluid change and what I thought would be an easy job, tank off and new air filter........... Tank off was easy enough but when I pulled the airbox lid I found what looked like quite a lot of manky oil in the bottom of the air box, what followed next was a major PITA! I couldn’t reach the bottom of the airbox to clean out the gunk so I decided to pull the trumpets out and gain access from the bottom. This wasn’t easy and I ended up taking all the rubbers off the throttle bodies, plus the intake manifolds off the heads. What I found next was even more concerning, the throttle bodies, intake manifolds and inlet tract in the heads were coated with black oily carbonised gunk. I’ve never seen anything like it before, it was nasty. I spent ages cleaning it all out with carb cleaner and rags, and finally I got it all super clean again, right down the inlet tract as far as the valve. Took me about 4 hours all together. I cleaned out the airbox as well. There wasn’t as much oil in the bottom as it first appeared, but it’s obvious that it’s been breathing oil from what was in the intake tract. So, where did the oil come from? Did a previous owner overfill the oil so it pumped up the breather into the airbox. Did someone use the wrong oil which foamed and pumped into the airbox. Have I got a different problem? I haven’t actually ridden this bike yet so I don’t know if it’s a smoker, but there was tons of oil gunk in there. Never seen anything like it before. Sorry no photo’s. I was too busy taking things apart and cleaning! Has anyone looked inside their throttle bodies and found similar gunk? Any advice appreciated.
-
MartyNZ thank you mate. Sounds logical. What type of dry lube did you use one the rubber dampers?
-
Good idea, i’ll remember that every time I check the tyre pressures now!
-
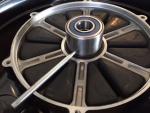
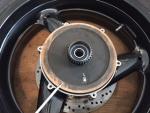
Folks I’m putting my wheels back together after having them powder coated. When I took the back wheel apart there was so much muck and grease on it that it was hard to tell what is supposed to be lubed and what isn’t. Everything is cleaned up now ready to go back together but there is no info in the manual on where you are supposed to put grease and where you are not. Obviously the spline drive needs greasing, but does the hub that the Cush drive sits on also need greasing (see pic with screwdriver pointing at what I’m trying to describe)? Also, are you supposed to grease the large diameter spacer in the second photo? Any advice greatly appreciated
-
In reply to nobleswoods question. When I pulled the caps I found the nut fully backed off per the photo and the cap was just screwed down as far as it would go on the cartridge rod I.e the nut was not touching it and not performing the locking function it is supposed to do. On reassembly I wound the caps down until they bottomed out on the cartridge rod and then I wound the nut upwards to lock the cap in place on the rod. This is how they are supposed to be. I can confirm that I got the full range of adjustment on the clickers and that they work as intended (preload and rebound)
-
Job done. I lied last night when I said the air gap had increased from 115mm to 118mm after a couple of hours. Idiot me used a 3mm piece of steel on top of the stanchion to give me a firm datum point to measure the air gap from and my tired brain forgot to subtract 3mm from the measurement. So for all those who follow, if you are doing a fork oil change on the 43mm dia. Marzocchi fork, you need to drain them thoroughly by pumping the cartridge a dozen or so times and then leave overnight to drain some more. You then need to add 435ml of new oil which will give you an air gap of precisely 115mm. The forks are back on the bike now and the damping feels smooth and consistent. Have some more servicing to complete before riding it though.
-
The 701 looks a great bike. I used to race a 690 enduro (predecessor to the husky) in the UK 2 day rally events. It was a great bike and like you say it could do both road and off road pretty well.
-
Beautiful bike and the price is in the ballpark
-
Not worked out how to take pictures and shrink them in size to fit within the forum limits. Anyone know how to do this? Anyways, re checked the air gap on the second fork (the one with 435ml in it) and found that after leaving it to settle for 3 hours it had increased from 115mm to 118mm. I then took oil out of the other fork so that both are now nob on 118mm and I’ll check them again in the morning before putting the springs and cap back in.
-
OK, progress report. The second fork has been draining for 2 days and has been thoroughly pumped. It’s as empty of oil as it is ever going to be without completely disassembling it. I filled it with 435ml of oil per the book. Pumped it 12 times and measured the air gap. It was exactly 115mm. I’m now going to leave it a couple of hours for any bubbles to come out and then re-measure the air gap. It will be interesting to see if there is a difference. After than I’m going to set the first fork I did to the same air gap. Sometimes it’s tedious being a perfectionist! Thanks for all the advice people gave btw.
-
I agree with the wurth sig 3000 grease, I just used it on my splines and it is incredibly sticky stuff
-
Well that didnt work! Setting the air gap at 105mm took 475ml of oil which is 40ml more than the book says is needed for this fork, therefore my conclusion is that the standard air gap must be more than 105mm. I only attempted this on one fork tonight so tomorrow I’m going to fill the other leg with exactly 435ml per the book then I’ll measure the air gap and take oil out of the other leg until it gets to the same measurement. All good fun and pretty easy to do. I don’t understand why most folks skip doing the forks (and changing the brake/clutch fluid) at servicing time because it’s no more difficult than changing the engine oil. Wait for tomorrow night for the next instalment
-
Just back from the garage on a tea break. Not refilled the forks yet. Wanted to grease and adjust the steering head bearings before putting the forks back in. What a complete PITA that was. My bike has the headlight and clocks mounted on the triple clamps and it all has to come off before you can take the top clamp off and get to the upper and lower bearings. Not difficult, just really time consuming for a straightforward maintenance job. Good news is that the bearings were in perfect condition even though they hadn’t seen daylight since 2004 and the guy who assembled them only wiped them with an oily rag rather than pack them with grease. Looks like my new to me bike has had a really easy life in a very dry climate. Everything I’ve inspected has been in A1 condition and it’s obvious the bike has never been apart before. Time for a cookie now before tackling the forks


