wavey_davey1
Members-
Posts
50 -
Joined
-
Last visited
-
Days Won
3
Content Type
Profiles
Forums
Events
Gallery
Community Map
Everything posted by wavey_davey1
-
Apologies, I was unaware of the "back story" with the Gutsibits supplied Roper plates. I'd also surmised (incorrectly?) that I'd missed the boat by a few months getting one from the guys supplying the plates from this forum, otherwise would have gone down that route in any case. Anyhow, I've just made a donation to Medicine sans Frontiers myself to honour Pete's input to these.
-
-
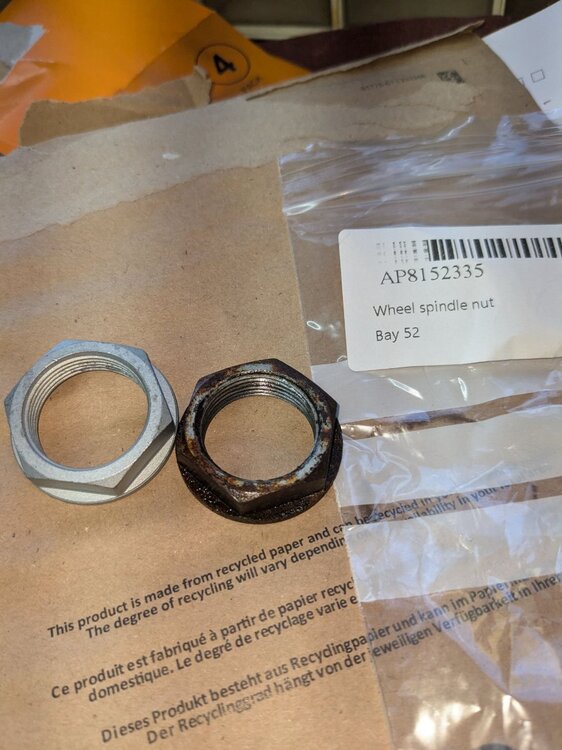
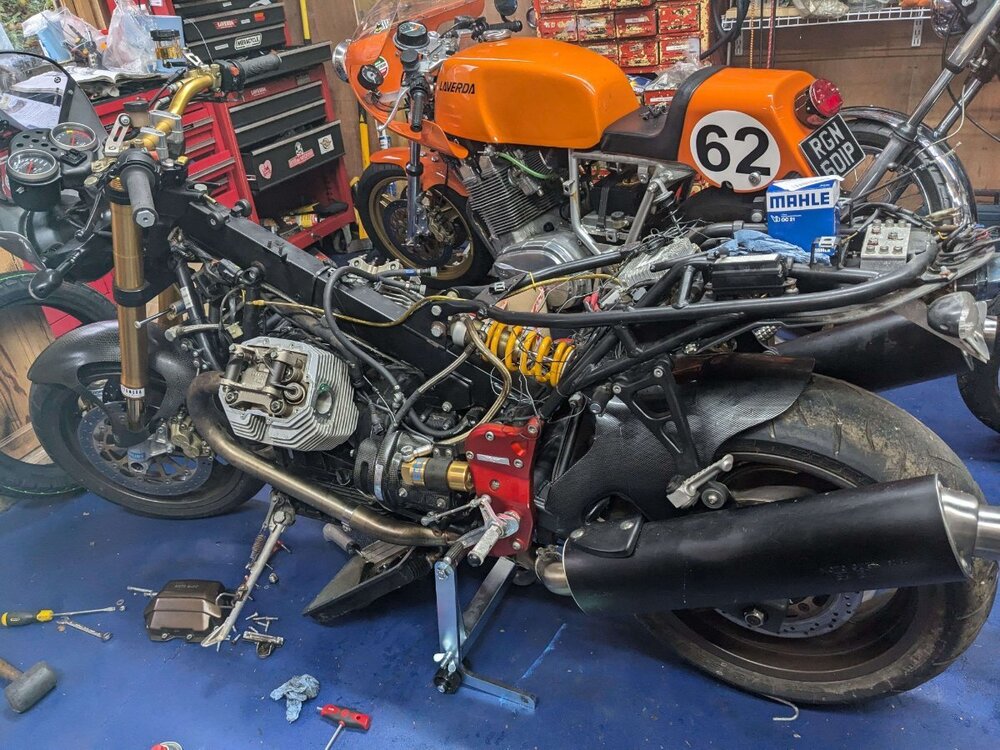
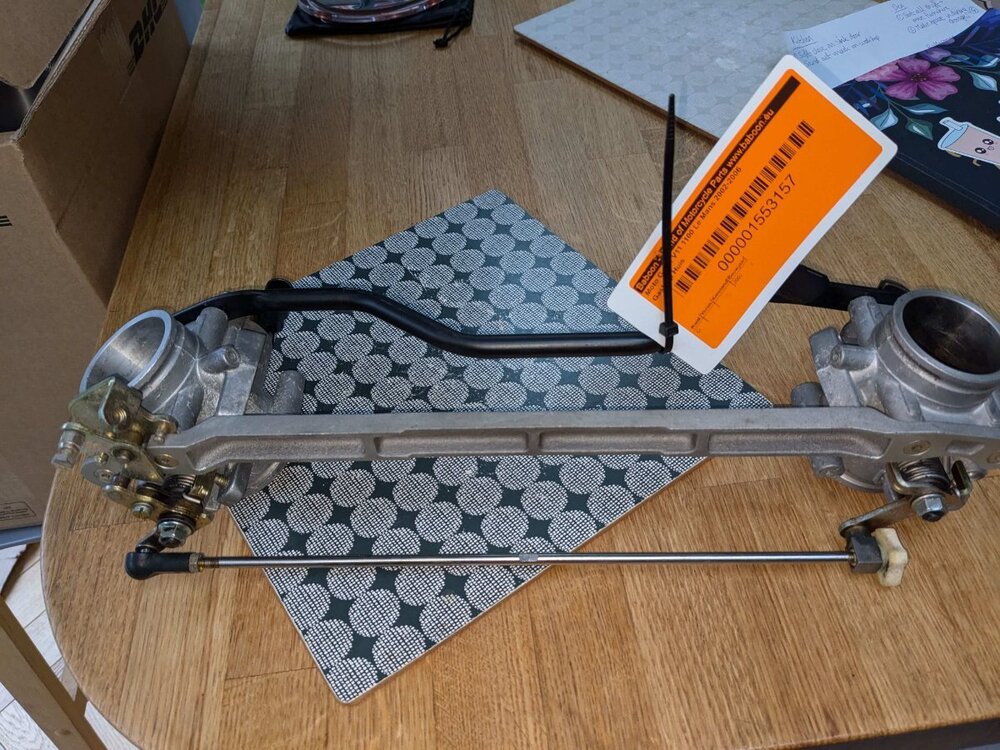
OK, some progress, edging nearer the first fire-up! Have successfully split the "new" TBs in readiness for new seals and fitment on the bike. Even with oxy fine torch one screw was stubborn , needed "shocking" with small hammer & soft drift taps while applying torque finally did the trick, definitely a two man job. New Becker stand arrived and works beautifully, so much nicer working on the bike now it's level! I ordered the TB seals as that Suzuki part number I mentioned simply because Fowlers in Bristol had them in stock along with a new front axle nut to replace the horribly rusty one. Cheaper as an Aprilia part it turns out!! Fowlers have good Guzzi parts stocks and received next day. It took numerous careful soakings of the rusty nut with ATF/acetone mix (moving axle around on loosened pinch bolts to distribute the penetrating mix better) plus judicious use of a heat gun (so as not to melt the Ohlins decal!!) before I could free off that axle nut, there's not a lot of socket engagement on the shallow nut. Feels so nice gradually removing the random rusty fasteners on this bike. Front calipers were semi seized, pads horribly rusty along with all the fasteners, nipples etc, but pistons looked ok. However I scored some better calipers with new pads on eBay at a price that didn't make it worth refurbing the old ones, as they came with nice stainless fasteners and bleed nipples. I now have two spare calipers that also match the ones on my (much modified) Laverda! All bled up with the new master cylinder reservoir. Sump dropped, I wanted to see how much sludge or mayonnaise was in there. Looked surprisingly clean, no condensation at all and hardly any sludge. Gauze screen was perfectly clean too . Changed out the UFI filter for a Mahle from Gutsibits in readiness for new oil all round. Tappets checked, one inlet about 1 thou loose, set to 6 thou inlet, 8 thou exhaust, all looked good in there too, no corrosion or condensation. Fuel filter changed with proper single use Oetiker clips, tank plate had been leaking very slightly so have cleaned it up. gasket looks good so might try dressing with a thin smear of Blue Hylomar. I've used this in the past as it's "fuel-resistant" but not convinced it will stand up to immersion type situation. New gaskets are VERY expensive. The pump LOOKS ok, no corrosion from ethanol borne water so I'll just see how it goes (or doesn't)? Final job so far is front alternator cover off (what a bar steward of a job with the front balance pipe!), turned engine over after 10cc of ATF/acetone mix into plug holes to free rings for 24 hours. A tiny bit of stiction on first revolution, then felt nice and smooth. I tried a compression test but speed of cranking with a ratchet handle on the front alternator nut resulted in a small blip of the needle then returned to zero on both cylinders? On the one hand, compression tests on all my kickstart bikes can't be that much quicker cranking, but compression FELT very healthy and similar on both cylinders? We shall see? Next jobs, send off injectors to Jim at Superbike Surgery in Gloucestershire for full service (£25 each). When I told him on the phone what injectors they were he described them as "the worst injectors ever made", so that's encouraging . https://www.superbikesurgery.co.uk/injector-servicing Have ordered new earth leads to connect the (Shindengen!!) reg/rec and battery to the unused fuel filter studs on top of the spine. The original owner had 4(!!) ugly leads connecting battery, reg and both cylinder heads? I can't complain because the 30A fuse looks perfect and there's that much better reg/rec too. I had to sort my original greenie for my mate last year as the 30A fuse had melted and the whole thing was a mess. I've put an order in to Gutsibits for a Roper plate (£120 with tax and postage), 4-8 week lead time as they're having another batch made, so will leave the sump off for now in case it arrives before I'm ready to fire her up! Change seals on the TBs before refitting, then rear wheel out ready for tyres, UJ greasing (not looking forward to that front one), clutch and rear brake bleeding etc. Getting there slowly..
-
Thanks for the clarification Mick, of course it's the bottom nuts, same as the Guzzi version
-
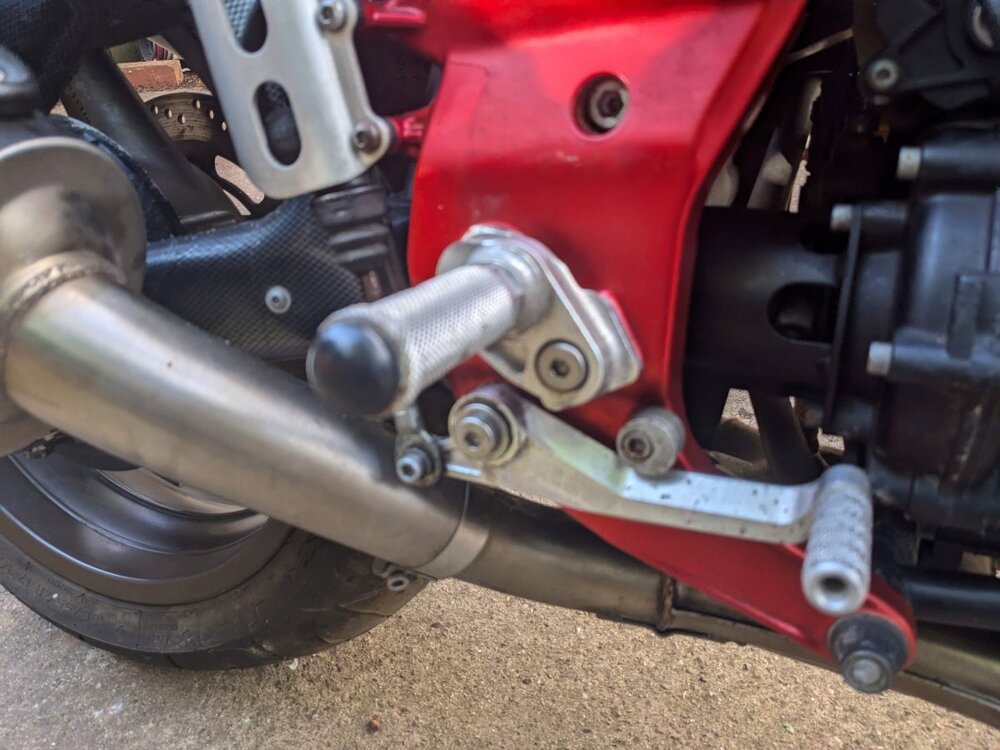
Oh, and I've ordered a stand off Becker Technik, which apparently utilise standard 1/2" drive sockets that fir over the Pork Chop nuts.... Then I realised my bike has aftermarket ("vital spirits"??) rearsets that fit OVER those pork chop nuts!! Oh dear.. Incidentally, not sure why the need for these rearsets (which appear to be quite nice bike specific not generic items) given they only move the footpegs less than an inch rearwards and upwards and it's not as if that's needed anyway? Maybe it's a ground clearance thing but suspect it's just a bling thing? I do have the std footrests in a box that came with it.
-
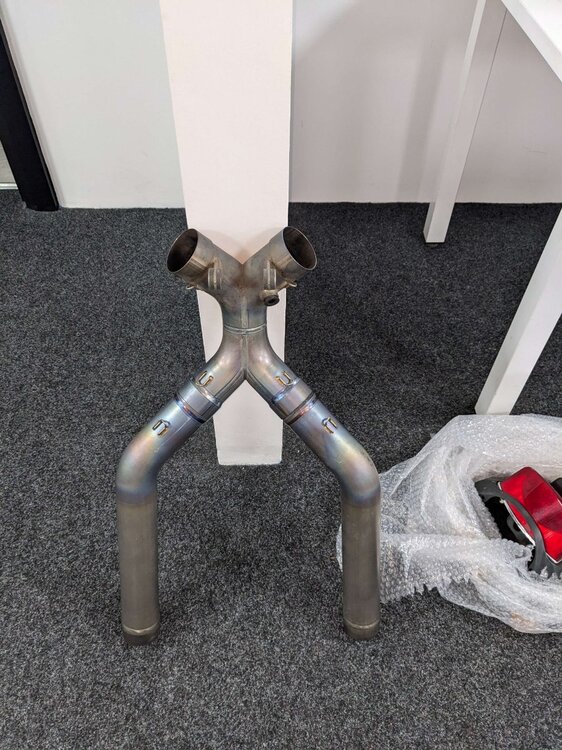
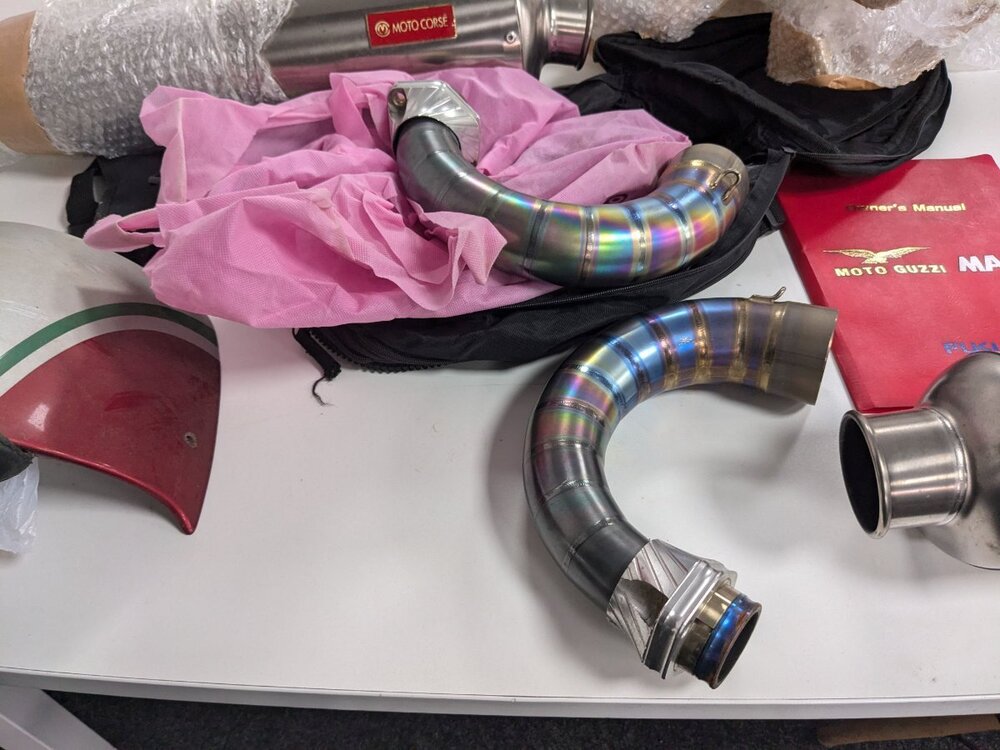
Apologies Phil, only just twigged you meant (I think) my titanium system? I've no idea yet if it fits/works/is ear-bleedingly loud? I have had dB killers made for other slightly exotic exhaust systems (including an ex-race XR1200 Harley believe it or not!) but it's not a priority right now. I am looking forward to at least a trial fit at some point, just to see what it looks like on the bike, but if I DO decide to move it on, you have first shout. I'll probably put up some pics of it loosely assembled (it's leaning up against the bench in my garage in that state now) as it's such a lovely thing to gawp at!
-
Definitely Allen on mine and the new ones. Hopefully when it's up and running/still a sad wreck you can come and admire/gloat at your near-miss! P.s I bought the rack on eBay off you, in readiness for those pan-Europe tours I'll be undertaking on it, ha ha.
-
Thanks for the comments guys. I came to the conclusion that the right hand TB was toast, the shaft was so badly corroded at the top there was no way that it would seal effectively imo. I guess I could take a risk and try it with fresh seals, at least with the top seals there's little danger of leaking fuel, it just comes down to what any leakage does to the mixture? Anyhow, I managed to source a pair of what look like good condition TBs off eBay from Holland. they were a lot cheaper than the German ones listed, about the same price as a single TB from them. Got stung on duties (thanks Brexit) but they arrived within 2 days, pretty good going (Baboon Motorcycles). So now I have the challenge of splitting THESE TBs to get them ON the bike!! I tried my previous technique with the Butane/Propane torch and, although it seemed to take longer to get the specific area of the TB up to 200C (and a bit) I did get there, BUT the allen screw remained tight. Maybe the previous ones on the bike had been removed previously, but they definitely had some threadlocker on the removed screws?? Anyhow, I will follow Phil's excellent article advice and see if my time-served engineer friend (who generally works on pre-war Nortons) can help out with his oxy torch. Fingers crossed! I'll probably change the seals in these as a precaution while they're off the bike in any case. The only other progress I've made is draining the tank of what looks like very old fuel and removing the fuel pump/filter assy ready for a new filter (I happened to have a suitable one from when I serviced my mate's old Multistrada). The Mahle filter in there has a date stamp of 2003 so might be the original, though I imagine they aren't a short shelf life item so who knows? I'm worried about the fuel pump anyway given how long it's been standing, there's a few Chinese knock-offs available, any experience here with alternatives given the cost of the Bosch item?? On the Ducati forums there's sometime talk of "black death" (black deposits in the plastic fuel filter) signalling a pump on the way out, but haven't found anything similar on here? Have replaced the snapped brake reservoir on the handlebar in readiness for starting on the front calipers. both are sticking and all the fasteners are rusty, so fun ahead!
-
Yes Phil, I googled your YAM part numbers and that's how I sourced the slightly cheaper Suzuki equivalents. I was surprised my blowtorch was able to heat the TB body (I focused the tip of the blue flame section on the TB casting where the screws thread in, rather than the bridge, and only did the left hand TB as per your advice, as the bridge is thicker on that side. I'll only attempt the right hand bridge screws IF I have to replace that TB. Thanks for your comments
-
Correction - I meant "source a RIGHT hand side TB" in the post above! Here's one of the inlet valves on an engine that's only (allegedly) done 20-something thousand miles? Hmmm. Comments from more knowledgeable people welcome (i.e. pretty much everyone on this forum!) Also gawping at the inlet port which looked pretty crude (okay, some of my brit bikes have been ported by people who know what they're doing, not me) led me to read up on the "redesigned" ports this motor got compared to the previous Tonti motors. Hmm, not clever having a port that stops flowing well below max cam lift??
-
Well I haven't had a lot of time in the last few weeks, what with school holidays and a BSA 250 with bodged electrics (my brother's) to sort. However I HAVE managed to remove the throttle bodies! Actually it was a (bit) easier than i was expecting. I was going to order a MAPP torch to heat the TBs to melt the red loctite, but managed to get the left hand one up to around 220C with my ordinary butane/propane mix blowtorch (as measured with an IR thermometer) and the very small bottom allen screws on the alloy tie bar came out good as gold, if a little nerve wracking as you slowly increase the torque! I used a dremel with cutting wheel to carefully dress off the peening on the butterfly screws, marked the orientation of the butterflys for reassembly and took both assemblies apart (with lots of photos) following Lucky Phil's excellent guide in the "How tos" section. The left hand one looks ok, and I THINK the right hand one (with all the corrosion in the venturi and initially seized butterfly) might clean up ok? However, this is what greeted me when I took the TPS off the spindle on top of the right hand TB - see pic. The circlip and washer that sits above the spindle seal have both pretty much disintegrated! As with much of what I've uncovered on this bike, much of it is in fine fettle (on the surface at least) but then you come across something horrible? I am going to dummy fit the spindle, which is badly corroded at the top back in the TB and see if the area the seal sits on is ok or toast. If ok, then I use a local bike shop to vapour blast stuff and ultrasonic it all afterwards, they've done cylinder heads (Guzzi T3) and crankcases (BSA Rocket 3) for me with no issues with lodged blast media. I've found a UK source for the seals, actually slightly cheaper as a Suzuki GS450 part (generic mikuni carb butterfly seals as per Phil's write up) over here - Suzuki part No. 13651-51011. If these work ok I'll add the details in that write up. The bushes also have some play but I've yet to remove those as I don't have a correct sized tap yet. My gut feel tells me however that I'm going to have to source a LHS TB, we'll see? The seals and bushes aren't expensive so nothing to lose. Hoping to make some progress this week but we'll see as loads of house jobs have been piling up! The other nasty I uncovered is, peering into the inlet ports (I've removed the inlet manifolds) the inlet valves look horrible, with loads of deposits on the back of the valve heads on both sides? I expected with a lean running "modern" engine they'd look white(??), no such luck, is this typical?? see next pic, hard to photograph, I've tried to illuminate a bit better with a torch. both inlets look the same so nothing to do with corrosion. I'll post a pic on the next post.
-
My brother sent me this Facebook link yesterday, is this your friend's? Looks nicer than mine! 😁 https://www.facebook.com/groups/731294041018851/permalink/1708661509948761/?sale_post_id=1708661509948761&mibextid=rS40aB7S9Ucbxw6v I would also add the market for even Mk1 lemans has "softened" considerably, I also have a friend trying to sell a nice "mock 1" , a mk2 made to look like a mk1. It's very nice and a good price but no interest.
-
About 37000 Kms or 23000 ish miles so not huge but was used back in the day? There's what I'd call localised corrosion on areas like some of the frame joints where water could have pooled but mostly it's in good condition with the rubber component deterioration pointing at UV damage more than anything. However paint is unfaded (maybe a bit on the pork chops) but none on the silencers for example which I know can fade? This bike's history seems full of contradictions!
-
Do you mean you were able to remove the TBs as a pair? I'm assuming you mean the inlet manifold fasteners? I'm pretty much resigned to sourcing at least one replacement TB but getting them off the bike is the first step obviously! Removing inlet manifold would also allow a better view of top end on the cylinder possibly? I tried poking a small camera in plug hole but not really revealing. Thanks to everyone for suggestions etc so far.
-
I've cleaned up the walls of the venturi on one side with some solvol just as an exploratory exercise, but can't do much without getting it off the bike. I've read the various threads on TB refurbs, so in no doubts about the challenges. The actual butterfly seems ok where it touches the walls, but I'm guessing the lower spindle will have suffered badly, as will the bush and seal area? If I can split the TBs at least I only need to buy one, which is also available on German eBay. Anyone know if you can drop the engine a few inches to get the TBs out without all the attendant crabbing parlaver? Here's the photo still seized.
-
Ok first major challenge is already apparent. I was hoping an oil and filters change and tank drain would at least let me turn the bike over and do a compression check. Seized twistgrip, which I presumed would be cable issues or possibly the tie rod fouling turns out to be a heavily corroded right hand throttle body! I'm guessing rain or condensation (??) has gradually dripped off the tank onto the body and eventually seeped through a cracked inlet rubber? The bike leaning on the side stand meant the left side is fine. I was able to get a look by pushing the airfilter tubes back and butterfly welded to venturi with corrosion. Soaking in WD-40 has allowed me to unseize it but it's a mess! Getting the throttle bodies off apparently means crabbing the frame! I can't imagine the butterfly spindle would seal even with fresh seals and a red loctited battle with the tie bars looks, but nothing to lose. There's a pair on German eBay at £300 ish as last resort. Also need to see if cylinder bore , rings etc have suffered, ho hum... I'll add a photo from laptop, phone won't let me resize.
-
but looking a bit better with a bit of a clean (still some paint film to go at but my finger nails are literally wearing down (an old credit card proved useless)
-
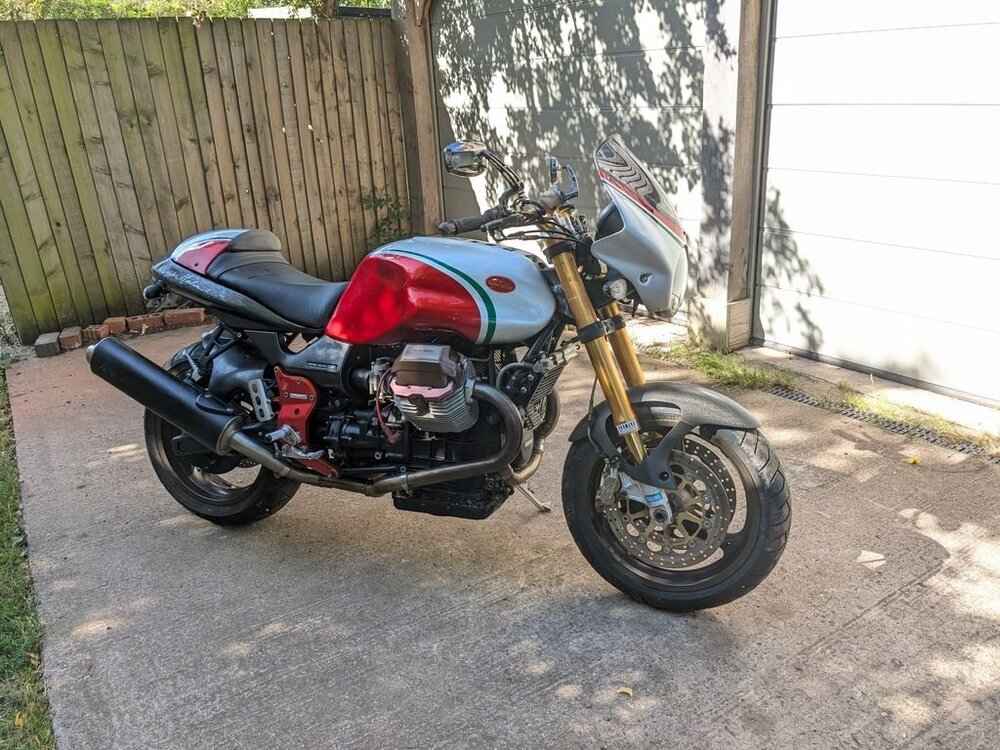
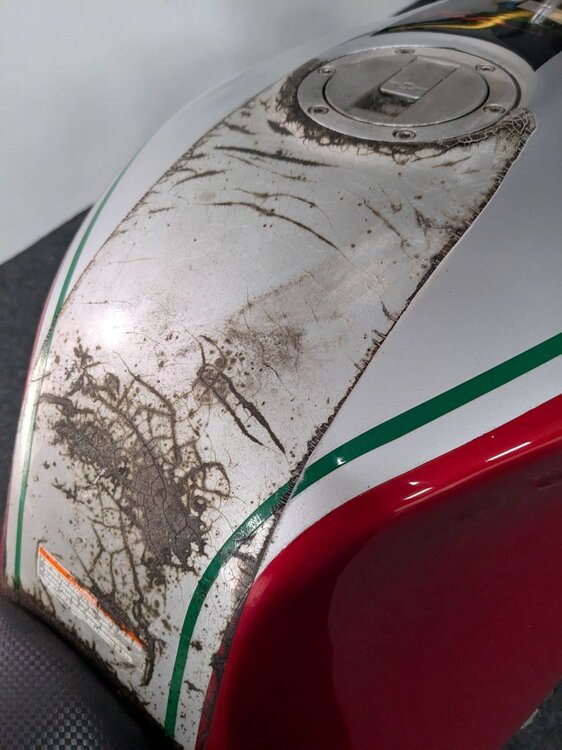
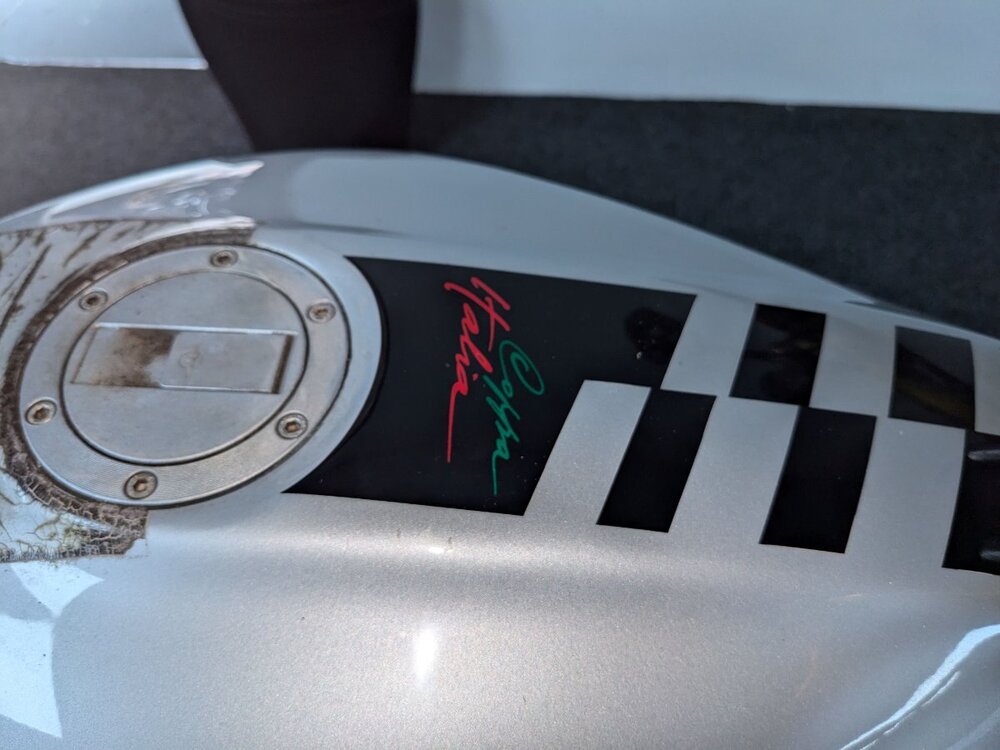
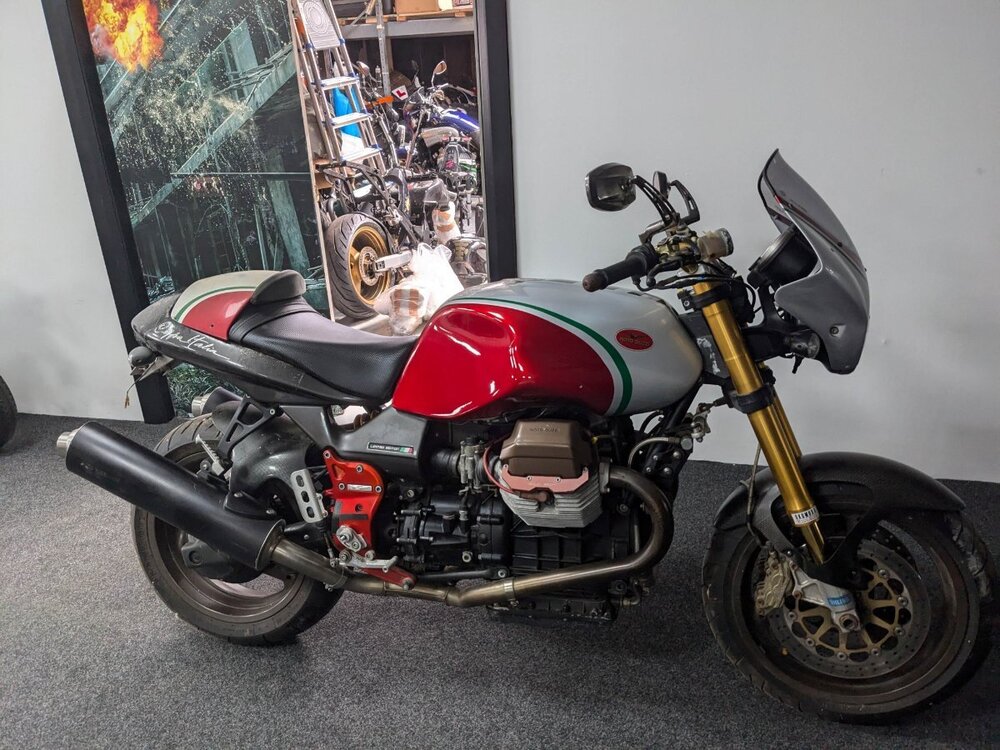
Ok, so as per my recent "introduce yourself" post, I have bought a Coppa Italia imported from Japan by a dealer, described as a "barn find". In this case I actually think it might have been in a barn! The date code on the tyres is 2007 and there's numerous signs around the bike of having been stored either in slightly damp conditions and/or UV damage though fundamentally in good condition? I suspect it might be a deceased estate purchase as there's a few expensive extras that came with it, but also signs of poor storage, we'll never know? I'm no stranger to restorations (which is not how I see this project) having resurrected a T3 Cali, numerous 60s/70s Bonnevilles and Commandos etc, but never really had that much involvement with a spine frame over and above tank-off checklist type stuff. I see this one as requiring a bit more than that somehow! First hurdle was getting the badly uv hardened paint film off without destroying the paint and decals underneath. So far it's working, albeit very slow process (combination of gentle heat gun and specialised solvent) but the tailpiece decals aren't clearcoated so will have to repair small areas or source new ones/get copies made, we'll see. I wanted to clean it up a bit before any stripdown or startup, as much to give me some motivation as anything else. It's really filthy, even under the tank etc. Oddly though oils look clean as does brake fluid, and there's a small amount of what looks like reasonably fresh fuel in the tank, which I'll change out before powering up the pump etc. I've sourced new oil, oil filter, fuel filter and just had 10 Picker relays arrive from Digikey in the states (2 days shipment time!) as it currently has the dreaded Tycos. Will post a few updates as and when, (and steer specific questions into the technical forum) though this project is competing with my brother's BSA 250 charging issue and a few other bits and pieces, plus the demands of a 10 year old daughter, so it's not going to be a 2 weeks and ride off into the sunset thing.
-
Hi everyone, My name is Dave, 63 years old and I live in beautiful Shropshire, England not far from the border with Wales, fine riding country. When I last counted I had owned 14 Guzzis, I think that's the most of any one make I've owned with Triumph in second place and maybe BMW or Ducati or even Laverda in third? I owned a slightly tatty Greenie back in the early noughties when I lived and worked in London and subsequently sold it to a friend back here in Shropshire, so see that bike fairly often now I've moved back here and occasionally work on it. I've sold my second V85 and had a guzzi sized hole in my collection when I saw a Coppa Italia Japanese import a few weeks back on eBay and took the plunge. Never imported over here but always liked the look of them and wanted something a bit more visceral than the V85s and (ha ha) a bit more usable than the 8v Griso I had before them. The Coppa has been standing a loooong time so I will start a seperate thread on that as I think it will be quite a journey with ups and downs along the way!
-
Thanks for all the positive comments, and I'll look into that plasticiser additive, thanks Mick and that grease thanks docc. All of these observations are based on a 20 minute squint and opening up bubble wrapped parts! I did google Moto Corse exhausts and found they still make (very) high end titanium exhausts for modern bikes, but nothing for Guzzis now. Who knows, it may end up as totally unusable/loud/doesn't fit/whatever, but someone paid a fortune for it? There's also a tailbag for what I think is the guzzi alloy rear rack, but no sign of the rack unfortunately. Someone spent a lot on that bike and then let it sit, apparently unprotected from the elements for years. Possibly an older owner who passed away? We'll never know. The dealer sources all the bikes from a trusted agent, and swore blind the engine will be fine as he'd heard it run . There were a couple of exotic Ducatis in the store room and a couple of years ago they sourced and sold a Nero Corsa Lemans (anyone on here?). You can see where we picked off a tiny bit of the film in this picture, apparently the best technique is to gently warm with a heatgun, though I have used wd40 on some very old britbike decals? Anyway, I suspect that will be the least of the challenges ahead! Oh, and there is at least one other Coppa Italia in the UK, tucked away in this gallery (along with a Nero Corsa):- https://pecam.org.uk/community/members-bikes/
-
-
-
-
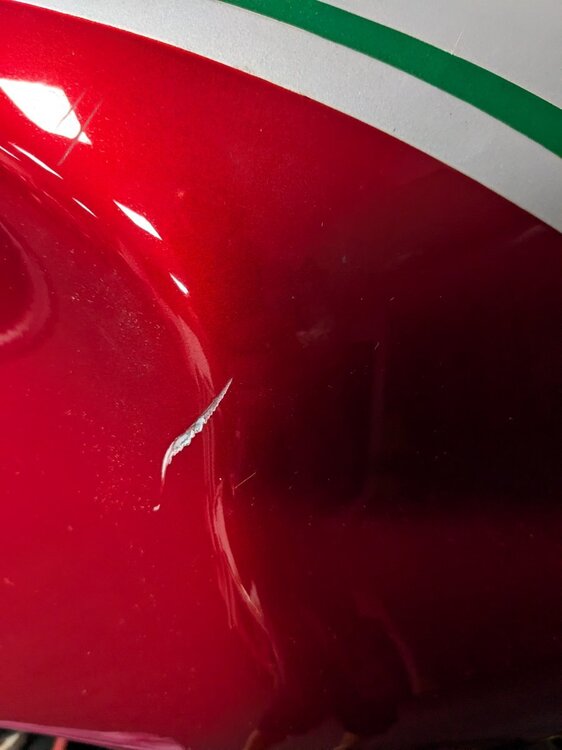
Well let's hope you're right Guzzimoto, I bought it!! I was a member of this forum many moons ago with a "greenie" that I sold to a mate probably 15 years ago? Anyway, I still work on that bike occasionally and , having just sold a V85 I had a guzzi shaped hole in my life. This one is a bit of a punt because, as you say, it's been standing so long. I took a look at it this week and did the deal. It's actually seems to be in pretty good condition under the grime, though the date code on the tyres is 2007!! Also, annoyingly it's picked up a nasty paint scar on the tank not shown in the ebay advert, I suspect it literally happened when they wheeled it out of storage to show me? Such a shame as the paint looks immaculate, I am pretty confident that all the crazing is just in the protective film on the tank top and tail section. We were able to pick a tiny bit off and it looked ok underneath. Otherwise it'll be a major paint job!! Bonus points, it comes with the seat cowl (just as well, TLM have them painted but 250 Eur!) and, get this, a full titanium exhaust system, though not the official guzzi one?? Anyhow, I'm not in a position to pick it up for a week or so, so will start a proper thread on it when that happens. This isn't going to be a quick polish and ride off into the sunset. The oil looked clean on the dipstick (obviously will be changed) and no stale fuel apparent in the tank (though injectors will almost certainly need ultrasonic etc)? One fork seal has dislodged (presumably shrunk due to drying out?) and the rubber bumpstop on the rear shock fell apart like dried out cheese when I touched it! But paint on the engine block is good, as is frame, with just localised corrosion on the rear bevel, odd fastener, battery carrier etc. Shock, pork chops, front forks, instruments (if they're working?) all look good. Even a tool kit under the seat. Footpegs are missing in the advert but come with the bike, look quite nice, not standard, but again, not the guzzi "ergal" ones either. My other major worry is if an engine or gearbox oil seal has dried out and leaking, big job, but no apparent oil leaks anywhere? Anyway, we'll see! Watch this space in next week or two.



.thumb.jpeg.58dab9859cf5ff4c8f748fd3053708df.jpeg)


