Keith Foster
-
Posts
235 -
Joined
-
Last visited
Content Type
Profiles
Forums
Events
Gallery
Community Map
Everything posted by Keith Foster
-
Hey Emerson - I'm on the shore too, in Salisbury, MD. Let me know if you want to arrange a time to check out my Nero. Regards.
-
I am in the process of changing a MPH ITI speedo for a KPH speedo as well as the cable...sound familiar? It looks like I have to take both speedo's apart as the wiring disappears through 2 rubber grommets and into the insides. I guess I have to disassemble the face plate to get them open to access the wiring; quite a pain in the ass! Any tips for changing the speedo's and internal wiring? 04-nero corsa. I recently repaired my 00 sports vaguelia tach, and that was a pain in the ass too. Here we go again, I love these Italian instruments...NOT! Thanks for any advice, and if I am successful, I may have a low mileage MPH speedo for sale. Thanks, Doug. Hey Doug, you don't have to take the individual instrument housings apart to swap them. The wires you mention are for the lights, they pull out of the back of the old housing and plug into the back of the new one. These are mechanical, cable driven speedo's, so there is no wiring that you can/need to access, so that makes it a little less PITA. I too have an '04 Nero Corsa, and I have went through two of the ITI speedo's. The first made it 25K or so and the second only 5-6K if I recall correctly. For the 3rd I ditched the ITI and went to an electronic unit. See Speedo Repair for the way I did it. It wasn't the simplest of jobs, but it's got 5-6 K on it and so far so good. Some folks cut the housing apart and grease up the worm gears to get increased life. I'd suggest trying something like that to improve the lifespan of the replacement. Unlike the Veglia's, no one offers a repair service AFAIK. Good luck Doug!
-
Here is a shot of my Nero and I. I bought it from Speeds Cycles in April of 2004 and I still look at it with lust in the garage, walking out to it at the end of the day leaving work, or any old time. Molto bella!

-
Heads up fellow V11 riders - next weekend (the 27th & 28th of September) is the Italian Moto Fest in Shepherdstown, West Virginia. I plan on going Sunday and hanging out much of the day. The web site for the event is here: Italian Motofest The parking area is as much fun to walk around in and check out bikes as the show grounds There is a lot of nice Euro hardware ridden to the event. Look for a Nero Corsa with Maryland plates and say hello - cheers.
-
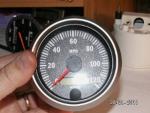
Part 4 - Final Answer: Once the fairing, fuel tank and seat were reinstalled, it was time for the moment of truth - would it all work Powering up the speedo brought the unit to life. Well, that was encouraging. Following the VDO instructions I needed a measured mile, the more exact the better. I rode out to the main highway that has mile markers, using those and the specified button sequence I got the speedo calibrated. Basically you tell the unit when to start the pulse count, you travel 1 mile, it counts the pulses it receives in the 1 mile, then matches the count up to stored data to calibrate itself. Once this is done, it works! And it should be very accurate, based on the State of Maryland mile markers The picture below is the completed installation. It's not a perfect match, but AFAIK it is as close as you can get using stuff that is commericially available. In all in wasn't the easiest thing to do, nor was it that hard either, but I'm happy with the results for what should be a long term fix. Cheers

-
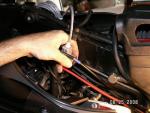
OK Gents, Here is part 3: I got the modified cable back and dug into the reassembly. The modified cable is shown in the pic below, it was kind of pricey I thought at $79.00 for the work, but I am too far along at this point to not go through with it. You can see the silver connector they added for the sending unit to connect to, and they added a female receiver on the shortened inner cable, then a short section of inner cable with the ends formed into a square cross section engages with the female receiver and the other end goes into the sending unit. The cable was 2-3 inches longer than what I would have liked, but I rerouted the cable to use up the extra length. The next picture is the sending unit installation. I hung the sending unit by its cable from a block of plastic I drilled a hole in. The hole diameter was just so that the cable was a snug fit through it, there was plenty of room in that area under the tank. The stud it is fastened to might have held the tip over valve, I'm not sure about that. The rest of the installation was connecting the wiring, making a little cut-out for the cable in the instrument housing, assembling the instrument housing back together. Everything went back together with a bit of finesse and jiggling. I blocked off the opening where the mechanical cable connected to the old speedo with a piece of plastic milk jug cut to fit and JB Welded to the inside of the housing. A spritz of black paint makes it nearly unnoticeable, I figure something was need to keep out bugs and vermin
-
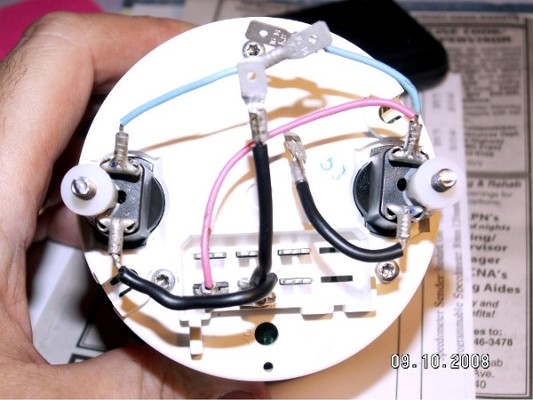
Here is an update on my installation. I should have the modified speedo cable back in a couple of days. In the mean time I decided to move forward with the wiring, trim ring installation and mounting stalks for the instrument housing. The wiring is straightforward, following the supplied schematic from VDO. I'm using the MG speedo light sockets for the switched power supply and ground. This electronic speedo pulls 600 milliamps (500 is for the lights alone if I recall correctly) so this should be OK on this circuit. I worked on the trim ring a little more with the Dremmel, getting the ring to nearly seat completely on the VDO lens trim ring. Then I applied JB Weld to the back side of the trim ring in 3 arcs spaced around the circumfrence and let it all set up. Today I fitted the two mounting stalks, they are the white posts in the pictures. They were made from two 1/2" diameter nylon spacers bought from the local Ace Hardware. I used the Dremmel again (best Christmas present that my brother in law ever gave to me!) to notch them out to get them to be in the same position and height as the stock isolation mounts. Then, I JB Welded them to the bulb holders of the VDO instrument. A popsickle stick with two holes kept them in position while the epoxy set up. A check after epoxy set up showed them aligned just right. You have to give a decent pull for the sockets to come out so I am banking on them being tight enough to hold the housing in place. It doesn't take a lot to hold it in place. Speaking of that, I originally thought I would use the thin plastic threaded sleeve that came with the VDO to secure the speedo to the stock instrument bracket, but the black plastic housing is too close a fit around the instrument, the threaded sleeve won't fit inside the housing, there isn't enough room. I should have Part 3 posted by this weekend.

-
It's the old YMMV thing. Today I mounted a set of Conti Road Attacks. The Pirelli Diablo's I took off had 12K mi. on them. No cord showing, but quite the flat in the middle. Before that the Diablo Stradas had 12.5K mi on them when I swapped them out, worn the same way as I recall. The original Metz's had 9.5K mi. when changed. I'm trying the 170/60 set up, I'm interested to see how it feels. I can say the Conti's sure were a lot stiffer tire than the Pirelli's. Reading the sidewall of the new Conti and take off Pirelli, the Pirelli was a 3 ply construction and the Conti a 6 ply Yes - twice the ply construction - no wonder they felt a lot stiffer, and heavier! It made the mounting of the Conti rear a bear. The front was normal, but the rear was work!
-
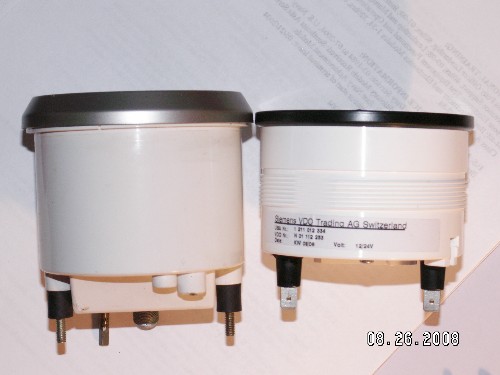
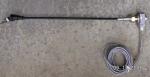
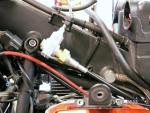
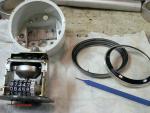
Here is a pic of how I plan to mount the sending unit. I bought an extra speedo cable, contacted Palo Alto Speedometer (Hartmut Mees is the man) and sent the cable and sending unit to them, it is in transit to them as I write this. So, the plan is for them to cut the cable, attach a new end to connect to the sending unit and cut/modify the inner cable accordingly. I hope it works out Hartmut seemed to think it would. Now, for a further "Factory" looking installation, I removed the silver trim ring from the clear lens of the ITT speedo. Using a Dremel tool and a router type bit I carefully cut a larger ID groove for the VDO speedo to nest into, it turned out pretty well I think. I plan to use some JB Weld to secure the trim ring to the black VDO flange. As you can see the back of the VDO is totally different from the ITT. But, I count some things as being much in favor of this swap. 1. The overall depth of the VDO is not longer than the ITT. 2. The two lamp sockets are oriented horizontal to the face (like the ITT and the rubber isolation studs) so I think I can use these as attachment points. With some creative fabrication I have come up with a mounting method I think will work, giving me a way to use the stock instrument housing shell, the same mounting holes and acorn nuts. The VDO gauge has a thin plastic threaded sleeve that provides the clamping force to hold the gauge to the instrument bracket, therefore the housing shell will just need to be held in place, not holding the speedo in place as the stock set up does. I'm taking a break for now until I get back the modified cable from Palo Alto Speeometer. No need to get ahead of myself. I'll update this topic as I progress. Wish me luck!
-
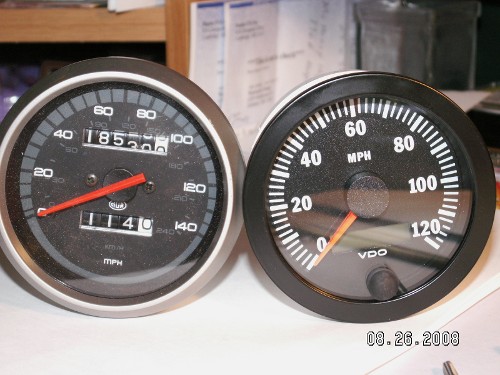
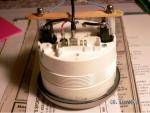
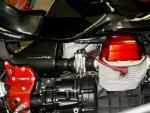
This won't be so much as a post about a repair but on a replacement. After looking at the posts by others in this group and on the wildguzzi forum I decided to not replace my 2nd failed speedometer (really it is the odometer function that frequently fails) with another OEM unit. What I am using is an electronic speedometer from VDO. I bought it from egauges.com, the Vision series, 3 1/8" diameter. This is the same diameter as the stock ITT gauge. As you can see in the pictures it is close to stock looking. The price for this unit is $115.60, PN 437-151. With this you will also need a pick up sensor of some sort. Other have used electronic bicycle speedometer sensors or other inductive sensors. I chose a Hall Effect sensor, also sold on egauges.com for $59.75, PN 340-011. It was different looking than what they showed on the web site, but I plan to hide it under the tank so that didn't matter too much to me. $10.55 for shipping and I'm at $185.90 so far. In the pictures below, the MG speedo is on the left, the VDO is on the right. I'll continue with another post after this one. Cheers.

-
Here's another one here...
-
The original thread is here: Exhaust Shims I bought a set and still have them in, going on 2 or 3 years now. There is a small spot of exhaust residue where the shims split, but the cross over has stayed tight all along. I recall another run of the shims was made, a search of the topics will turn up the latest.
-
His spot is located here: GuzziTech Website Scroll down, the info is on the right. You can get all the info there. Let us know how it works out.
-
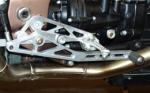
I have seen these forward controls in the MGNOC news letter, I can't vouch for anything about them. But they can be seen here: Motratech.com The ad says they move the feet 5.5" forward, contact is John@ 973-459-9417, the ad says the price is $450.00. YMMV

-
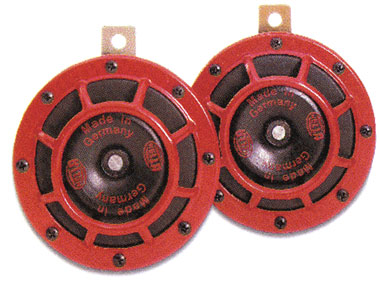
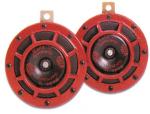
FalcoLion, I've had the same idea too. I've seen this set of horns in Griots Garage catalog for a while now and thought they would look good on the Nero. They are also available here ($65.00), along with specs, etc: Hella horn These draw 6 amps per the specs. The stock horns are 3" in diameter, these are nearly 4 7/8", so mounting them in the stock location probably would not happen. Maybe drawing half the amps a relay could be avoided.
-
Total miles on your V11: 30,300 miles and counting. Years you have ridden it: 4 years, couple of months. Miles on the clock when you acquired it: Bought it new, so like 3 or something. Major rebuilds/repairs and approximate: Nothing major, Bad ECU, replaced under warranty 1st month. Have had the odometer on two speedos go bad, have a 3rd ready to install this summer. Then just normal consumables. Ride more!
-

"Anodized" Red 2002+ Sideplate Touch-Up Paint
Keith Foster replied to al_roethlisberger's topic in Technical Topics
After a year or so of looking at the off color valve covers, a weeping valve cover gasket prompted me to try Al's suggested paint. My local Autozone had it on the shelf. I scuffed up the original paint a bit, preheated the parts a bit in the oven and sprayed away. They turned out pretty nice. In direct sunlight the brake side pork chop is a bit lighter. On the shift lever side, in shade, man they look the same. I'm happy! Thanks Al! Here a b/4 and after shot.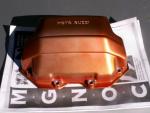
-
I was just looking at www.oppracing.com. They have Aprilia carbon front fenders for $185.00
-
Remember too guys, Aaron is the guy who came up with and had produced the cross over shims. Hey Aaron, will you willing be able to do a run of shims in the future if there is enough demand? I understand the family thing - for me I am of the same mind as Garsdad, with 2 girls (8+5). The riding in my neck of the woods has a lower risk potential than DC/Balto. so I understand and respect your choice. Best of luck.
-
Italian Moto-Fest - Sunday 30 Sep 07
Keith Foster replied to orangeokie's topic in Meetings, Clubs & Events
Bummer Okie, it was perfect weather and a good little gathering. Mostly Ducati of all sorts were on hand. I'd say there were 8-10 Guzzi's there. A Norge, a Breva, a 99 LeMans, mine, an SP, a California, some others I don't recall specifically. I was suprised how many Aprilias showed up, more than I have seen in one place for a while. Sign me up for next year. What thread did you see my bike? I scanned pages from the link but came up empty. -
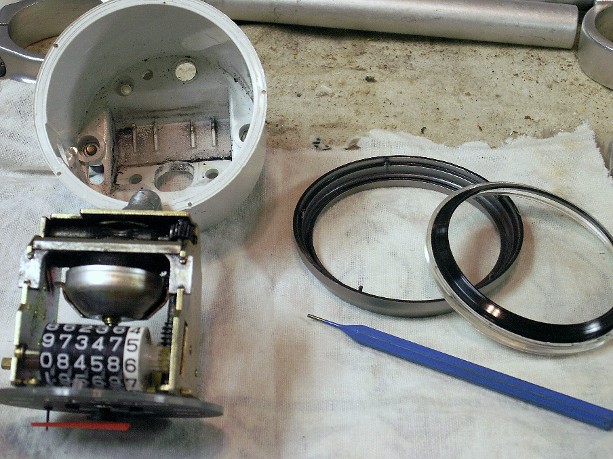
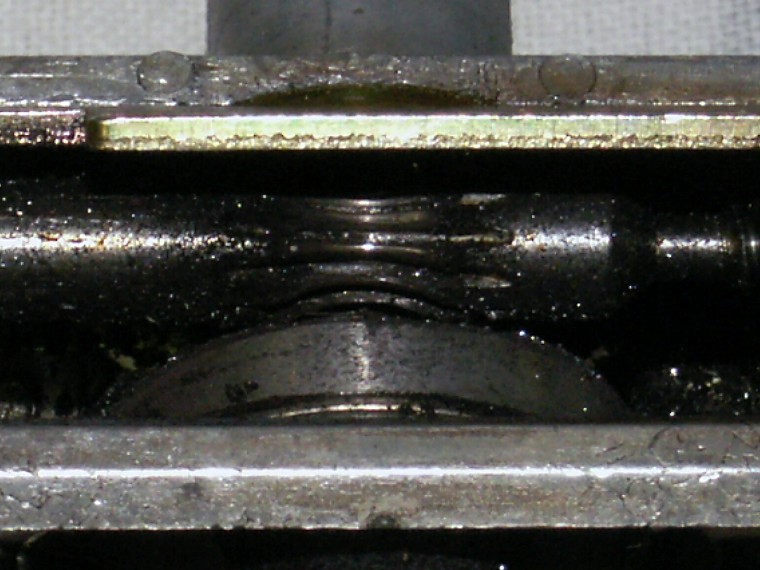
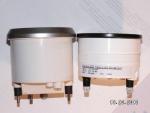
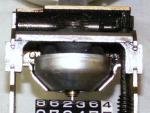
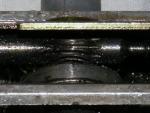
Well I'm reserecting an old topic. Being that the 2nd speedo I installed last November started showing signs of the odometer function quiting (like the original one did) I decided to crack open the original one tonight and have a look. But before all that, a rant - the original odo function made it to 20K miles. One would hope the 2nd one would do something similar? NOT! - at 6850 mi. the odo function (today) starts packing it in - sheesh! Anyway for you viewing pleasue I have some pics of the guts of the beast. There is quite a bit of crud scattered about the interior of the housing. Testament to the gnashing of gears that had been going on. The one close up one can see how much of the driven gear (driven by the worm gear from the speedo cable) for the ODO function has been eaten away. At this point I can turn this driven gear (sorry but I don't know the proper name) freely with a pick, it doesn't engage with the worm gear any longer. So, next? I'm going to disassemble and get the driven gear out. But then what? I had thought I would try to build it back up. But with what? JB Weld? How would I recut the gear profiles? Any suggestions out there? A close up of the parts. And a closer close up.
-
Italian Moto-Fest - Sunday 30 Sep 07
Keith Foster replied to orangeokie's topic in Meetings, Clubs & Events
Okie - it looks like I will be making the event - hope to see you there. -
Italian Moto-Fest - Sunday 30 Sep 07
Keith Foster replied to orangeokie's topic in Meetings, Clubs & Events
Would love to make it but I have a family committment that weekend. Dang, it's the 3rd year I've missed it. Have fun Okie! hoppefully the weather will be good -
Odometer/Trip Odometer malfunctioning...
Keith Foster replied to rocker59's topic in Technical Topics
It sound like your odometer function is giving up, a similar thing happend to mine in the fall, then it quit all together. There is a thread here about it. Short version - prepare to buy a new speedo unit if you want that feature. -
You, him and me make 3. I think there is one or two others (Nero's) in the V11 LeMans group. Maybe we should be the ones starting a registry instead of those Tenni guys!