

Ryland3210
-
Posts
1,033 -
Joined
-
Last visited
-
Days Won
1
Content Type
Profiles
Forums
Events
Gallery
Community Map
Everything posted by Ryland3210
-
From the album: My Cafe Sport
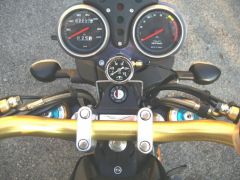
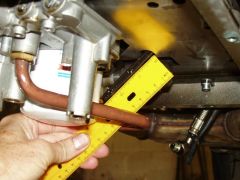
The gauge mounts to a manifold, which in turn uses two orginal screw locations for a bolt-on installation.© © 2007
-
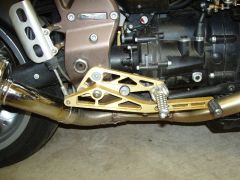
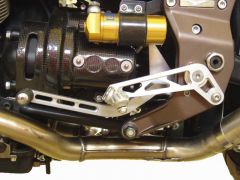
Hi Al, that would almost be me! I'm 5'9" with 31 inseam. Keep in mind that the feet are moved forward 5.5 inches, and down to the same level as the Centauro controls. Keep in mind that the orientation of your legs relative to your hips is governed by the foot position, but that does not affect the orientation of your upper body to the grips. That depends on your butt position, not your foot position. However, the forward foot position not only unbends the knees, but the fact that more of your weight is transferred to your feet farther forward takes pressure off your hands. It creates a rotational torque of your whole body about your hips away from the bars. At the same time, because the feet are pressing on the pegs down more vertically, instead of backwards, is the reason why it makes it easier to position your butt wherever you prefer, instead of tending to push the crotch into the tank, especially when braking, as Darius pointed out. Moving the feet forward also makes the feet closer to horizontal instead of the toes pointing down as much as they do with the original. That keeps the ground clearance to the toes about the same or higher than original for carving those twisty corners. Control levers also preserve the original leverage ratio. Hope this explanation helps understand how it all works so well. I originally bought a set of Centauro brackets and levers, and found it was slightly better, but I wasn't satisfied. I did several months of ergonomic study and engineering prototyping to arrive at the particular dimensions of the brackets to not only work for me and you, but taller riders as well. I originally did it only to try to regain the comfort I had enjoyed with my Norton, because I plan on riding the Guzzi into the sunset, if you know what I mean. I'm happy it's worked out for many others. Best, John
-
Have a look at this installation, Al: http://www.v11lemans.com/forums/index.php?...=si&img=476 Here is the adapter fitting that replaces the banjo bolt. The original pressure switch is untouched. And the gauge mount for Cafe sports, Ballabio, etc.: Here's the profile view of the manifold adapter and mount for the gauge:
-
From the album: My Cafe Sport
Later on, I had them gold anodized to match the Ohlins. They came out great!© © 2007
-

-
Here is a link to show how it mounts on the LeMans style bikes: And here is one for the Cafe Sport style bikes :
-
Kits for relocating the footpegs and control levers are available from the following proven sources: www.motratech.com PM to Ryland3210 for details www.motointernational.com PM to Greg Field for details Rossopuro also makes a footpeg relocation kit, for those that want to go back and up. http://www.rossopuroitalia.it/index.asp?Pr...d_PrdType_ID=12 Centauro and Buell pegs will lower the pegs a little, but they don't relocate the controls.
-
In addition to forward foot controls, one creative rider reversed the throttle and clutch clip-ons and added risers to move his hands back for less pressure on the hands and wrists.
-
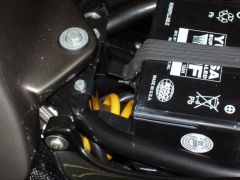
It fits most models. but there are some, including my '04 Cafe Sport, in which the seat's plastic base transfers the riders weight to the battery. The metal jacket option may protect the battery, but I posted pictures in my album showing how to modify the battery bracket and seat to eliminate the problem. The Yuasa equivalent has almost exactly the same dimensions, and also has the interference issue. If you haven't already, search this forum for charging methods. They are different for the Odyssey than from other batteries. John
-
-Dipstick Calibration. -Battery Bracket Mod to prevent seat interference with Battery on some models, including Cafe Sport
-
-

From the album: Tech Info.
This shows how the Motratech MGP-G10 oil pressure gauge mounts on the LeMans. A single screw is sufficient to hold the adapter manifold fast. A thin rubber gasket is used under it to prevent rotation. Karl's bike, shown here, also has the throttle and clutch handle bar brackets reversed to make the riding position more comfortable. Risers are used to prevent interference with the tank. Also, without the anti-rotating screw there, one can rotate the bar to suite the feel on the hand. This added comfort to his hand and wrist. Purists may prefer the original forward leaning position. To each, his own. The gauge will mount the same way with the original bar positions. -
There are aftermarket foot control sets to relocate the footpegs and levers to various positions. Motratech ( www.motratech.com ), and Moto International (Greg Field) both supply retrofit kits.
-
Original, with MGC-SB10 Foot forward controls and tank bag
Ryland3210 posted a gallery image in Modifications
-
Seat modification to eliminate battery interference
Ryland3210 posted a gallery image in Modifications
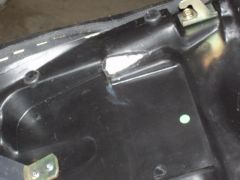
From the album: Tech Info.
The triangular white area shows where I carved a notch into the seat base to prevent it from transferring my weight onto the battery. Afterwards, I patched it up with black silicon rubber for appearance.© © 2007
-
From the album: Tech Info.
The seat on my '04 Cafe Sport rested on the battery. After a short period of riding (I bought the bike new, and it came with a new battery. I only had the bike one week before my weight on the seat (I weigh 145 lbs, no kg's!) caused the battery to leak. The picture shows how I bent the battery bracket to lower the battery about 20 mm. I also had to use a Dremel tool to carve out a bump in the seat's plastic base, which I then filled with black silicon rubber for good appearance.© © 2007
-
From the album: Tech Info.
This shows the dipstick installed fully screwed in. The Roper Plate shows where the gasket level is for reference. Filling with 3.5 liters of oil, as specified by the manual and new filter brings the level to .69 inches above the dipstick full mark. In my opinion, that should be the full level without the Roper Plate. My oil pressure gauge test showed that without the Roper Plate, even with 4 quarts, the pump starves under maximum acceleration in first gear from a rolling start. With the Roper Plate, refilling with 4-1/2 US quarts is still safely below the plate, and no oil starvation occurs even with 4 quarts. Long, hard accelerations up steep hills and/or wheelies, may still cause starvation. I have not done these tests.© © 2007
-
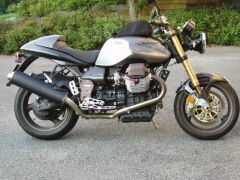
From the album: My Cafe Sport
© © 2007
-
Oil Filters, Installation and Tightening FAQ
Ryland3210 replied to al_roethlisberger's topic in Frequently Asked Questions
UPDATE March 26, 2008 Further analysis showed that the UFI and Purolator filters use gasket material of the same durometer-no difference there. However, the dimensions of the UFI filter's gasket groove prevent tightening it until the can bottoms out, because the gasket extrudes outside the groove before that happens. The Purolator design permits the gasket to be compressed for more turns than the UFI, and the can will bottom out before the gasket extrudes. This permits the gasket to act like a longer spring, so that the prevailing friction of the gasket against the flange decreases less if the filter tends to loosen. Since the gasket does not extrude, exceeding the compressive yield strength is prevented, so the gasket has a better chance of staying elastic. Other filters which will fit are: Fram PH6022 stock replacement around $5-6 at Advance Auto, no specs provided by mfr. Champion (Wally World) ST3614, used by some Guzzisti's, no specs provided by mfr. I have not inspected the Fram filters, so no comment. The Champion's gasket design is midway between the UFI and Purolator designs. I have no comment on the media. -
"Vapor Lock" and "Tank Suck" FAQ
Ryland3210 replied to al_roethlisberger's topic in Frequently Asked Questions
UPDATE March 25, 2008: The tipover valve must to be oriented vertically, but also right side up. If upside down, even if vertical, it will not prevent the vacuum from forming in the tank. For pictures of the layout, see the following post: http://www.v11lemans.com/forums/index.php?...st&p=132990 FAQ Administrative Contact: ---------------------------------- Please feel free to contact this FAQ's administrator via Forum Private Message to submit new information or suggest corrections. Ryland3210 -
The hose is also intended to deal with a reasonable amount of flexing. The fittings supplied for both ends are not the ordinary type one finds at the plumbing or automotive supply stores. They are of a special design intended for high vibration hydraulic and pneumatic machinery applications. As long as the bend radius along the hose is not too tight, and it is not severely flexed at the fitting, it should be fine to mount it on the steering head. It might be possible to make up a simple sheet aluminium bracket to mount it to the control lever brackets. Of course, there is nothing wrong with fairing mount, but the motion of the speedo, clutch, and electrical cables will still be moving relative to the fairing, so do consider that in routing the hose, and make sure it is long enough. There are many grades of nylon hose, the one supplied is rated for high pressure (which also gives it the vibration tolerance, and high temperature. Use only the hose supplied. If it is too short to go to where you want to mount the gauge, let me know. Cheers, John
-
Search "pressure gauge adapted" for the detailed background. Pics and description can be seen on www.motratech.com If you have any questions, send me a PM or email. Cheers, John
-
Hi Nige, Yes, thanks. Every little bit helps. I do have an inquiry for 50 from France, so if volume builds a little, that will be great. They were shipped out on the 24th, along with the pressure gauge kit. I've sent you an email with tracking information. It is due in the U.K. in a day or two. However, UK customs may delay things a bit. The hose I supply is rated at several hundred psi, and yet is only 1/8", so it can take a lot of flexing, and is a hard nylon, so it is pretty hard to damage. If you are concerned about it getting pinched, use a length of 3/8 OD automotive vacuum hose about 12 inches long to run the gauge hose through. This is covered in more detail in the instructions. If you want to use only one of the two screw locations on the adapter, one of the two stainless screws I supplied is certainly strong enough. I believe that's how it's been done before. Cheers, John
-
I'm back! One more detail. There has been some question in the past about possible interference with the seat because the dimensions of the GEI's and Omrons are different from the Siemens. However, I've check the height of the Tycos supplied by Guzzi on my bike, and they are the same height as the Omrons I supply, thus, I do not believe the Omrons will create any interference. John
-
Yes, you can run a mix. The Tyco's have the arc suppression resistor in them like the Omrons and GEI's. My research and inspection indicates the Omrons will have better reliability and lower voltage drop across the contacts than other brands. I'm traveling for the next week, so I'm sorry I won't be able to help any further until I return. Cheers, John
-
Hey Mate, Your self deprecating comments are totally unfair! They leave no room for sarcastic personal attacks! Then again, maybe I'm just not creative enough and will be proven wrong!