-
Posts
19,424 -
Joined
-
Last visited
-
Days Won
1,086
Content Type
Profiles
Forums
Events
Gallery
Community Map
Everything posted by docc
-
That, right there, is the most hen's teeth ever seen in one spot at one time . . .
-
Trying to follow my own advice, and add new things learned: rear bearings and brake
-
So, the SKF are in, brakepads and fluid, but no way could I get the original rotor off with my ill-fitting, cheap Craftsman hex drive (even with heat and an impact tool). Stopped before I destroyed the fastener and installed the much more aggressive looking Brembo "Carbon Ceramic" pads (07BB0106) that came from MGCycle as OEM. They have blue backing plates if that means anything? [edit/ July 22, 2023: More on this at the Brembo brake pads thread. I learned a couple things to share, partly because of the Sport's service life but mostly because of my "last technician" (me ): 1) I miscalculated the mileage on the Chinese bearings because of my speedometer change. The brake side bearing went 20,000 miles/ 32.250 km. Half what the OEM lasted. 2) Having consistently neglected cleaning where the bearings install in the wheel or greasing that surface, the bearings were very hard to remove. I have now diligently polished those surfaces, cleaned, and used a thin layer of BelRay Waterproof grease, then the "freeze/heat method" to install the new SKF. 3) I remember some of the spacers in the early V11 were undersized leading to premature bearing failures. My original spacer is 112mm, just for reference. [EDIT/ critical length looks to be 113mm!] 4) Anytime your rear wheel is off, do not neglect to clean and liberally grease the needle cage on the right side between the swingarm and the rear drive. Grease also the race that sits within the needle cage and rotate them to new positions. Grease under the washer that should be between the swingarm and this cage/race. I say "should be" because my Sport was delivered without it. Failure to seal that critical area destroyed the sealing surface on the crownwheel nose of another reardrive I have. Again, much of this is in the Wheels Off Maintenance Checklist. I'm thinking a lot of V11 are approaching the point in their service life that these things should be seen to routinely . . .
-

DNA Tests - I'm a Neanderthal
docc replied to Scud's topic in Special place for banter and conversation
It seems entirely plausible the Neanderthal gene may be over represented in the Moto Guzzi population . . . -
Yeah, mon. My two rears are same (6204/ 20mmx47mmx14mm), and the two fronts are 52s and different from one another on the early Sport. Later V11 fronts are probably different than mine. Just seems like such a good idea to have quality spares on hand for that next tire change.
-
Yeah, so, post the make/model/ and date code of the battery. Also, the make and type of relays. New battery will require "conditioning" before installation . . . Probably some simple, easy things to try before spending another X.XXX$CN !
-
Gots a good voltmeter, Stu? We can do some checks on that battery. What make/model/age is the battery?
-
Looks like the (delayed) Koyo bearings will go in the spares pile while I fit a pair of SKF from Argentina. New Brembo pads, new MG rear rotor and fasteners, bleed the system, and free the pistons. Going to grease the fit of the bearings to the hubs as the rust and corrosion made the last ones a bugger to remove. . . . + a fresh (expensive) Pirelli Angel GT (now "Made in China" )
-
Look at your first image. There are fasteners aft-to-fore holding the intake tract. On the outboard side near the head, facing outward, is a hex that plugs the vacuum tap. It (and the right) should be tight, but do not over-tighten! Looks like the Sacred Yellow Glob is still on your white synchronization knob, so must agree with Rox Lemans: time for synchronization. "Decent Tune-up" may be a good starting point . . .
-
"Held!" . . . I always knew footgoose to be a classy guy!
-
Agreed that cracks don't usually go through, but that looks separated. While it's idling, spray some carb cleaner or other solvent on the boot. If the idle changes the split goes through. A good tune-up and synch is always excellent method, but even if it coughs, it shouldn't cough on your leg. (Might also check that the vacuum tap plug is not loose.)
-
Aerostich Roadcrafter one piece, grey/ Alpinestar boots/ Shoei Neotec (Olympia one piece ventilated for summer)
-
So, if buying the RAM unit for a V11, select the "NON FLYWHEEL SENSOR" version? Or is there an additional "kit" to source?
-
There is so much electro-spaghetti throughout the V11, it isn't obvious looking at it on the bike, but look at the parts "fiche" and the two are clearly separate: Page 10: "Electrical System" Page 38: "Ignition Electrical System" From having been fairly deep into these harnesses, it looks to me that the "Ignition" harness was installed on the production line early and the more extensive "Rest of the Wiring" harness installed over it.
-
I was thinking Flywheel sensors are pre-V11? You're saying the RAM flywheel (for the 5speed) has to be modified for the V11?
-
So, there are two RAM "conversions" at hand: 1) V11 single plate/aluminum flywheel (Scura/Tenni/Rosso Mandello) ----> RAM "5speed" clutch/flywheel unit using the existing V11 6speed single plate input hub ? 2) V11 twin plate/ steel flywheel (all other V11/ all years) ----> RAM "5speed" clutch/flywheel unit using a sourced V11 single plate input hub (or, perhaps, a modified twin plate input hub)? (Leaving the pushrod/ push button adaptation alone for this post and only focusing on the hub.)
-
Be aware that the V11 has two completely distinct wring harnesses. One for the spark ignition, fuel injection, fuel pump, and ECU. The other (more complex one) for everything else (lighting, horns, safety lock-out systems to the run switch and for the clutch switch, charging (such as it is! ), and starting). It seems to me the less reliable of the two is the latter.
-
Those look great for clamps (which are hard to apply with the the factory set-up.) It is always cramped to get a tool onto the terminal fasteners, but I'm thinking yours are hex drive and a 90º hex key slips into the space? Still, a flash of old inner tube over the grounded corner of the ECU seems an easy precaution to an unintended short to critical electronics . . .
-
I would be inclined to say, "Yes, too soon" for a modification until the culprit(s) can be apprehended. Then the LuckyPhil/Chook-made shift extender would be icing on the cake! I should have mentioned to remove the pivot bolt (after taking off the lock nut on the inboard side) and wire brush the rust from it and give a good coat of waterproof grease. I have also used a "bottle" or bore brush to clean out where the pivot bolt goes through. Finally, many have discovered improved shifting changing to a lube like RedLine Shockproof®. We have seen some great outcomes with shift issues never going inside the gearbox or even pulling the shift plate.
-
I ran across this post on the recall from 2004 with a helpful image: https://www.v11lemans.com/forums/index.php?/topic/1916-v11-recall/&do=findComment&comment=17900
- 39 replies
-
- 1
-

-
- rosso mandello
- v11
-
(and 2 more)
Tagged with:
-

Gratuitous Pics of Girls + Guzzi
docc replied to sign216's topic in Special place for banter and conversation
-
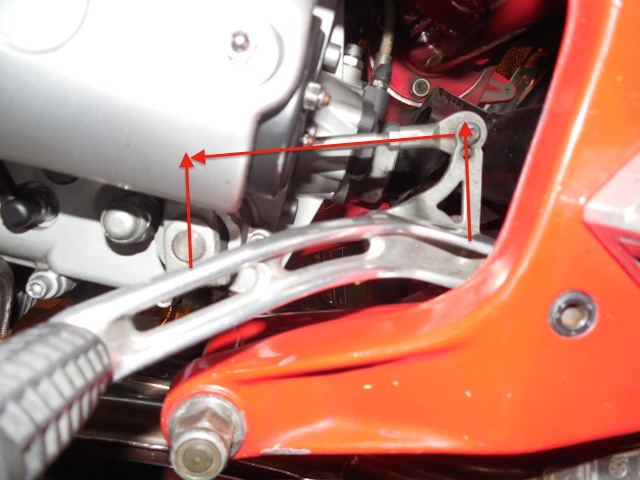
Hi, Bigwig! You've come to the right place to get the most out of your wonderful V11! The shifter is a real Rube Goldberg affair that dos take patience and proper fettling. Be sure the the connecting rod is adjusted to align the arms of the gearbox and the shfter parallel and all the fasteners are tight. Use the top hole in the shifter arm. See that the shifter does not strike the frame sideplate on the down stroke. Also, the pivot bolt should be set where the is smooth rotation of the shifter, but no slop. There is a lock nut on the inboard of the subframe where the pivot bolt screws in. Mine is loose enough that I shim it with a thin washer.
-
While you're in there, see to those numerous leak points (are there eight? ), and be sure to stake that input hub with a fresh "safety washer." After I rebuilt my clutch, I got to squeeze the lever on footgoose's RAM. So sweet, light, and buttery!
-
Another craigsinclair post with a link to images of the pushrod and button: https://www.v11lemans.com/forums/index.php?/topic/19621-shifting-woes/&do=findComment&comment=215047https://www.v11lemans.com/forums/index.php?/topic/19621-shifting-woes/&do=findComment&comment=215047https://www.v11lemans.com/forums/index.php?/topic/19621-shifting-woes/&do=findComment&comment=215047
-
Alright, here we go. Check out this thread by craigsinclair. That is linked in the RAM conversion discussion in the thread "Sticking Clutch." The discussion is on pages 2-4 and the link is to a post by footgoose with some actual dimensions.


