al_roethlisberger
-
Posts
4,482 -
Joined
-
Last visited
-
Days Won
21
Content Type
Profiles
Forums
Events
Gallery
Community Map
Everything posted by al_roethlisberger
-
The ECU with the MG Ti cans is exactly the same as the regular M15 ECU, just with a new fuel/air map, and perhaps a different ignition curve(but not sure about that). So yes, it can be remapped. Many MG dealers can certainly tweak the fuel/air map when using the tuning software, and a gas analyzer, but unless they also have a dyno and a lot of experience tuning these bikes and twiddling with the map/ECU.... results can vary. It seems that in Europe, there is more expertise in tuning the Marelli ECU, but not so much here in North America. There however is a plethora of Certified Dynojet Tuning Centers in the USA, and they in combination with a PCIIIusb(the PCII and PCIII are no longer available AFAIK) can get excellent results. It's really just a case of using the best tool available, depending on where you live, and what expertise your shop has All in all, most have had great results with the Power Commander. If I had the Ti kit in North America, I'd leave the map on the ECU alone, and fit a PCIIIusb for tweaking the map further. Plus, another advantage is that you can fiddle with the map yourself with your PC. You cannot easily do the same with the ECU. al
-
Not that I've heard of... While a few people have complained of this, for the most part I've rarely heard of it happening or causing damage. So, as far as I've heard, no warrantee claims have been made in relation to the breather. There are quite a few comments though on your first thread on the subject, including links to my inner fender modification which seems to be a simple and effective solution. Other "big unit" Breather Thread Inner Fender Modification
-
They are neat looking for sure .....but they apparently do some odd and potentially undesireable things to the power curve, and unless they've been updated, suffered from cracking at the welds Something to check into before buying al
-
Many shops sell Leo Vince, and online..... A quick search for "Leo Vince exhaust USA" turned up quite few hits, but I've heard good things about these folks: http://www.ema-usa.com/exhaust/exhaust.shtml Leo Vince isn't their primary "line" it seems, but they list them as available. al
-
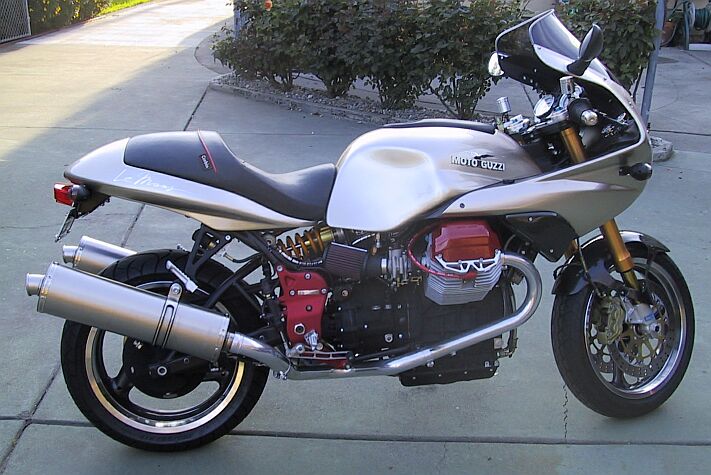
I love my Leo Vince Ti pipes.... about $800 ...although I don't know if they are the "fastest"
-

SF Bay Area Guzzi Dinners
al_roethlisberger replied to al_roethlisberger's topic in Meetings, Clubs & Events
Next one -
Whoo Hoo.... SUCCESS!! I don't know what changed, but I pulled on the hose, and pushed on gray collar toward the hose(again)... and off they both popped with no drama I think that maybe because I soaked them with WD-40 last night, then let them sit all day... that might have helped. Maybe they were just frozen on a bit after sitting for so long with no fuel on them, etc... Anyway, they work like a charm, awesome... no more hose clamps al What worked:
-
Unfortunately as mentioned buried somewhere in past threads, pumping it over won't work ....the problem is that as soon as you "slosh", pump, siphon, whatever.... the fuel from the right to left side, it's drawn into the EFI loop through the petcock, and almost instantly recirculated back into the right side through the pressure-regulator. You'd be surprised how much fuel flows back through that thing The injectors actually use very little fuel, and most of the fuel pumped by the pump actually comes right back into the tank. So, that's why I jokingly refer to "continued sloshing" to get to that last gallon-ish of fuel.... as one big "slosh" won't keep it over there for long. But what I do think might work, and would be potentially easier... is the "tube" modification suggestion that has been made by a few... and mentioned above in this thread. I think that based on the work you've done on your bike, that this modification(if possible) is definitely within your skill-set. Although untested, I think it could work, and even though it doesn't automatically make the "trapped" fuel in the right side move over to the left, it does address the repeated sloshing required once you slosh it over once(or however you get it over there) by at least not continuously recirculating the fuel right back to where you started, in the right side. I think this is another alternative mod that someone should attempt. It's certainly much simpler than mine. In theory it should be easy to affix, solder, thread... something... a copper or aluminum fuel line to the top of the pressure regulator to squirt the fuel over on the left side, instead of always refilling the right. If no one is interested in trying, I suppose I could give it a try, as I have the stock pressure-regulator just sitting around. But I wouldn't be able to do any long-term testing, as I'm pretty sure I'll be converting to the 2003 tank permanently... it's just such a more clean solution I'm pretty excited to get rid of even MORE plumbing, hoses, pumps, and filters from under the tank! al
-
Throttle Position Sensor - tells the ECU where the butterflies are in relation to their extremes(open/closed), so the ECU can then deliver the proper amount of fuel. al
-
Well, my most recent tank went to almost 140 miles, and still no light..... I won't know for sure when it would have lit though, as I'll be doing the 2003 tank retrofit soon. al
-
Well, certainly filling the right side of a pre-2003 tank with some other material than fuel such as marbles would "solve" the wasted fuel problem per se, but personally I'd rather have the fuel there, even if it's difficult to get to via the oft mentioned sloshing method.... much less more available via modifications as I've shown in other thread. After all, the term "wasted" is used loosely here, as you can get to a good portion of it, just not as automatic and smoothly as one might like .... so I'd rather have the "insurance" Regarding the filling question, one would have to use something like marbles though that would let fuel percolate up through them, or re-engineer the fuel return to have a taller inlet internal to the tank, as currently it's flush with the bottom of the right side of the tank. Ergo, filling the right side with some solid material without doing so would plug up the return Which BTW, on that note, it has been mentioned that it could be possible to fit a bent tube to the top of the fuel-return/pressure-regulator that would squirt the returned fuel back over the hump to the left side of the tank. This would work. One would still have "trapped" fuel in the right side of the tank once the fuel level fell below the middle hump, but once "sloshed" over, it would mostly stay on the left side, which is where you want it. This would be a potentially easy modification, although I've not seen anyone do so. But back to filling the right side with some solid material, unless one used some sort of lightweight "foam"(that BTW, was fuel resistant, and wouldn't act as a sponge), I don't think there would be any weight or performance gain by replacing the "wasted" fuel with some other material. Marbles would work to some degree though, I just wouldn't see the benefit. Plus I don't know what they would do the inside of the plastic tank over time, combined with vibration, and any debris(read: abrasives) that get into the tank over time al
-
Good question! First, check the following threads for more info than you were probably interested in Wasted Fuel Thread Relocating Fuel Pump Thread Retrofitting 2003 Tank Thread But basically, first, all the 2002 and earlier bikes use an external Weber fuel pump, same make/model(AFAIK) found in one of three locations, on top of the spine where some have the fuel filter, slung under the spine on the left(where some have the filter), or out in front of the engine subframe above the voltage regulator(best location). All of these locations except the "out front" spot, seem to be vulnerable to heat soak and vapor lock. A forum search for "vapor" in the title of threads, or checking out the FAQ section and the VL FAQ provides more info as well: Vapor Lock and Tank Suck FAQ But to answer your question directly... "it depends" I found that the total capacity of the 2002 and earlier tank is about 5.5 gallons +/- .2 gallon(US). Typically about 1 gallon or a bit more is "trapped" at it's maximum on the right side of a 2002 tank, while the left side(that draws fuel) can be empty. Sloshing the fuel over is only a temporary fix, but will get you down the road..... just keep sloshing So, "conceivably", when the low fuel light comes on, you could have anywhere from 1 to 2 gallons(probably somewhere in-between) actually remaining. Given that on average, most people report 120 miles on the odometer when the light comes on full-bright, and estimating MPG at ~30... .well that seems about right, 4 gallons consumed, and 1.5-ish left "1.5ish" that in reality you probably have ~.5 gallon of unencumbered smooth and level riding left(about 15 miles), and less than ~1 gallon of regularly sloshing and jerking the bike to the left whilst riding to get the fuel over to the petcock... and you to a filling station. I suspect that on average, you probably have a good 20 to 30 miles on this "reserve" once the light comes on, and that's honestly not too bad. But test your own bike by filling it up after the light comes on full bright, and note the volume... and subtract from the more conservative 5.5 gallon total capacity figure. That should answer your question in regard to your bike specifically, as we've found some people's bikes have a less forgiving fuel level sensor, and they're not all calibrated alike Hope that helps! al
-
hee hee... "Nature's Way" Oh man
-
Hey, yeah I see where you're coming from But seriously, calling either side of the tanks "saddle bags" I think helps mentally illustrate the construction of the V11 tank for those who haven't looked at it closely.... or ever. In execution, it's sides are much like any "old school" tank that straddles a spine frame, where there are two, well.... "saddle bags" that either need two petcocks, or a balance tube in order for the engine to get to all the fuel. Also, it's true that the internal pump module takes up space, and although I didn't end up with time last night to test fit the 2003 tank as planned(I was installing a hitch on our new multiple child carrier Honda Pilot ) .... even though the outside dimensions look to be similar, I do know a little volume was added by elimination of the tank "pad", and with the widening(inboard) of the tank on the right underside where the module goes. I suspect these minor changes regained most of the volume in comparison with the old tank I'll be testing volume in the next day or three as well, and report... so we'll know for sure I still can't get those @&^@#*®@! disconnects to snap off though al
-
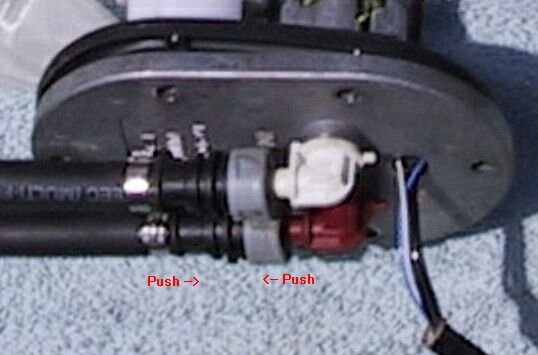
Thanks Frank ..... but, I went out and fiddled with the QD connectors, and no amount of wiggling, squeezing, pushing, etc... could get them to budge I even went so far as getting two pair of needle nosed pliers to gently squeeze the gray collar and black fitting together towards eachother with a bit more force, and evenly.... again with no result I stopped short of squeezing "too hard" and breaking them, but am still puzzled as to why they seem so difficult to remove. I can't imagine trying to remove them while up under the tank, versus my wrenching on them in my lap However, it seems that some folks are able to get this quick disconnects off by hand, so I don't know if mine are just being difficult, or if I'm doing something wrong If I can't get them off easily consistently, I guess I'll just put a regular worm clamps on the plastic barb..... ....odd Anyone have any other ideas regarding these fittings?? al Illustrated below is the direction I am pressing/pushing, is this correct?

-
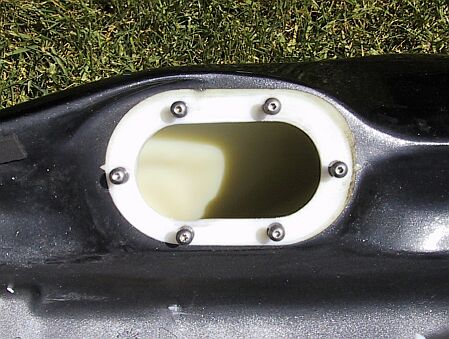
And here is a photo of the metal spacer/neck that goes under all 2002 and earlier caps, to lift the cap above the tank pad, and that the cap actually locks into. This spacer is no longer present on the 2003 tanks, and I have already tested and found that the 2002 and 2003 caps themselves are interchangeable
-
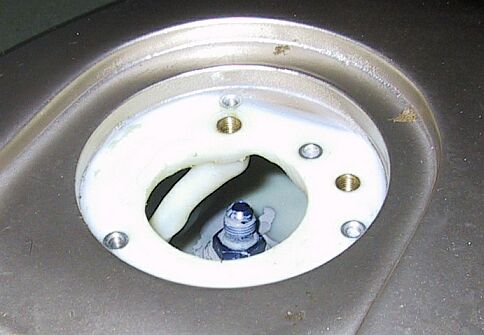
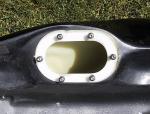
Here is a photo of the 2002 neck(disregard the modified fuel return fitting seen through the hole ) with the cap and metal spacer removed. Note how much larger the access hole is:
-
Whew .....yeah, that might be a bit too complex a solution for what could probably just be solved with a length of hose and two fittings Plus, although it's easier to get into the 2003+ tanks through the pump module hole, it's still nigh impossible to work inside the tank through the neck... based on my experience. BTW, one notable difference with this particular 2003 tank, is the cap/filler/neck area. Where on my 2002 tank, once the cap and black pot-metal mounting ring is removed, there is a relatively large hole(maybe 3 inches across), on the 2003 tank, the metal insert and collar is molded into the tank, and the filler hole is only about 2 inches across, if that I don't know if this is unique to Euro versions of the tank, or if all 2003 tanks have a narrower filler hole under the cap assembly ....but I suspect they do. al 2003 Tank Neck(apologies for the glare), note the built-in metal reinforcement ring, and that the cap now locks directly into the tank neck/plastic. Again, access into the tank is now much narrower and confined through the neck.
-
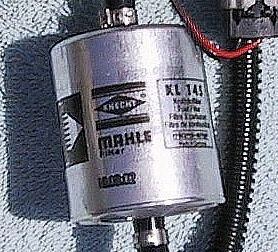
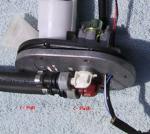
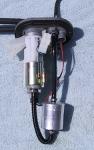
Filter and Pump info: Fuel Pump Module is apparently made by "Bitron" The Pump itself looks to be made by Arrum, although it was hard to read the fine script logo. The older 2002 and earlier pump and regulator are made by Weber. And the Filter is by Knecht, model KL145 BTW, does anyone know how to unhook the undertank "quick connects"(grey/black red/white plastic fittings) on these? I've tried every gentle push, pull, and twist... but they don't budge. I don't want to break them, and since I take my tank off often... well, I want to learn the correct method I'm sure it's simple, and I'm just missing something al
-
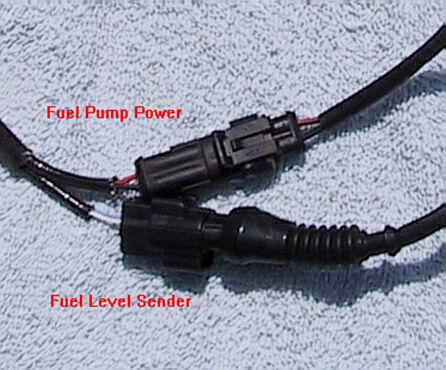
Wiring harness connectors:

-
Closeup of filter:

-
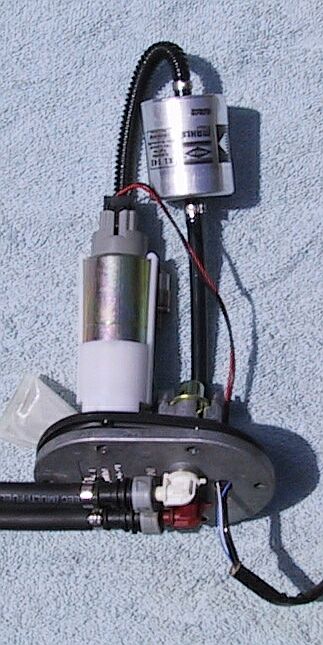
Pump/Filter/Regulator Module, view 2:

-
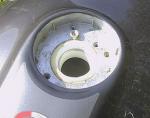
Pump/Filter/Regulator Module, view 1:
-
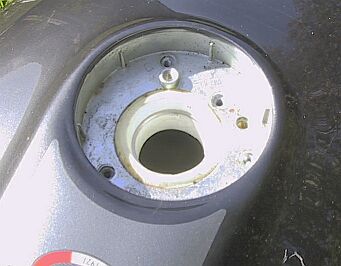
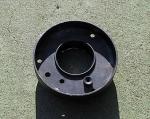
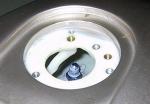
Closeup of the pump module orifice:
-
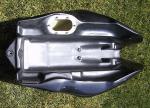
Well, as mentioned in the following: Wasted Fuel Thread Relocated Fuel Pump Thread I had ordered, and now received a salvage 2003 tank with the in tank fuel pump, from a wrecked 2003 LeMans Originally, as covered in the two referenced threads above, I had modified my fuel system and 2002 tank to address two issues: 1) Heat Induced Vapor Lock 2) "Trapped" fuel due to a lack of a balance tube/function in the tank In both cases, I believe I was successful in addressing these issues with the various phases of my modifications. But I was curious how well the 2003+ tanks addressed either or both of these concerns with the new design. So, with the receipt of the 2003 tank, I can now begin to examine it's design. And because I have not heard of any 2003+ owners complaining of the vapor lock issue, I will focus upon evaluating the following: 1) Fitment issues, if any, regarding retrofitting to a 2002 or earlier bike 2) Total available fuel capacity Although I will not know the results of either issue above for certain until later this evening or tomorrow, I can make some assumptions and observations now. First, it appears that the external dimensions of the new tank are unchanged, or very close to that of the old tank. I of course will again know more once I try to drop it onto my bike, but a casual comparison appears that it will not be a problem. Also, as you will see in the photos below, at least on European models(this was a UK bike), there is no reflective heat shielding as installed on underside of my 2002 tank, and every other modern motorcycle I've owned On another positive note, it appears that the electrical connections for the fuel level sender and pump will not be difficult to integrate with the 2002 bike's harness. First, the connector for the fuel level sender looks to be the same as on the earlier bikes, so no modification there is required. And although a two conductor AMP Weather Tite connector is now used for the fuel pump power leads(as opposed to two eyelets on the old external pump), this will be a minor, and better modification/solution to mate with the 2002 harness than the bare eyelets. So my concerns of major harness incompatibility, or some strange proprietary connector are unfounded One interesting observation is that although the new tanks are a major step forward, they will still suffer from "trapped" fuel, although on the opposite side ...and somewhat to a lesser degree. Where on the 2002 bikes, fuel was drawn from the left petcock, to recirculate to the right "saddlebag", where it was "trapped"(see thread above for more detail)... the new tank draws and returns fuel to the right side exclusively. This unfortunately still leaves fuel now trapped on the left side, but at least with this setup one can effective "slosh" fuel over to the right side, and have it more or less "stay there" to be effectively scavenged by the pump. So that's a good thing. Although, I have to still note that it would be a better and cleaner solution to have some sort of balance tube, but with the airbox, this isn't easily done. However, I might look into making one since my external pump mounted above the spine, and my airbox will now be gone. We'll see Heck, one could even put a small fuel-cell under there Anyway, other interesting observations are that the new in-tank pump, regulator(it is now teeny TINY BTW), and filter are all quite compact and a nice, clean solution... albeit a bit tangled. BTW, to finally answer the oft-asked, but never answered question: YES, THE FILTER IS NOW IN THE TANK So, to replace your filter, as seen in the photos below, one must remove 6 3mm button head fasteners, and drop/remove the whole module. It is a much smaller filter.... as is the pump, and again the teeny pressure regulator... but I have no idea regarding service intervals, or alternate sources. If anyone has this information, especially regarding the service life of the filter, this would be great to know. It's also interesting to note that it is obvious that the pump is quite high on the assembly, so although often submerged, it is also often quite obviously well above the fuel level once well into a tank of gas. So it appears that submersion is not the primary cooling factor. I would assume fuel flow therefore is. Also, as a final note, although unlikely in normal riding, etc... when I received my tank, the pump had fallen out of the two plastic clips that hold it into it's seat. After reclipping it in, I realized how poorly these clips retain the pump. So it might make sense to add a stainless steel hose clamp around the clips/pump to guarantee it's not getting knocked loose if you have an accident, drop the bike, or just hit a really hard bump So, I've posted some preliminary photos of the tank and pump assembly below for those interested, and I'll update my experience adapting the tank over the next few days/week. It appears that just installing the tank will be a non-issue, while measuring it's total capacity will take a little effort, and getting it painted will of course take a week or more. .... more to come al