al_roethlisberger
-
Posts
4,482 -
Joined
-
Last visited
-
Days Won
21
Content Type
Profiles
Forums
Events
Gallery
Community Map
Everything posted by al_roethlisberger
-
Have you tested "total tank range" on your 2003 yet BTW? I am really interested in this... but haven't heard of anyone reporting good stats on the range offered by the in-tank fuel-pump models al
-
...that's not bad at all IMHO
-

Wasted Fuel - Right Side of V11 Sport/LeMans Tank
al_roethlisberger replied to al_roethlisberger's topic in Technical Topics
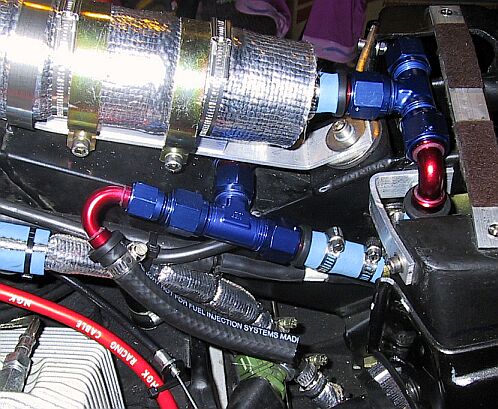
Whew, well .... it's pretty well documented, even with photos, in the Relocated Fuel Pump Thread It was a two phase/two goal project... 1) To combat heat induced vapor lock by relocating and shielding portions of the fuel system, specifically the fuel pump 2) Increase practical range by creating access to the "wasted fuel" trapped in the right side of the V11 tank due to the EFI fuel return loop and how it was engineered I feel like both goals have been acheived at this point. But as mentioned in the two threads(this one and the relocation thread).... this will probably prove a historical reference, as I'll be most likely be changing out to a 2003 tank with the internal fuel-pump in a few weeks. But basically, the "balance tube" modification incorportated the following(assuming one has already relocated the fuel pump): 1) Removed stock fuel pressure regulator and integrated tank return from the right side petcock mount under the tank. 2) Installed another manual petcock on the right side 3) Installed a new fuel return up under the tank by drilling a hole and installed an AN -6 bulkhead fitting. This specific solution is only possible if you have removed your airbox BTW. If you still have your airbox, you would have to engineer a different location. 4) Ran new fuel supply lines/fittings from both petcocks to the fuel-pump inlet, using 2 AN -8 "tees" to creat a "balance" connection between both petcocks 5) Fitted a new remote fuel-pressure regulator(see photo above) ...that's pretty much it, in a nutshell It seems to be working fine, and should provide easier access to the total capacity of the tank. Long term durability is still an unknown(i.e. leaks) but so far it looks good. The photo below shows a closeup of the fuel-supply line, and the "crossover" or balance manifold under my relocated fuel pump bracket. Hope that helps!
-
Wasted Fuel - Right Side of V11 Sport/LeMans Tank
al_roethlisberger replied to al_roethlisberger's topic in Technical Topics
Unfortunately is ultimately ineffective ....because which in about 2.6 seconds(OK, that's a SWAG ) the "sloshed fuel" gets pumped right back into the right-hand "saddlebag" as the EFI loop recirculates the fuel past the injectors Well, it "kinda works" if you keep "sloshing" every few minutes.... I've done it. But it's an odd "reserve" function if you ask me -
Dim Tachometer.... bulb or ground?
al_roethlisberger replied to al_roethlisberger's topic in Technical Topics
Awesome! Thanks The instrument nacelle is one of the few things left on the bike that I haven't disassembled yet ....so was curious what I was "in for" al -
The Ducati levers will fit, for quite a bit less $$, but are of course silver al
-
Dim Tachometer.... bulb or ground?
al_roethlisberger replied to al_roethlisberger's topic in Technical Topics
Thanks Carl.... that's the type of answer I was looking for So, do I have to do the "pry apart" surgery to get in there and JB-Weld it? Or can I repair the stud without disassembly? BTW, just as an aside, can one replace the instrument bulbs without prying apart the bezel to get to them? Just curious. al -
Yep, it's crazy... you can get a new pump, regulator, and probably the filter directly from Redline Weber for "pennies on the dollar" for what you'd pay through Guzzi I haven't tried to get a filter from them, but I bought an external pressure regulator for $70, that mechanically is exactly the same as the OEM unit. al
-
Wasted Fuel - Right Side of V11 Sport/LeMans Tank
al_roethlisberger replied to al_roethlisberger's topic in Technical Topics
...yeah, I know... those things suck -
The "flappin front crossover" seems to be a common(although not ubiquitous) problem, but I haven't heard of a fix from anyone yet Although I don't have a late model LeMans with the front cross-over in front of the alternator, I'd like to find out as well if others have found a lasting solution for this. Keep an eye on it though, as at least one person reported the front cross-over, when loose, swung back and forth... banged against the alternator cover and damaged it al
-
Wasted Fuel - Right Side of V11 Sport/LeMans Tank
al_roethlisberger replied to al_roethlisberger's topic in Technical Topics
So, a quick update on capacity and any changes to range regarding the fuel warning light... Last night my light lit pretty solidly at 110 miles. Since I had done a dyno run, been running the bike "hard" this last week, and did quite a bit of test running in the shop after filling up the tank, this sounds like that even after the dual-tap modification, the fuel reserve light will still come on at about the same time as before... around 120-130 miles. But this isn't really a surprise or disappointing, as the "wasted" fuel level was always below the "empty" level of the fuel sensor anyway After filling up(4.1), I calculated that I actually had ~1.6 gallons left in the tank of "reserve" now with the modification. So that's pretty significant Now, what will be interesting is to watch my fuel consumption, and ultimately the range, now that my dual-plug conversion and ignition remap is complete. I'd really like to hope that range/efficiency will increase a little. Only time will tell though. al -
I've always noticed that at night the illumination of my tachometer has never been quite as bright as the speedo. But riding last night up to Oakland and back to meet Ed Milich and Co.... I noticed that it had gotten significantly more dim, and even wavered in brightness as I hummed along. Having read Carl's write-up on Guzzitech: http://www.guzzitech.com/CuringTach-Elec-Carl_A.html ... I have a few observations and questions before digging into this. First, I noticed that if I tapped on the tach, it would brighten back up for a moment. So, would this indicate a bad bulb/socket? ...or the ground ...and which one, bulb or instrument cluster? And if it is the bulb, can one get into the tach to fix the bulb without the trouble of prying apart the tach as described in Carl's description above? I can figure all this out by just taking it apart I suppose, but thought I'd ask. I can certainly add the ground wires as suggested, as that's easy enough, but wanted to check into whether this might also be the bulb issue based upon others' experience. Thanks! al
-
uh oh ...here we go again. US Gallons or Imperial anyone..... anyone.... ?? heh
-
Keep in mind that the "tankslapper" isn't adhesive or "self stick" I don't like adhesive based protectors, as they could damage the soft Guzzi paint finish. That's the great thing about the "tankslapper" vinyl stuff(which BTW, can be found elsewhere in bulk, but I just don't know where off-hand). You just squeegee it on with water, and surface tension.... static.... or something... just holds it on like "magic". Neat stuff! No mess, no tack, invisible al
-
...maybe not what you are looking for, but I can't say enough good things about www.thetankslapper.com I actually take the side cutouts and custom cut a slightly taller version out the material. It seems to last about a year before I manage to damage it. But it's nearly indestructable, and great looking... in that, they are INVISIBLE Check 'em out al
-
Hiya, Yep, this is a common problem. The source is the transmission breather on the rear of the case, that is exposed to directed water spray from the rear tire. One solution is to build a small triangular plastic fender insert, and mount it in the front trellis of the swingarm, as illustrated at: Forum Inner Fender Modification Thread Other solutions suggested before include changing out the breather to another type, or modifying the cap on the breather to accept a remote hose. So far though, I think the fender modification has worked well enough for most folks. Hope that helps al
-
2003 Tank Wiring Harness Questions
al_roethlisberger replied to al_roethlisberger's topic in Technical Topics
...you are probably correct, although I think I can build a new connector or adapter pretty easily. I'd hate to change out the whole harness just for two connectors BTW, how many wires/pins come out of the 2003 connector? I'm hoping 4, which would make it pretty easy to figure out. ...if it's 3, that will prove more challenging to "figure out" All in all, I'll know the answer to this I guess in a couple weeks in any event al -
Hrmm, that's a good question.... it's been almost 2 years since I installed mine All you have to do is find the 12V running light lead to the tail-light behind the bulb socket, and splice into it. They make an easy "vampire clamp" sort of splice that you can get at any auto parts store that just clips over the existing wire, and you plug a spade connector into it. It's clean and simple. You can then hook this to the power lead for the Kisan flasher. You can also do the same with the brake 12V lead to the tail-light for the turn-signal cancel delay. Hope that helps! al
-
2003 Tank Wiring Harness Questions
al_roethlisberger replied to al_roethlisberger's topic in Technical Topics
"Sooo" just means, "based on that, I dunno" I hear ya, and I believe.. I'm just hoping "it ain't so" The tankbag I have has two holes for the rear bolt, and I currently use the shorter/closer one, so maybe I got lucky and got a bag designed for 2003+ tanks We'll see. al -
2003 Tank Wiring Harness Questions
al_roethlisberger replied to al_roethlisberger's topic in Technical Topics
Really?! My Guzzi tankbag has lots of adjustment left in the straps on my 2002 tank, sooo Ah well, we'll see how it all fits once I get the tank. Hopefully the dimensions didn't change in such a way that it won't fit with my 2002 fairing either. From my casual observations on other 2000 versus 2003 bikes, I don't think it will... hopefully. al -
Great Prices on Polishing Aluminum
al_roethlisberger replied to Mike Stewart's topic in Technical Topics
Let us know how it goes Mike I'd prefer mine anodized as well, but when I took my valve covers over to a very reputable(does NASA's work, etc) anodize shop(PK Selective) here ... they looked at the material of the valve covers and said... "sure, we can anodize them, but because they are cast aluminum, they'll come out a nice sooty black, regardless of what we dye them." They said it was because of the composition of cast aluminum material, not the finish. I don't know about the side-plates though, however the looked cast as well. In any case, I had mine powder-coated and while not indestructable... sheesh, that stuff is darned tough... much tougher than the Guzzi paint for sure But for the very same reason that the anodize shop warned me of QA issues, even when powder coating these cast pieces... the crappy material Guzzi uses outgasses like a bastard duing the cooking/curing powder coating process ... and almost is guaranteed to have a few bubbles/blemishes. Both powder coat shops I used tried twice to get it blemish free, then just gave up and did the best they could This is probably why Guzzi paints(liquid) them from the factory. Now, if we could find someone to CNC these parts from billet affordably, then you could anodize some "badass" covers and sideplates al P.S. The big problem with polishing aluminum is keeping it looking nice afterwards. You can do/get a stellar job done initially, but you have to stay on top of it for it to remain "show". I see this a lot on the sportbike boards where guys polish their wheels, frames, etc... and eventually just get exasperated because they are polishing all day long. I'd think that if one got a big part polished, you might want to have it clear-coated afterwards to make preserving the finish manageable. -
2003 Tank Wiring Harness Questions
al_roethlisberger replied to al_roethlisberger's topic in Technical Topics
It might... if it's current and represents the *2003* tank wiring, and not the old harness. I say that as Guzzi is notorious about not keeping(or even making available ) their documentation up to date So, sure al -
Heya, ...sure, in theory it should work, as others have used ATV/Jet-Ski/Motorcycle jacks from Craftsman, etc... with the V11 Sport/LeMans. What you have to be careful of is that the jack has broad lifting surfaces that can spread the weight of the bike around the oil-pan, and/or along the edges... versus concentrating the full weight of the bike in a small location centered in the pan. If you do the latter, you risk cracking the pan. And of course, we have our new Shop Stand FAQ al
-
2003 Tank Wiring Harness Questions
al_roethlisberger replied to al_roethlisberger's topic in Technical Topics
Ummm, well I'm at work, sooo But hey, rode it for the last three days, even to work and back. Aren't you proud? But I have to go by Home Depot today to pick up some building materials for the house, then to Pet Co-Land-Smart for cat dirt and a new box.... so I'll be driving the Surburban in the rain today But seriously, if anyone knows the answers to my questions above... it'll just "get me on the road" even faster. So hey, that's a good thing right? al -
So, as mentioned elsewhere, I have a 2003 tank on it's way from the UK to install on my 2002 LeMans.... and I have some questions hopefully someone knows the answers to. Obviously there are some wiring differences between the 2003 in-tank fuel pump version, and my old 2002 external fuel pump tank. First and foremost, the wiring harness for the pump module is certainly different. On the 2002, the 12v power leads have eyelets that attach to the screw terminals on the external pump. On the newer tank, although I haven't yet seen the connector, I'm certain it is simply a snap weather-tight AMP connector at the end of the harness. So, to hack this into my 2002 harness(or make an adapter), I'd like to ask if anyone has any knowledge as to which wire/pin in the connector is positive, and negative for the pump circuit? Secondly, on the 2003 tank, apparently the fuel-level sensor/sender is also integrated into the in-tank pump module, and it's lead is also integrated into the same harness wires as the pump circuit coming out of said module.... as opposed to being a separate sensor and connector on the left side of 2002 and earlier bikes. If someone knows or can identify the relevant wires/pins for this as well, that would be great. This could save me some time, and perhaps grief once I get the tank in-hand in a week or two Thanks! al