al_roethlisberger
-
Posts
4,482 -
Joined
-
Last visited
-
Days Won
21
Content Type
Profiles
Forums
Events
Gallery
Community Map
Everything posted by al_roethlisberger
-
I'll have a "spare" ECU that will technically be "spare" when I get Dave's back that I sent to TLM for the ignition remap. And I'd like to check into your ECU at some point, but right now just don't have $700-ish to spend on it So in the meantime, I'll try to keep close tabs on your progress, and maybe be a "later adopter" You and Carl let me how it goes though. I'll be particularly interesting to see how well and beneficial the closed-loop system is. One question, although TLM is modifying my ignition map, and I assume retarding it a bit from stock to accomodate my dual-plug setup.... they apparently won't tell me exactly what the adjustment is After talking to them, I don't think they are concealing the data for competitive reasons so much as they outsource this to another fella that doesn't make the data available Anyway, what I wonder is... if I later get the M15 ECU, how much I (and how I would) need to retard the base ignition curve? Hopefully I can learn from Carl's experience when he maps his dual-plugged 1100 Sport. al
-
Yeah, I always take a spare key, and when on a long tour with a buddy, we exchange spare keys... just in case. Came in very handy one time in Las Vegas. I found the original key right after calling in reinforcements, but I was very glad I had that backup My keys also have the return address, account, and phone number of my Motorcycle Towing Service on them via some pet "shrinky dink" tags It's about time to make some new ones though, as the ink is finally wearing off. al
-

Bubbling Failing Tank Paint
al_roethlisberger replied to al_roethlisberger's topic in Technical Topics
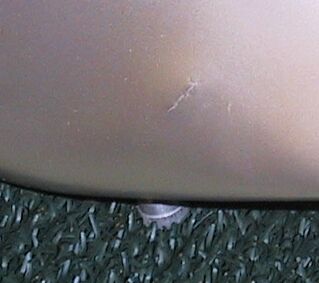
Here is a better photo of the defect, and it's degree of severity .... it seems to get worse in the heat(even with the tank empty). Of course, that's not really a surprise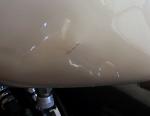
-
...ahhh, your LeMans is CLOSED LOOP?! veddy eeenteresting I don't think any of the bikes in North America, except maybe the new Breva?? are closed loop yet. I wonder if the 2004+ North American V11 bikes will start arriving closed-loop soon? Glad to hear you've got it running al
-
Good luck and have fun Dave. If you make it down here, look Denise and I up I have nothing really to add for the trip, as I think most have covered it well already, so I'll just wish you the best of luck! al
-
Fitting over-seat panniers and tank bag
al_roethlisberger replied to belfastguzzi's topic in Technical Topics
....that's very true, fitment, or ill-fitment can be critical. On my first long tour a few years back, my Tour Master bags took a good bit of fiddling to get to stay put properly on the FJ. There weren't any model-specific instructions, so I had some issues keeping them off the wheel when fully loaded. And at one point out in nowhere Utah, they nearly broke my remote nitrogen cannister for my rear shock of, when the right side shiftedf. I just happened to notice it at one stop, otherwise it could have broken free and gone right into the wheel Good thing I had a bunch of plastic wire ties and tools with me But yes, for all "toss on" soft luggage, always check and double check along the ride, as they can loosen, and move around into positions you swore would be impossible when you cinched them down before the trip al -
Bubbling Failing Tank Paint
al_roethlisberger replied to al_roethlisberger's topic in Technical Topics
...indeed, that is very true , and one of the reasons that I wasn't terribly reticent to cut into the tank in the first place.... since I knew this was most likely going to happen But naw, I'm not upset about it. I am bit disappointed that the paint failed, just from a Guzzi QA standpoint, but it's not a big deal. But keep in mind, that unless my dealer just forgets about it, they'll require the old tank back.... it's hit and miss that way, whether they require keeping the defective part, but I'll cross my fingers this time that I can keep the tank. al -
Bubbling Failing Tank Paint
al_roethlisberger replied to al_roethlisberger's topic in Technical Topics
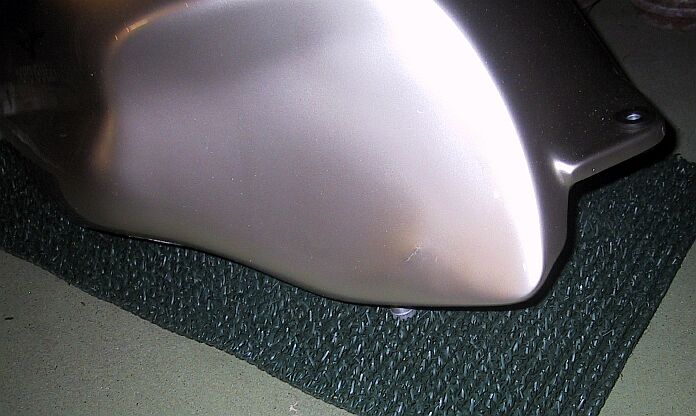
Closer up view: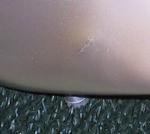
-
Bubbling Failing Tank Paint
al_roethlisberger replied to al_roethlisberger's topic in Technical Topics
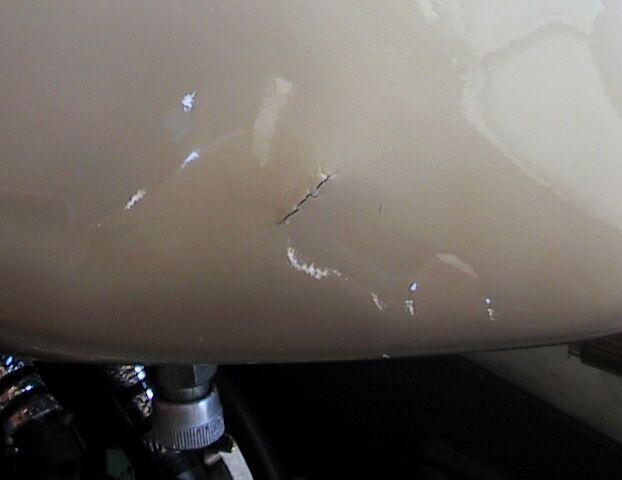
...could be related, who knows Here are some photos. Unfortunately, they didn't turn out in such a way that really shows how it looks during the day in natural light. During the daylight, the center of the crack is deep enough to be black in shadow... an actual crack in the paint. In these photos, it looks more like the "crevasse" that has been under the clearcoat for the last couple months. But it gives you the general idea. In the case of the Rosso Mandello's tank, the crack was almost identical if my recollection is correct. However, it was in a more advanced state and had progressed to the point where the paint had lifted off on both sides of the crack. I suspect mine will exhibit this behavior over time.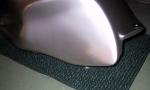
-
Well, this is interesting... although I was expecting it. ...it looks like I'll be getting my tank replaced under warrantee after all, and it has nothing to do with my wasted fuel project. I'll take a photo later this evening, but here's the description: A while back I saw someone on this forum, or perhaps on Wildguzzi, post a photo of their red Rosso Mandello tank, where the paint was lifting off on the left knee tank cut-out, about the size of a half-dollar. It looked a bit bubbled, and cracked under the clear-coat, and had split(the paint not the tank) at the crack, and was coming off in a pretty uniform disc. Well, a few months back(before I did any modification to the tank) I noticed that there was an odd "crevasse"... looked like a canal on Mars ... up under the clearcoat on my tank, in the same location as the one that I saw on the RM mentioned above. So, knowing the likelihood of what was coming, I called my dealer and let them know that a new tank was probably in order. ...and I've kept an eye on it, and reminded them a couple times that it's gotten worse.... that is, although very very gradual, the "crack" has become more prominent. Well, sometime in the last day or two, as the tank sat on my driveway in the Sun, then cold evenings, the crack has finally erupted through the clearcoat. Now that there is a real crack in the paint, I'd give it no more than a few weeks before it starts coming off ...ah well. I'll post a photo tonight or tomorrow. Since I never had the infamous "tank suck" problem, I just attribute this to faulty paint, and perhaps a thin and overly flexible part of the tank The only drawback, is that I'll have to redo my tank piercing upon receiving a new tank, and reapply the heat-shielding. Of course, having done it once, it's just an evening's work, but *sigh* al
-
Air Inlets Through Fairing
al_roethlisberger replied to al_roethlisberger's topic in Technical Topics
..$17k ....ouch It's not $THAT$ neat -
Air Inlets Through Fairing
al_roethlisberger replied to al_roethlisberger's topic in Technical Topics
Hey... that one's kinda cool too Where I can buy that kit? -
My ECU(well Dave Gross's donor ECU - thanks Dave ) is currently at TLM in Holland getting it's stock ignition map modified. I'll be very interested to see how well it works out once I get it back in a couple weeks al
-
Air Inlets Through Fairing
al_roethlisberger replied to al_roethlisberger's topic in Technical Topics

-
Air Inlets Through Fairing
al_roethlisberger replied to al_roethlisberger's topic in Technical Topics
Funny you say that, as Denise and the kids and I were watching "Big Fish" today, and upon seeing a scene with a side-car rig on-screen, she commented how fun that might be So maybe a Ural in our future one day Could be fun al -
Thanks Mik I had the valve covers powder-coated. The current ones are a bit more orange than I wanted, so I have another set that I coated along with a matching set of "porkchop" side-plates, that I'll install at the same time after the engine rebuild. They are a deeper red. The front brake and clutch master cylinder reservoirs are from Rizoma. Guzzi does offer a "billet" "adjustable" footpeg set, but the reviews by the folks on this board haven't been very positive. It seems that the set is more for show, as although they do adjust via an eccentric, the range of adjustment is very minor. Other popular options though include using Centauro controls, and the relocation kit from Evoluzione.net. al
-
Air Inlets Through Fairing
al_roethlisberger replied to al_roethlisberger's topic in Technical Topics
I have a Suburban, and a Honda Pilot will be in the garage in about 60 days or less as soon as my bonus and tax-refund comes al -
Ohlins Shock Preload Adjuster Location
al_roethlisberger replied to al_roethlisberger's topic in Technical Topics
Good thoughts. I had looked around but didn't really see somwhere else that was a good fit. I'll look at the two locations you mention. As far as getting dirty, you are right, but it's where they specify putting it and where I see it on other bikes .... so I guess it holds up al -
If you get the Sachs replaced under warrantee, it should be fine. I think you just got a "bad" one Some of us have complained of course about the performance of the Sachs/Boge unit, but to tell the truth, on average and especially for lighter riders, it's not that bad for a standard OEM unit. In fact, some people like Lex have actually had them rebuilt to their satisfaction. Now, that being said, a WP or Ohlins shock is a vast improvment, but they are spendy. You could though keep an eye out for a used WP off of a 1100Sport. They do pop up on eBay occassionally for a good price. Good luck! al
-
Air Inlets Through Fairing
al_roethlisberger replied to al_roethlisberger's topic in Technical Topics
Ok, that's it... I'm going to bring that photo in from work next week and scan it... the one of my shaking hands with Richard Karn(Al) at some home improvement "expo" a few years back .... I have it on the wall of my cube with the caption "Al meets Al" We both have beards, about the same height... I'm wearing a flannel, it's too much And yeah, I'd get out more, but with the 2 young kids, and new one nearly here... I'm around the house or running errands in the afternoons after work. No blame placed, but ever since the GF and kiddos moved in last Summer, my time has been less available for running down to the local watering hole But that's OK, it's been a good "tradeoff" al -
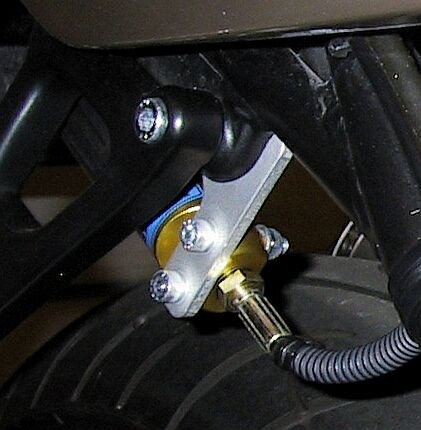
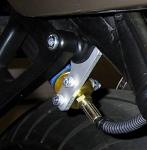
For those that install the aftermarket Ohlins shock with remote preload adjuster, it comes with a bracket and instructions for installing the knob under the exhaust hanger/passenger-peg-bracket. I initially installed mine as directed, but it required the mounting bracket to be placed sandwiched between the exhaust-hanger and the rear-subframe to which it normally mounts as stock. I didn't like this arrangement for two reasons: 1) It increased/created an uneven exhaust offset, by kicking out the exhaust mount 2) It looked a bit "kludgey" 3) In the recommended location(rear hole) of the bracket, the knob was very visible, and seemed quite exposed to potential damage. ....and it was a little too much "bling" for my tastes So, I instead installed it BEHIND the exhaust hanger, and via the front fastener. However due to the uneven surface on the back of the bracket on the subframe, and the need to slightly increase the spacing to clear the adjustment knob, I had to use a new 4.5cm bolt, and use a ~1/8" spacer/washer in between the Ohlins bracket and the subframe. This isn't the best photo, but it gives you the general idea. I can take one or two more if necessary for clarification. IMHO, it looks much better in this slightly modified location, and is more protected. A caveat, it *is* just a bit more difficult to adjust, especially if you have thick fingers as I do, but it's very doable, especially if it's not something you adjust every day... and I don't Anyway, it's just an alternative option for those that install this model shock al
-
Air Inlets Through Fairing
al_roethlisberger replied to al_roethlisberger's topic in Technical Topics
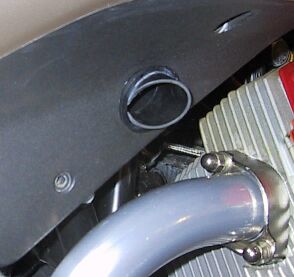
...other side Note: Check out the location of PowerLet outlet, currently attached to my Battery Tender Major , very convenient!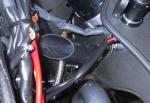
-
Air Inlets Through Fairing
al_roethlisberger replied to al_roethlisberger's topic in Technical Topics
And what the inlet looks like from the inside of the fairing: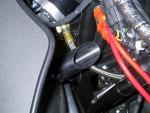
-
Air Inlets Through Fairing
al_roethlisberger replied to al_roethlisberger's topic in Technical Topics
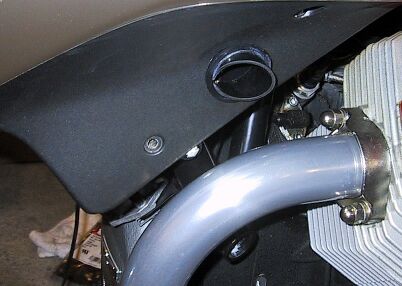
Another shot better showing the angled "air grabber" protruding a bit: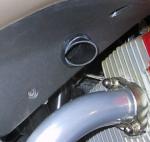
-
Well, while I was tinkering around with heat-shielding, etc... and thinking about not only my vapor lock issues, but also the new dual-output coils that themselves get hot.... I had looked at the mostly cosmetic side "scoops" on the LeMans front fairing, and remembered my FJ1200 that had functional scoops that force-fed air to the rather isolated tops of the cylinder head for cooling. Well, I wasn't going to block the "scoops" on the LeMans fairing completely, as obvioulsy they are designed to guide air toward the cylinder heads, but I did want to try to scavenge a bit of the airflow and guide it up under the tank. Every bit of airflow helps right? And to tell you the truth, from what I can tell, due to the LeMans fairing, and the air-blocker around the fork legs, not a lot of air gets up and around beyond the dimensions of the oil-cooler ...and the air that predominantly gets through gets pre-heated by said radiator. So, I took two 1.5" plumbing pipes(sink tail pieces) and trimmed and glued them up, and secured them into two holes via screws in the neck of the tube behind the fairing. This way, no glue is used on the fairing, nor any screws, so hopefully it will prove durable and a clean solution. Now, how well does it work... is it worth doing? Well, I can sorta answer the first question Via my very scientific "hair-dryer test" ....I found that directing air from a hair-dryer, and later my high output garage cooling fan, toward the front of the bike simulating motion, a good bit of cool air seemed to get directed out of the outlets. So hopefully at speed, a significant amount of cool air will indeed get scavenged and directed up under the tank, and on some key electronics like the coils ...but I can't answer the second question It was just something I decided to do, and think it "couldn't hurt"... but whether it makes a huge difference, dunno. But I like to think it could Also, once the tank is on, and the side "scoops" are reinstalled, the inlets are invisible unless you look down/up into them al