al_roethlisberger
-
Posts
4,482 -
Joined
-
Last visited
-
Days Won
21
Content Type
Profiles
Forums
Events
Gallery
Community Map
Everything posted by al_roethlisberger
-
Hrmm, that doesn't look bad at all, but it does look a bit different. It is hard to tell though without a side-by-side comparison. Well, just post pics when it's mated up to the tranny, timing belt cover, pan, etc.... that will be the most telling Thanks for the update! al
-
Great! ...keep us up to date on how it goes I'll tell ya what's interesting though. I've noticed on mine and other bikes that the black finish is heaving on other components like the transmission cases and pans... not as bad... but starting mildly in places near heat especially. It'll be interesting to see what happens over time with these other parts I'm waiting to hear from Moto Italiano for the actual date of my repairs so I can pre-order my parts from Mike Rich(pistons, cam, etc...). al
-
....nope, the forks are different stuff You could certainly get them anodized without problem. al
-
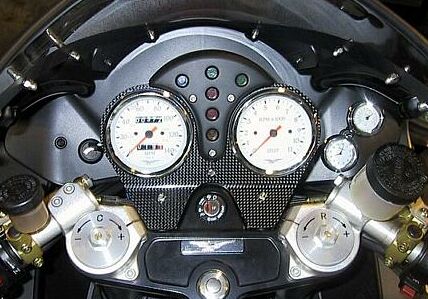
Nice job Although not the best photo, below is a photo of where my PWM heat controller is installed on the left-hand side of the dash.
-

Megacycle cam: 620x9 verus 620x10
al_roethlisberger replied to al_roethlisberger's topic in Technical Topics
Now class, I want everyone to take a close look at Jason's response, as this is exactly the kind of detailed technical data I am looking to receive ...thanks Jason al -
Awesome! I was wondering about this just the other day. Just let us know the results ...and then if successful, the how to buy and how much al
-
A little off topic, but has anyone bothered to send a sample sump gasket to that fella that makes the silicone gaskets we've got for the valve covers? http://www.realgaskets.com/files/motorcycle.htm ...that was all he was waiting for to make one, a template from the original paper unit. al
-
...yeah, what he said al
-
Hey Ian, ...well unfortunately I can't tell you if you've knackered anything up significantly. But I can offer this bit of comfort... rest assured that it's all fixable I'm sure someone will have something more specific and constructive, but I thought I'd provide that little bit of silver lining Let us know how it turns out! al
-
I don't know if hard steel versus soft lead will impact damping 'per se'(although I assume it would some), but you will lose a lot of space between the bearings versus the tiny lead #7-ish balls such that you'll have a lot less density ergo weight to work with.... which would be a disadvantage. al
-
Megacycle cam: 620x9 verus 620x10
al_roethlisberger replied to al_roethlisberger's topic in Technical Topics
Oh no you don't... you'll have to get YOUR DADDY to buy you a Goose! -
Megacycle cam: 620x9 verus 620x10
al_roethlisberger replied to al_roethlisberger's topic in Technical Topics
Now, Now, Now... I want a golden goose now! -
How do the MI ends compare in size to the "heavy" Throttlemeister ends? These guys are some damn solid and heavy stainless P.S. The photo below exaggerates the scale a bit, although the "heavy" model is quite long. However, it doesn't look out of place IMHO.
-
WELCOME PETE ...now if Jeff or Jaap can just get Ivano on board, we're all set! al
-
Megacycle cam: 620x9 verus 620x10
al_roethlisberger replied to al_roethlisberger's topic in Technical Topics
ACK... people.... come on Take the OS wars to 24/7! Less jibber jabber, and more cam talk I want an x10 dyno run, and I want it now al -
No problemo.... now to just see if it lasts I have no idea yet. Time will tell al
-
Megacycle cam: 620x9 verus 620x10
al_roethlisberger replied to al_roethlisberger's topic in Technical Topics
ahhhhh hem, now don't go hi-jacking this thread for an OS war will ya Back on topic, anyone have any 620x10 cam data and observations? (...or even more x9 thoughts and experiences to add to John's?) al -
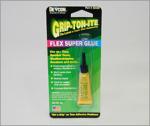
BTW, that "Super Glue" I used is by Devcon(who makes the regular Super Glue) and is called "Grip-Ton-Ite" ....green card, mustard yellow tube. See photo below
-
....the power of the Internet
-
Not that I know of per se Joe, although I don't think the stock petcock is really sealed with anything. I've taken mine off many times over the last few months working on my fuel-pump relocation project, and other than a smidgen of some red goop that looks like silicone gasket seal around the o-ring base, the threads were bare But it doesn't hurt to be careful, so sure, just go check the automotive section, and I'm sure there is some thread sealer that is fuel resistant. I actually used Loctite Blue on my AN fuel fittings, but not really to seal them. The AN fittings seal themselves quite nicely, and once tightend seem impervious to loosening, but I just wanted a small bit of vibration induced loosening "insurance"... so I put a dollop of Blue on every fittings threads. BTW, that "Super Glue" I used is by Devcon(who makes the regular Super Glue) and is called "Grip-Ton-Ite" ....green card, mustard yellow tube. See photo below

-
....yes, and 7.5 is darned tiny. I can't imagine working with anything much smaller. I impressed myself though, I actually didn't make a mess. Just used a graduated cylinder to pour them into the bar end with the silicone, tamped down and mixed with a screwdriver, and then really smashed down with the "plunger" from the Throttlemeister insert. I think I only dropped about 10 of the tiny buggers through the whole process I really thought this "simple job" would turn into a multi-hour frustration-fest like most "simple" projects often do .... but I just removed the whole clip-on, and lifted it off the top of the fork crown, and rotated(carefully) the bar end up vertical. I didn't even have to remove any cables or anything. It was literally a 30 minute job per end, even if you took your time. BTW, wear gloves when you do this. I'm the last person to be uber-careful around chemicals/metals, but I ended up wearing some latex gloves for this. Because upon just touching the shot, I got that greasy lead dust all over my hands instantly, and one small cut on my finger started to burn... and I thought.... "you know, that can't be good." Anyway, handle with care.... no need to dumb yourself down faster than nature has already got you scheduled for al
-
Well, while changing out the heated grips, and other Winter projects, I decided to try adding the bird shot. Harder to find than I thought out here in enviro-friendly California as compared to back home in Louisiana where a gun/huntin' shop was around every corner Anyway, finally found a place that sold reloading supplies, and had bird shot in 7.5, 8, and 9, only in 25lb bags.... for about $17. So, here's a question, has anyone ever realized just how heavy a small 10inch long bag of lead shot really feels? Oh sure it says 25lbs, but I swear it was a neutron star. Amazingly deceptive.... it's all perspective I guess. Something that small shouldn't weigh that much! Ok, well anyway, I went ahead and got some Silicone II and mixed it with the shot, and lo-and-behold used near to none of the shot, as our stock bars aren't hollow all the way to the end, plus the Throttlemeister inserts are relatively long. But I figure I got a good 3 inches of lead in there with the Silicone.... so hopefully it'll add some noticeable damping. In any case, it was a $20 investment, and about an hour to do... so it's inexpensive "vibe insurance" for a low cost in time and money I'm hoping that where my right hand used to go numb in 30 minutes because of my carpal tunnel sensitivity, the new "Superbike Gel Grips", and the lead shot, with the Throttlemeister "heavy" models, will offer superior damping. al
-
....spectacularly embarrassing for Moto Guzzi al
-
...yep, I think I'll now either be super-judicious with the S100, or just toss it out. I found that it also ate the finish on the black clutch/brake levers just like the finish on the exhaust hangars. Before, satin black, after S100 application... ashen/dull black A little wax will clean them right up, but they look like the bike's been out in the weather and Sun for months now Back to Simple Green... al
-
I'll be very interested to see how your painted covers turn out. Heck, if you like the color, even if they chip, etc... repainting them once a year is a breeze, and cheap I just repainted my alternator cover with Rustoleum's version of "Hammerite" silver, and it looks pretty spiffy. Road debris had done a pretty good job of chipping the stock silver paint to hell It's amazing how dinged up the little silver eagle badge even is from rock impacts.... ouch I tried to hand polish it, but the casting was too porous and had too many defects. If I had used a power buffer, it might have worked, but I just painted it instead. I'll probably just keep repainting the cover in the back of my mind as a yearly refresher thing. It takes about an hour to strip, clean, and repaint.... so no big deal. Oh, and after Feb(engine rebuild) and I put on the new coated side-plates and covers, I should have a "spare" set of powder-coated red valve-covers, and stock red side-plates for sale. I haven't decided yet if I want to keep them for a future color project or not... al