al_roethlisberger
-
Posts
4,482 -
Joined
-
Last visited
-
Days Won
21
Content Type
Profiles
Forums
Events
Gallery
Community Map
Everything posted by al_roethlisberger
-

02 LM R and R Rear Turn Signal assemblies?
al_roethlisberger replied to JesterGrin_1's topic in Technical Topics
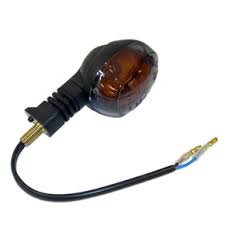
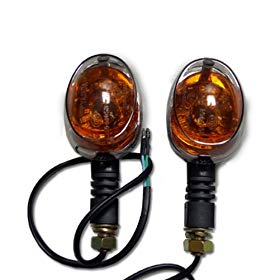
.....aaaand if you want smoked dark lenses for the V11 Sport/LeMans OEM signals, the Buell version used smoked lenses with an amber insert that snaps right on, and yes if you can still get them from HD. If not, I'm sure they can be found aftermarket. You can see the Buell smoked lenses on the photos of my bike. Here are some photos of the Buell version of our signals. It appears however while the lenses will swap over, and that the Buell versions have the "foot", that the actual mounting of the Buell version is via the wiring shaft and not a secondary screw.... unless there is also another Buell version that also uses the Guzzi/Ducati mounting method.


-
Has anyone used the Motogadget m-Blaze Pin LED turn signal? I've always found the front signals on the Le Mans fairing to be a bit too large and detracts from the nice lines of the bike, and even smaller aftermarket units still are an aesthetic distraction. ... of course the primary function of the front signals isn't all about looks, but instead is about visibility and safety. So one can't just get rid of them, or put some cheap flush and ill fitting signals on that sacrifice visibility. But these Motogadget m-Blaze Pin LED turn signals seem like they could be the rare case where you get more with less. They are ECE approved, so they aren't junk, and along with being incredibly bright from the front of the signal, they also provide much better side visibility than most OEM signals. And of course, when mounted and not lighted, they just disappear. One minor downside is that they can't be used as running lights like an incandescent bulb and some LED lighting. These are either on or off. I mean, you can wire them up as running lights, but they'll be incredibly intense. I ran across a thread in another forum where some owners went through various approaches to make them operate more dimly as running lights to no avail. Check them out: https://motogadget.com/shop/en/m-blaze-pin.html https://www.revzilla.com/motorcycle/motogadget-m-blaze-pin-led-turn-signal https://revivalcycles.com/motorcycle-videos/R6eDBC3NHCA
-
Is it ok to discuss "reforming" & or replacing caps on this topic ? For sure ! While I know what "caps" (capacitors) are, how to do anything with them is beyond me. I noticed my amp *sizzling* a little from time to time. Is that something with the caps or was that this rectifier going bad? A couple more questions on the rectifier, if you please: 1) If I press it really hard or rock it toward one side it come on. It looks to have a "retainer, but the tube won't stay plugged in. Is this just a connectivity problem with the chassis? 2) I've heard that these amps should not just be left on, but I'm guilty of that more lately without using the "standby." Has this contributed to my rectifier problem? Reforming capacitors refers to electrolytic capacitors that have "dried out" due to lack of use, say sitting unpowered for a decade or three. In some cases one may be able to reform the electrolytic paste by slowing introducing current and slowly raising the voltage versus just plugging the equipment into full 110V/220V AC main current which in a worst case can expose you to an electrical shock hazard or minor explosion/fire if the capacitor fails dramatically. To reform the capacitors one uses a variac, which is a big variable resistor like one may have used in high school or college physics lab. You plug the variac into the main, then the tube equipment into the variac, then over hours or days you slowly increase the voltage. This may restore the electrolytic capacitors to spec, but honestly this is really only useful if one wants to the keep the equipment in some museum original state or just for some initial testing before a complete rebuild. For safety and reliability, the electrolytic capacitors throughout most electronics should be checked and considered for replacement after 20-30 years, especially if they have sat unused for a decade. The good news is that with the resurgence of hobby interest in restoring old audio gear, there is a lot of information available online for the DIY amateur and parts too. For a long time the main electrolytic filter capacitors (the ones in the shiny cans) were unavailable as the original manufacturers stopped making them in the 1980s when solid state finally killed most tube equipment in the consumer space. But in the 2000s these and other tube specific parts have begun to be made again. I remember in the 1980s having to give away boxes of tubes to a TV repair guy, versus throwing them out. My grandfather had repaired TVs and radios as a side job, and we had tons of old tubes. The TV repair guy said he wouldn't buy them from us as he had a whole room full of old tubes, and no one wanted them, but he'd take them if we wanted to get rid of them. Regarding your questions: 1) That does sound like you have a connectivity problem with the chassis, not the tube. It is possible that you have a broken/cracked pin on the tube, but I suspect you have a loose socket or other intermittent electrical connection. It's likely that the socket just needs to be replaced. To be honest, you might consider taking it to someone. I bet they can diagnose and replace a socket for a lot less than your time & worry are worth in this case. As far as how the tube is secured, I don't know about this amplifier but some tube amplifiers with inverted (hanging) tubes do have a little metal hook, spring or ring to secure the tube from vibrating out. 2) Actually it's good to leave most amplifiers, whether tube or SS, in an "idle" state so that some electrical current is trickling through the power supply; see the comments about electrolytic capacitors. Some higher end SS equipment do this by default and will often indicate it with a "standby" LED, and many tube amplifiers will have a "standby" switch that keeps the tubes and power supply warmed up and ready to go. But if you play your amplifier regularly, every month or so, I don't know that it is helpful to keep it in a standby mode and you are exercising it enough to keep it healthy. Keep in mind that with most tube amplifiers it can be destructive to the output transformers to run the amplifier without a speaker connected. For an integrated/combo guitar amp with a speaker built-in, this isn't an issue. For standalone heads it can be. The amplifier won't "fry" instantly, so I don't mean to frighten anyone, but it's best just to avoid it entirely by keeping a circuit closed on the output side by having a speaker attached and giving the induced current somewhere to go.
-
Nice stuff, Al ! Is the rectifier tube the most likely to go in an amp like this (Fender reissue '59 Bassman Ltd) ? The tube still shuts down when it heats up. I'll search a good replacement. Like, something OSRAM, and made in Sweden . . . ? Maybe, keep a spare on hand like we do a Hi-Current OMRON relay in the monkey-paw-trap of a V11 ? Not that I'm a fan of just tossing things out and buying new without trying to fix it.... but honestly, the rectifier tube has nothing to do with the sound of your amplifier unless of course the tube is malfunctioning ...and in that case the amplifier just doesn't work. So I'd really recommend buying a new tube and be done with it. Years ago I would have said stay away from Russian, Chinese and other tubes, and instead search for some NOS 1950-70s tube. But I don't think that really matters as much anymore since some new tubes have gotten quite good with the resurgence in popularity of tube amplifiers (guitar and HiFi), and again I think this is especially less of an issue for a non-signal tube. There are a bunch of online vendors, even Amazon, that sell the GZ34/5AR4 tube from $15-40. I suspect if you go to a Fender amplifier or other guitar forum you can find some quick recommendations for a new GZ34/5AR4 replacement that is reliable and will last.
-
02 LM R and R Rear Turn Signal assemblies?
al_roethlisberger replied to JesterGrin_1's topic in Technical Topics
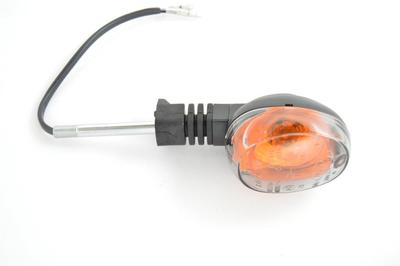
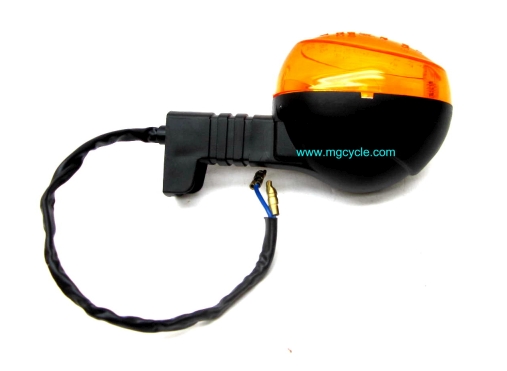
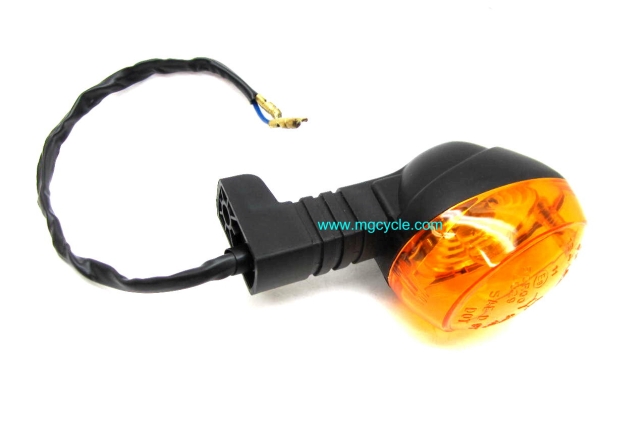
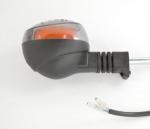
A note for anyone else researching the replacement of V11 turn signals; the signal mounts on this era of Moto Guzzi products has a "foot" with a separate screw mount versus using the hollow shaft of the signal as the mounting point like most typical OEM (other manufacturers) and aftermarket signals. You can see the mounting foot and hole in the photos below (courtesy of MG Cycle): In many cases to attach a more standard style signal, especially aftermarket, one often has to enlarge the hole in Moto Guzzi body work to allow the larger shaft to pass through what was a smaller wiring hole. But good news is that Moto Guzzi wasn't the only manufacturer using this style of signal. Ducati at the very least was another that used this style for some of their bikes, so the aftermarket for them is larger and thus one may find a signal marketed for a Ducati that will bolt right on to the Moto Guzzi with no modifications. What I've also run across are adapters, usually for a Ducati, that allow easier mounting of standard signals on bikes that use this "foot" mount instead, such as (look under "Italian bikes"): https://www.kellermann-online.com/en/products/accessories-for-indicators/accessories-bullet-1000-series/41/mounting-plates?c=192

-
That's a great resource you have started with your collection of CalVin videos. That will be very helpful for any other current or potential owners The only three minor things I don't care for on the CalVin are: 1) MG changed the mounting of the driving lights from a nice chrome bar in the pre-production promotional photos to "L" brackets in production. A very minor issue, and I'm sure one no longer even notices after a while. And if it does drive you nuts, there apparently is an aftermarket version that uses the chrome bar. 2) I like the concept of the large simple vintage rear tail light, but not the execution. Similar to the pre-production driving light bar, the promotional photos show a slightly nicer rear light with a nickel/chrome ring around its circumference, but that bright trim is absent in production. And in some earlier models I've read that the mounting bracket cracks. Fortunately this has been covered in-depth here: http://www.motoguzzicalifornia.com/2011/07/replace-tail-light/ 3) This isn't unique to the California Vintage, and is shared across all the V11 California models; and that is the plastic frame/wiring cover in front of the fuel tank that covers the junction of the frame at the steering head and associated wiring. I'm sure this just fades away into obscurity once one owns the bike for a while, but for all the V11 California models I wish MG had come up with a slightly more classy treatment for this area. Perhaps someone aftermarket has? I have no idea. ...none of these would be deal-breakers though Great looking and sounding bike:
-
I wish the deep sump kits were more readily available and affordable, but I think they are something of a unicorn these days.
-
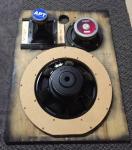
Speaker compliment, all high efficiency to match the 12-15W 30-A amplifier. One might be amazed how loud 12-15W is when the speakers are high efficiency. Kids today chasing 100s or 1000s of amps of power just don't understand. Exponential horn loaded tweeter 5" midrange 12" woofer
-
I'll try to remember to post some finished photos once complete, which should be in a week or two, but here is a photo of the rear of the cabinet open with the crossovers and rear firing bi-polar dome mid-range speaker which makes the mono speaker sound a lot more spacious. Since the tuner and amplifier have no tone controls, I have pots on the horn tweeter and midrange themselves, as well as the ability to switch the crossover in/out for the mid-range making it full-range.
-
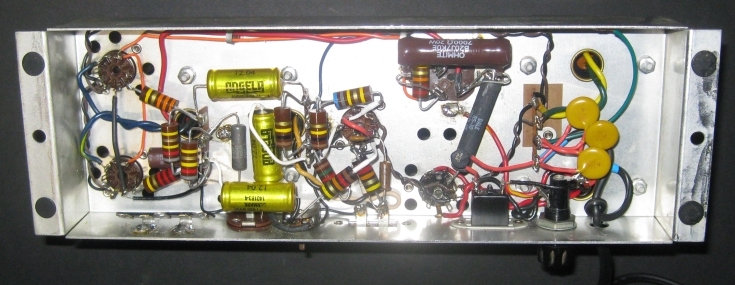
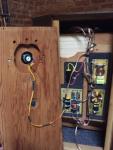
FM-50 underside after restoration. The big coupling cap has actually been changed to a Mundorf oil capacitor since this photo was taken. The FM-50 is unique in that it has a recording level circuit, which is actually a simple preamplifier via a 12ax7 tube, so the tuner has a volume control built in. So I can connect the output of the FM-50 directly to the 30-A amplifier. I think I've either got a vintage NOS Telefunken or Bugle Boy in there now. https://www.radiomuseum.org/r/fisher_fm_50.html

-
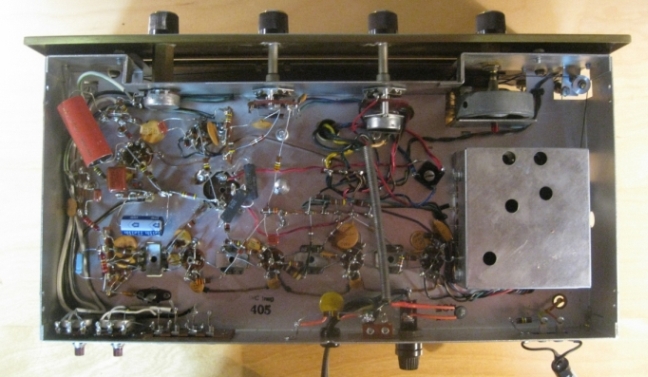
Here is a photo of the underside of my rehabilitated 30-A mono amplifier after recapping, etc This and the FM-50 mono FM tuner will power a 1950s cabinet for which I've built custom crossovers, etc Some vintage NOS GE EL84 tubes provide the amplification, with vintage 12ax7 and rectifier tubes. https://www.radiomuseum.org/r/fisher_audio_amplifier_30_a30.html

-
..... again, such a nice bike
-
Wow, quite a dated thread that I've somehow just run across and wish I had found back when the original questions were being asked. So in case anyone searches for this again, as someone who has the Mike Rich pistons, valves and 800-620x9 Megacycle Cam installed, here is what I can offer based upon my conversations with Mike Rich almost exactly 15 years ago First things first... I don't know if Mike is the same as he was 15 years ago, but he self-admittedly didn't keep up with email very well. He however was happy to speak on the phone and answer questions. I found Mike to be very friendly, honest and helpful and didn't try to up-sell performance parts that really didn't add much value based upon your goals. He was often clearly working busily in his shop versus at the computer So here are my Mike Rich modifications that were installed as part of the warranty recall "fuzzy case" replacements back around 2004: - Mike Rich dual-plug head conversion with Teo Lamer ignition remapped 15M ECU - Mike Rich Motorsports "Stage II" ported heads - Mike Rich 10.25:1 (10.5:1 actual) pistons - Mike Rich performance valve spring kit (springs, titanium retainers, lower platforms) - 800-620x9 Megacycle Cam, street grind. 258° duration, .400" lift - TiN coated valves and matching guides After these modifications I had the bike tuned on a Dynojet that indicated an 86 rwhp and 64 ft-lb of torque. Some drive train loss estimates based upon other dyno results of stock V11 Sports suggests an approximate 105 hp at the crank. Of course I also have a Stucchi crossover and Leo Vince exhausts, and the airbox removed. Who's to say how much those modifications add or subtract from any gains, and where on the power band. Unfortunately I didn't perform any before/after dyno testing for each individual modification, which of course would be ideal. Below are some email excerpts from Mike Rich regarding these modifications that we exchanged back in 2004: I cover a lot of this and early observations here: https://www.v11lemans.com/forums/index.php?showtopic=5171 Again, sorry I missed the opportunity to possibly help out when the question was first asked.
-
Since I think we want others to be able to update the list, I vote for putting the thread in the "How to" section.
-
I suspect y I suspect the photos you've seen are of the Magni fairing that was available for the V11 Sport. I don't know if they are made new anymore, but the kits do show up every so often for sale. http://www.magni.it/v11_fairing.htm A member here also fitted a Laverda fairing which looks very similar: https://www.v11lemans.com/forums/index.php?showtopic=18911&hl=laverda
-
In the following review it does mention using the Breva 1100 engine https://www.topspeed.com/motorcycles/motorcycle-reviews/moto-guzzi/2012-moto-guzzi-california-vintage-ar126796.html
-
Hrmm, not to be argumentative, but are you sure about that? I agree about the tubeless tires, but I thought the California Vintage is the same frame (platform) as the other V11 based California bikes, including the EV, so how could there be more legroom and handle better? The California Vintage was the last hurrah of the V11 California bikes. Also, regarding the engine, the engine in the Breva 1100 looks notably different than the engine in the California Vintage, with the Breva having valve covers like the Griso and a different alternator cover. Now those are just bolt-on covers, but the same parts on the California Vintage are identical to the V11 engines on the other California models like the EV. I didn't recall reading anything about the California Vintage having any better engine performance than the other V11 California bikes. If so, it would be great to see some documentation on how the California Vintage incorporated components from later bikes and platforms. It's a pretty cool bike. I like it better every time I check it out, especially in black with that skunk stripe seat. ....and it's amazing how much ground clearance all those V11 California based bikes had, especially with the current fads of very low cruisers. The V11 California bikes look a lot more sporty, and definitely European. .......aaaaand it's interesting how often it is said in reviews how the V11 California bikes are "small" or "medium" sized cruisers, but clearly from the photo above they are full size bikes, albeit smaller than the big baggers and even Moto Guzzi's current crop of cruisers. But I think these look more sporting.
-
anyone know Dave Blue, guzzi rep from way back?
al_roethlisberger replied to Gmc28's topic in 24/7 V11
I haven't heard of him, but along with hoping he's OK, it would be great to get the "top 10 tips to get it to run right" from these guys. I suspect it isn't anything complicated like dyno runs and CO probes, but instead is simple stuff we just didn't know to do, or to correct factory SNAFUs that were compromises to meet a given nation's emissions or noise standards similar. -
Of course, agreed. And I'm sure the HP claims are at the crank, they almost always are.
-
Yep, mine just came in too. I suspect sales of these specialized "cottage industry" items is closely correlated with forum posts
-
Thanks everyone! Here's my thought, as others come across new values specific to a component or find a correction we update the thread and ultimately the master list.
-
It's a shame all the Moto International original owners and staff have retired, and MI itself then shuttered after the new owners didn't maintain the same customer service and passion. Or they actually looked at the books and decided they couldn’t make it work. Heh, well I suppose that is possible too. I just recall reading on another forum that the quality of service had drastically deteriorated after Dave and Greg were gone, and that the new owners were "just trading on the name and past reputation". But I personally have no first hand knowledge. It's all academic though as MI is now out of business entirely. Time moves on, things change.... it was good while we had 'em
-
It's a shame all the Moto International original owners and staff have retired, and MI itself then shuttered after the new owners didn't maintain the same customer service and passion.
-
1100 Sport torque Specs This is information raz collected from various places. Usual disclaimers applies. Ranges have been deduced to some sensible mid value and all are converted to Nm. 1100 Sport i workshop manual Nm Notes Nut and stud for cylinder head tie rods (M10x1.5) 40 Bolt, rocker pin securing 7 Spark plugs 25 Hollow screws (banjo bolt?) delivering oil to heads (M8x1.25) 16 (I'd rather use 10-12 for the banjo bolt) Nut, camshaft sprocket 147 Nut, oil pump sprocket (M8x1) 22 (not in Guzzi manual) Screw, intake pipe 20 Connecting rod cap securing screws (M10x1) 62 Screws securing flywheel to engine shaft (M8x1.25) 40 Loctite medium, new screws Screws securing flywheel crown (M6x1) 16 Nut locking alternator (M16x1.5) 78 Nut locking secondary shaft (layshaft) 167 Cap for topping up oil in gearbox and transmission 29 Safety nut for secondary shaft 74 Nut locking bearing on bevel pinion 186 Screws securing crown to drilled pin 40 Screw to fix stand support plate 71 Front wheel spindle 93 Fork pinch bolts are M8x1 22 Screw for rear wheel spindle (case side) 118 Screws for front and rear brake discs (M8x1.25) 28 Loctite 270 Triple clamps, 7 screws 19 Fork drain screw 23 new copper bushing Large bevel gear screws x 8 40 Loctite 601, new screws Reaction rod back 30 Reaction rod front 51 Bevel gear tripod back 39 Loctite 601 Bevel gear tripod front 28 Loctite 601 UJ fastening to rear drive 39 Side plate, rod beneath swinging arm 49 Side plate lowest/frame to gearbox 78 Engine to subframe/ subframe to frame 78 Oil breather lines/ oil cooler (M16 banjo bolts) 30 (not in Guzzi manual) Standard values Nm Guzzi, use when not listed above M4 3 M5 x 0.8 6 M6 x 1 10 Oil pan, rocker covers and other casing M8 x 1.25 27 M10 x 1.25 47 M12 80 (not in Guzzi manual) V1000G5 shop manual Nm / guzzitech.com Oil level and drain plugs, gearbox and rear drive box 25 Brake caliper fixing bolts, M10x1.5mm 36 Griso 1100 workshop manual Nm Oil filter 19 Steering head plug M29x1 100 Standard values: Aluminium (lubed) Nm / dodgeram.org M6 7 M7 11 M8 18 M10 30 M12 55 M14 90 M16 140 Standard values: Grade 8.8 Iron (lubed) Nm M6 9 M7 14 M8 23 M10 45 M12 80 M14 125 M16 195 Standard values: Grade 10.9 Iron (lubed) Nm M6 13 M7 18 M8 33 M10 65 M12 115 M14 180 M16 280 Standard values: Grade 12.9 Iron (lubed) Nm M6 14 M7 23 M8 40 M10 70 M12 125 M14 195 M16 290 Source: member since 2007: raz "Bork, bork, bork!"
-
That's true, +1 on the Guzzi bag. I have the V11 Guzzi bag somewhere, and it indeed does work well. I thought about mentioning it, but wasn't sure if was still available?