al_roethlisberger
-
Posts
4,482 -
Joined
-
Last visited
-
Days Won
21
Content Type
Profiles
Forums
Events
Gallery
Community Map
Everything posted by al_roethlisberger
-
I gotcha ...same here regarding "more info"... heck I almost installed a fuel-pressure gauge during all my pump relo projects In the end I thought it was overkill though. I wouldn't mind a real oil PRESSURE gauge though. That might be more useful than the "uh oh, I just cooked my main bearings" idiot light, or oil temp I've wondered about the best place to put that though, other than just tee-ing off the location for the current oil-pressure sensor. I don't think there's a tap anywhere else I could put a pressure sensor into Maybe someone knows of one, I don't upon casual inspection. Oh, and although I don't know the answer to your first question: I'm going to guess that based on the fitting in the photo, and what most people care about, it's oil temp, not head temperature. The only real advantage knowing head-temps is tuning the ECU for air/fuel ratio. al
-
...they sure do have some nice stuff though al
-
Wow, that's expensive.... I wonder where the sensor bolts into? And it looks like you lose our nifty dashboard(although I assume you could mount the gauge elsewhere if desired, especially on a LeMans). I've got one of those goofy dip-stick thermometers from MG Cycle, and although you can't see it when riding(without gymnastics ) and I'm sure it's not hyper accurate, I have used it for various testing when troubleshooting various heat-related issues, and it's at least "consistent" Anyway, other than neato factor, I'm not sure what this would buy you.... I don't think anyone has reported any overheating issues with these bikes per se, even in high-temp environments. We have had some "heat related" problems with the fuel systems, or the valve lash being too tight, but no endemic problems with the engine overheating. I guess like with any air-cooled bike, one just has to use common sense about sitting too long in the heat. A few years back, I was in the Nevada desert, where they had just laid new jet-black tarmac... and traffic was stop and go for about 45min while they continued with some road work. After sitting for about a minute and a half, and realizing we weren't moving anytime soon.... I just shut my FJ1200 off and waited. But anyway, as a "farkle" I think this gauge is pretty neat. I'd probably buy one if I had $300+ just lying around You know how I like "gizmos" I just don't know if it's "necessary" BTW, it's also only listed as available for the Sport1100 and Daytona. I don't know if that matters for a V11 Sport/LeMans application. al
-

Swingarm Pivot Bolt Sizes
al_roethlisberger replied to al_roethlisberger's topic in Technical Topics
Ok, well to answer my own question... after chatting with Paul via PM, the "on center" question is only critical in relation to location of the bore to the other mounting points on the sideplate, not the relief/surface of the casting. So, if we assume Guzzi "got it right" with the original 20mm bore of the donor plates, drilling them out to 22mm "on center" should be the safest approach by retaining the true location of the pin these plates were made to fit. Does this make sense? We are also assuming here as well that Guzzi didn't make any major changes to swingarm and drive-shaft tunnel dimensions between the mid-90s Sport1100 and the V11 Sport, such that a difference of 1-2mm(2002 hole located down and to the front diagonally ~2mm) would cause a problem Or again, maybe my left 2002 plate is just an aberration? Is everyone elses pins/nuts (no pun intended ) centered? My right one seems to be. Maybe I am just "tilting at windmills" here, but I just don't want to install these and have my driveshaft hit the tunnel or some other oddity. I can't imagine 2mm making that much difference(given the location of the pivot, and it's relation to the rest of the swingarm).... but, just thought it's safer to ask. al -
Swingarm Pivot Bolt Sizes
al_roethlisberger replied to al_roethlisberger's topic in Technical Topics
Ahh, just sent you an identical PM as my post above... nevermind So, anyone know the answer to my question about the centering(or lack thereof) of the threaded pin hole in the 2002 sideplate, versus the Sport1100 plate, which is perfectly centered? I am having the Sport1100 plates drilled and tapped for the new 22mm size, and the existing bores are perfectly centered in the flat area the lock-nut cinches down to. However, on the 2002 V11 Sport plate(the left one at least, not sure about the right) the hole is a couple mm off-center, a little down and to the front.... I just want to make sure this dimensional difference isn't critical, as I am having the machinist enlarge the Sport1100 plates to the 22mm "on center". I suspect this off-center hole on the newer plate was a manufacturing error, as visually(I haven't had the pin out of the right 2002 plate yet) the lock nut looks pretty centered on it's raised mating surface on the right 2002 plate. Any thoughts before they drill my Sport1100 plates?? Should the new holes be centered? al -
Swingarm Pivot Bolt Sizes
al_roethlisberger replied to al_roethlisberger's topic in Technical Topics
Paul, Thanks, but I've already dropped the plates off.... although I suppose I could "stop him" as he had to order the 22mm tap, and won't have it until tomorrow. Do you have a link for Daes Motec? I Googled them, but didn't find a link. I wonder how quickly they could ship me the part.... and how much they cost... that would be my determining factor. Also, SS isn't as strong(typically) as high grade steel. I don't know what these pins are made from, but I would assume it's a higher grade CroMo or similar Would SS be a good choice? al -
Swingarm Pivot Bolt Sizes
al_roethlisberger replied to al_roethlisberger's topic in Technical Topics
Well, unless someone else chimes-in, I just heard from Micha at Moto International: ....so I'll cart the plates down to Nichols for machining Final "word to the wise".... Sport1100 sideplates are not all going to be a bolt on fit for the V11 Sport. Maybe later ones will, I have no idea, but check first The plates I have are from 1996 I believe. al -
How to? ...replace the "pork chop" sideplates
al_roethlisberger replied to al_roethlisberger's topic in How to...
Well, although I had to abort the attempt to swap out the plates this afternoon because of the issue covered in this thread: Sport1100 side plates use a smaller diameter swingarm pivot than the V11 plates ..... I can confirm that it is totally possible to change out the side plates in your own driveway, one at a time, without something catestrophic such as the bike "breaking in half" occuring I supported the bike under the oil pan(with padding) using a flatbed lifting jack I had, while keeping the rear tire lightly on the ground. This kept the shock fully extended, but no real weight on the swingarm. At that point I was able to carefully remove one plate, and reinstall it without any undue stress. Once I get the swingarm pivot bolt issue resolved, I'll try this again. al -
Well, as mentioned briefly in "How To", I was trying to swap out my "pork chop" sideplates with some that I had powder coated a nice new red. This newly finished set came from Joe Camarda, who had picked them up second hand, from a wrecked Sport1100. And from everyone's perspective, and visual inspection, they should have bolted right on. Well, of course, as soon as I had one of the original plates off, and was about to reassemble and mount the new one.... well, they aren't exactly the same Everything matches up dimensionally, but the diameter for the swingarm pivot bolt is a couple mm smaller than the bolt used on the V11 sideplate. So apparently MG changed the size of this bolt to a bit larger sometime between 1996ish and 2002 Anyway, I have two options it seems... 1) The first option, if workable, obtain some pivot bolts and lock nuts for a Sport1100 and use them instead. The catch here, and my question, other than the threaded portion, is the actual pivot that inserts into the swingarm bearing the same diameter as used on the V11? If so, this would be an easy swap. If not, new bearings would be required, which I don't want to pursue. 2) Machine out the hole in the Sport1100 side plates to accomodate the larger V11 pivots. An interesting sidenote is that the holes on the V11 sideplates is not perfectly centered in the area made for this bolt. The factory hole seemed to have been drilled out a little down and forward by a mm or two. I don't know if this was on purpose, or just poor QC from Guzzi So, again.... does anyone know if the Sport1100 pivots can be used with the V11 bearings, or should I just get the sideplates drilled/tapped? al
-
SF Bay Area Guzzi Dinners
al_roethlisberger replied to al_roethlisberger's topic in Meetings, Clubs & Events
Couldn't make it myself due to other family stuff Maybe next month, although that will be a few days before the baby is due, soooooo....... al -
BTW, I don't think the rear brake caliper uses the same SB1010S fitting as the front brakes. I was holding up the M10 fitting they sent to the stock fitting on the rear brake caliper, and it seems to match in size visually. Anyone know for sure the size of the bleeder in the rear caliper before I yank it, and/or order another one from Speed Bleeder. al
-
Ahh yes, the infamous(didn't I just use that moniker in another thread? ) rear brake "groan" while rolling backwards This is VERY common, and fortunately is not a sign of knackered bearings, etc... Many people have thought that their rotor was warped when this happened, but after much trial-and-error, I am convinced it is a matter of the caliper pistons binding up due to debris, especially on a new bike as the pad material gets eaten away as the pads seat. Several of us have found that a good dousing of the rear caliper with brake cleaner will cure this problem for a long while. If it returns, just pull the caliper again, and spray liberally. I suspect you will be amazed at the amount of debris that will "wash" out. al
-
I too would like to know the length of the clutch, and both front brake lines when adding risers. I was given a set of risers, similar in execution to the MPH units, but I'll need new lines. So it would be great to know how long each of the three lines has to be. al
-
I just cut 'em off..... if you use a new sharp blade, and take your time, you won't hurt anything. The throttle tube is pretty hard plastic, and thick, so it would be hard to damage it. And of course, on the left grip, it's just a metal bar. Just slice them down the middle, lenthwise, and peel 'em off like a banana peel al
-
Ahh, looks like one of the few 2003s we've heard of with the infamous return-spring failure. More info here: http://www.v11lemans.com/forums/index.php?showtopic=1633 ...if it is your return spring as covered in the FAQ, make sure they replace the bracket/boss, not just the spring. Otherwise you'll just have this failure repeat itself in a couple thousand miles al
-
Has anyone installed the JB1010S(M10x1.0 1.23mm) to make sure the length and thread pitch is correct? This is the size they sent for the clutch slave, and as confirmed by Todd above, M10 is the correct diameter. I am just curious if the length/depth is correct, along with 1.0 thread pitch before I pull mine. Also, have we confirmed that the SB8125L is also correct for the rear caliper? Once we have this last little bit confirmed, I can return my mis-sized parts, and get SB to send the correct ones. Thanks al
-
Thanks Interesting feedback, as it looks to me like they would seem to make a BIG difference in ergos. Maybe in combination with the TB bars, you can't tell so much?? I bet in combination with the stock bars, the difference would be quite noticeable, perhaps more than with the new bars in combination They do look a bit bulkier than the stock solution, but other than the custom plate for the shift linkage, this looks like it could be a good solution for many folks Thanks again for the great photos. I'm sure that will help a lot of folks making their decisions. al
-
Thanks Dave! Ahh, so you were able to mount them above the triples... eeeenteresting I didn't realize that. ...did you have to drop the triples a bit to do so? It seems like there isn't enough of the fork crown normally protruding above the triples as delivered stock otherwise ...or maybe it's just an optical illusion Another interesting observation is that you must have a later model 2002, as your controls are the late 2002/2003 variants. I picked up a set of 2003 switchgear on eBay a month ago, and the right hand switches will swap out evenly with no modification, but the left uses a different harness I believe. It will plug-in, but it looks like the wires are all rearranged in the connector Just something "good to know" in case you ever need new controls/switchgear. al
-
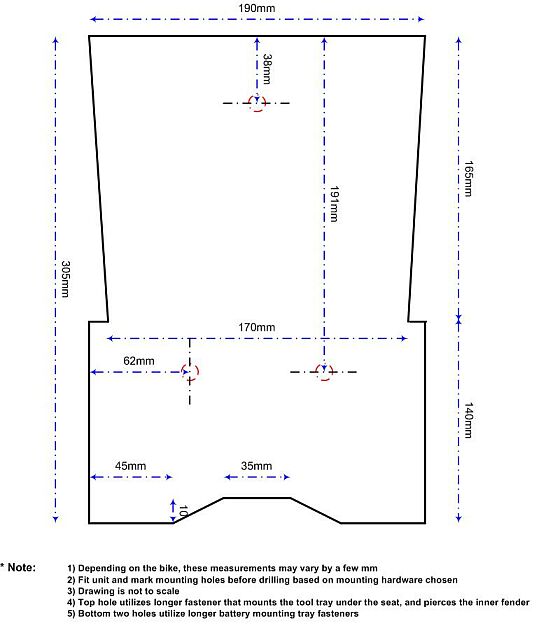
Due to popular demand, here is a drawing(and yes, it's metric this time ) of the inner fender mod shown in the photo above. The material is 1/8" textured black PVC(I think), available as scrap from my local TAP plastics for about $2. Whatever it is, it is nearly indestructable Keep in mind that the measurements may vary by 1-2mm depending on each bike's unique dimensions, but in general the dimensions shown should be accurate. The real trick will probably be to make the fastener holes a bit oversized, especially the top lone hole, to allow some "wiggle room". It's not a perfect solution, but this certainly helps to keep debris off of the shock, and protect the battery and wiring harness that as delivered from Guzzi is exposed. Hope that helps. al
-
Question: What would be the best adhesive(or tape-type-stuff) to use to attach the "Moto Guzzi" emblems to the tank? Obviously something water proof, and low profile would be preferred. Someone mentioned just a few dollops of black RTV, but I dunno... would that hold long term? al
-
Great Mike Stewart has them on his V11 Sport, and Dave Gross on his LeMans, and I think they've been happy with them. If you have any additional questions, you should drop them a note I think a couple more may be "out there" as well, although I don't think anyone has mounted them above the triples AFAIK, especially with a LeMans, where fairing clearances are an issue. al
-
I know we've briefly discussed this in threads like "crabbing the spine frame", but I was thinking about replacing my side plates tomorrow(I had some new ones powder coated a few moths back), and wanted to check-in first to see if there are any catch-22s to be aware of. I don't have any way to "hang" or support the frame from above, so I was going to support the front of the bike under the oil-pan with a flatbed lifting jack I have. And I assume at that point, the only thing that will "fall off" once I remove one side plate at a time will be the swingarm. Can I just support it with a block of wood or similar under the tire and keep it "square" with no ill effects? I planned to just take and replace one plate at a time. Anyway, I just wanted to touch base for any tips in case anyone else had done this already. al
-
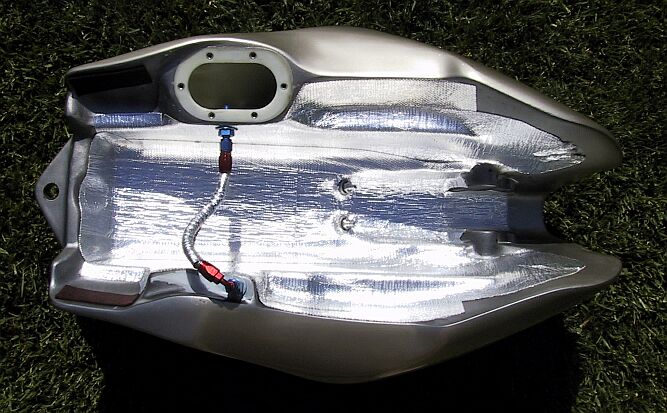
Here is the balance tube installed on the bottom of the 2003 tank. It isn't ideal, as one side(the pump side) is a bit higher as that's the lowest point on the right side of the tank, but it will still "balance" the two sides of the tank to some degree with no "sloshing".... ideally providing access to I guess about 70% of the "isolated" fuel on the left side.
-
...now, THAT is customer service I've suggested the same for various parts before, but generally met with a cool reception
-
Indeed, aery important point when checking all the fluids, not on the side-stand