-
Posts
550 -
Joined
-
Last visited
-
Days Won
8
Content Type
Profiles
Forums
Events
Gallery
Community Map
Everything posted by Gio
-
I'll have to look at mine...I've been thinking about my Eldorado recently, so I have that on the brain. It really shouldn't be too hard to take the intakes apart though. Are new gaskets available? I'll pack that wine up post-haste and get it right out to you! I'm sure that new gaskets are available, as would new intake rubbers should the hardened one crack during removal (!) ... but this is how these things go sometimes - one thing leads to another. So if I start to add up the cost of the helicoil kit and possibly gasket and rubber ... a small dab of JB weld starts to look way easier/cheaper. Plus I get a bodge point!
-
Interesting option Chuck - and less expensive than I would have thought. Could this also double as a compression tester? Seems to me that a compression test gives more of a dynamic snap-shot (ie piston / valves moving through complete cycles) followed by a leak-down to pin-point any problems ..? I already had a screw in compression gauge on hand and (fingers crossed) so far have not had to resort to further testing.
-
I'm not so sure it would be as easy as 3 bolts jrt ... I suspect the main problem would be removing the original (12+ year old) throttle body rubbers (which are now nice and hard) and possibly getting the manifold gasket to re-seal. Then I would need to replace the balance nipple with another size etc etc I think the balance tube solution is perhaps the easiest ... and even if this hardens or leaks, tube is easy to replace. And yes - little Chianti corks would be cool! PS - why exactly are you sorry about too much wine ..? Send some my way if it becomes intolerable
-
Thanks again for all the advice. I share your concern re the risk of flakes guzzimeister (I guess we are not as brave as Hubert!). Just waiting on another possible option (a used manifold) ... but otherwise the urge to bodge will be hard to resist. Cheers, Gio PS - do we still award bodge points ... and if so can they be converted to airmiles or ?
-
Always nice to compare notes with a fellow bodger ... it is the drill flakes that I would be concerned about with options 2 or 3 (unless manifold removed for drilling) and as I do not have the heli-coil stuff I think I will go for option 4. Thanks for putting my mind at ease. Bodge first - ask later. I like that! See you further down the slope then. Gio
-
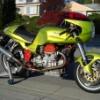
Nice looking bike - and from the write-up it sounds like they did a very thorough re-build.
-
I'm trying to decide which way to go re a damaged inlet manifold - the thread on the left side balance port is stripped. The options I'm considering are : 1) replace with new or used manifold (if I can find one) 2) drill and re-tap the port (would need new balance nipples with larger thread) 3) drill and heli-coil the port (to orig thread) 4) JB weld balance nipple(s) in place and either plug or connect together when not in use Option 1) might be $$$ and I would prefer not to have to remove the manifold and/or drill the port ... so leaning toward option 4) Question - what would be likely result of an air leak (eg if the JB welded nipple became loose)? I realise that this would imbalance the "carburation" and also lean out the mixture on the leaking side ... but is there any danger of say burning a valve or ???
-
Looking for just the left side, or even a pair of inlet manifolds for a 2000 V11 Sport. The allen bolt that plugs the balance port on the left side has stripped the thread in the hole - so would prefer to replace than try and re-tap. Am located in NS, Canada. Edit - managed to repair so no longer needed.
-
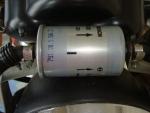
Replacing the fuel filter today - the last one I purchased from my dealer out west (in 2009) was also the Bosch F5002 (previously I had used the stock Weber filters) and I note that in addition to the size difference (my bracket can accomodate this) the other big difference is that the Weber flow exit is on the welded end, wheras the Bosch flow exit is on the non-welded end according to the label. Can anyone confirm this - I want to make sure the Bosch flow direction label is on the right way before installing ... PS - if you ever need convincing of the merit of regular filter changes - just try back-flushing an old filter - it's scary what comes out!
-
Interesting feedback guys ... Diesel engines I can relate to Hubert (I have an Italian made Lombardini in my tractor - and it always starts - even in winter), but Boyles law ... er, still too early for me Roy but I think I get your drift. Thanks for the education.
-
Photos ..?
-
Here's a follow-up to that thread: http://www.v11lemans.com/forums/index.php?showtopic=15408&view=findpost&p=171867 raz Thanks Raz - I recall reading about your adventure but missed the compression test update ... something I learned (I think?) from that old thread would be that the calculation for a stock motor (spec compression ratio of 9.3) should give expected compression of around 9.3 x 14.7 = 136 psi ... I also learned that there are many other variables here (temperature of motor, accuracy of gauge etc) but is this a theoretically correct calculation? This is purely for my own interest ... it's still the "off" season remember!
-
Yes - wide open.
-
Motor was cold (very cold actually!) ... and yes, this is what I got from the earlier thread, a measured difference of only 7% between the pots, and also in the "expected" range of 140-160 psi (warm values) ... thanks for the feedback
-
I mean, you normaly can't tell a badly paid line worker "just make it right", they need some objective guideline. hubert Perhaps a length of al dente pasta wrapped around one of the fork legs, should be able to tug the forks one way, and then the other without breaking if properly adjusted ..? Apologies in advance for the flippant comment. I've always gone with the adjust until bind, and then back off a tad method also. Gio
-
Just finished head-torque and valve adjust and thought I would do a quick compression check. With plugs out, fuel pump disconnected (as tank is still off) and throttle wide open I'm getting 135 (~5 cranks) to 145 psi max on right cylinder and 135 psi max on left ( after ~ 20 cranks) ... does anyone have spec or expected values (couldn't find anything in the manual) ..? Bike is a 2000 sport with 85,000 km and runs very well. Gio (I did try a search but was getting all sorts of weird results to un-related posts when I searched on "compression check" ..?) Edit - just found and tried Doccs suggestion (from another post) and sorted search results by relevance followed by "update" - this produced more relevant results including this one : http://www.v11lemans.com/forums/index.php?showtopic=11694&st=0&p=124262&hl=compression%20check&fromsearch=1entry124262
-
No idea, sorry. I thought it could hardly become worse as it was already, and as the 2.option with the $$$s was not an option I just did it. So far (25.000km) all is fine. I will make a picture next time I look after it. Actually I'll loose a finger or two should I touch anything 'frosted' outside Definitely. There is not very much movement between the mating surfaces, so nothing bad should just fall out of the blue. Just watch it, now as you're sensitised for it. Next time you pull the bearing pin you might want to mark its orientation and compare that with how the pin itself is wearing. My experience says that these rockers always look like that after 'some' time. I had 4 or 5 engines over the years, all with 100.000 at least (never bought a new one so far), so I don't think it's really a matter of batch. Hubert PS: this mug has done 125.000km. Would be nice if I had a picture of it at 50.000 Thanks for the advice. As far as losing a finger or two, normally this would be the case here also as the bike usually lives in the barn (and forecast for tonight is -14) ... but I rode him into the porch which has become the winter workshop. Closer to coffee / beer etc ...
-
I noticed that over the time the valve train became remarkably louder and I thought this particular point could be part of the emissions. It was not. Anyway a smooth surface there could take off some stress from the valves' endings, as you wrote already, otherwise the valve guides will go even quicker (bigger lateral forces). If you still have the heads off you could consider the Guzziology idea of arming (and enlarging) the valve ends by putting Ducati shims over them. Hubert Not planning on removing the heads in my case, and so I guess my choices are 1) grind/polish to remove the pits (not sure how much material can safely be removed - Hubert?) 2) replace the rocker assy ($$$) or 3) re-install and keep an eye on clearance for any further wear ... very tempted to go this way! Based on the pics, it looks like Bjor's rockers have experienced greater wear than mine (and in significantly less km's) and so I would ask the same question as thumper re what clearances were used..? Of course this could just be a production/batch issue and not related to clearance.
-
I think folks who remove the air box (eg to install pods) have done that, but can not think why one would remove the sensor from the air box otherwise ..?
-
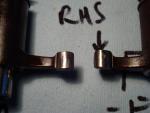
Not wishing to hijack Bjor's thread, but I have made similar observations. The left side rocker arm pads were very smooth, but right side have some very small pits (detectable via fingernail) - particularly the exhaust (see attached pic - may not be obvious). Bike has just under 85,000 km and I was running 6 and 8 thou clearances (measured 7/9 before re-torque) but think I will back these down to 5/7 or even 4/6 again. So I guess I have the same question as Bjor - to try and grind / polish out the pits or will this do more damage than good ..?
-
I will leave for more experienced members to answer your question, but there have been a few cases of wear reported recently which has prompted me to include a look at the valvetrain on my '00 as part of the adjust/head torque work this weekend. Lex Stockton did a very good write-up on this procedure in the FAQ section - but perhaps adding an inspection of these items would be a good idea whilst the rocker arms are removed ... Gio
-
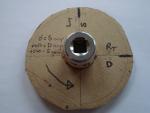
Agreed - use of the cardboard wheel is not intended for accuracy - but it costs nothing and provides a quick visual confirmation without having to look for the marks (except first time) or poke anything into the cylinders ... but I accept that spinning the rear wheel is perhaps a simpler method ... have attached a pic for those that may be interested. Looking forward to the arrival of Spring! Gio
-
I'm not sure if that would work as it's not just TDC you are looking for, but TDC on compression (ie valves closed) for adjustment ... and re-reading my earlier suggestion I realise that what I wrote may require some clarification : Starting at S (LHS @ TDC - compression - adjust here) +90 (anti-clockwise) = D (RHS @ TDC - open) + another 270 = S (LHS @ TDC - open) + another 90 (450 total) = D (RHS @ TDC - compression - adjust here) + another 270 = back to starting point again (On second thoughts I guess you could rotate 270 from D to S with piston stops fitted, but I think I would prefer to keep turning one way completely through each cycle in order to verify any adjustment made on the previous cycle ... if that makes sense?)
-
+1 ... I lost a couple of those screws early on (from good vibes!) but a dab of the blue stuff keeps them in place.
-
As a refinement of the above, I slide a small cardboard wheel over the 24mm socket marked with D and then 270 degrees later S so that once aligned (with reference to the stamped marks) you don't need to keep checking the timing marks ... turning anti-clockwise and starting with D (RHS TDC) turn 270 = L (LHS TDC) then turn another 90 = D again etc (so you can check any adjustment you made on the previous cycle)


