-
Posts
5,003 -
Joined
-
Last visited
-
Days Won
257
Content Type
Profiles
Forums
Events
Gallery
Community Map
Everything posted by Lucky Phil
-

Rear drive needle bearing and swing arm restoration
Lucky Phil replied to Bjorn's topic in Technical Topics
My home made tool works really well, truly it does:) But the secret is loading up the bearing and then impacting the bearing housing with a copper hammer or a 2lb hammer with an aluminium block to protect the swingarm. The impact shock is absolutely critical to the operation. The problem with the impact puller is mainly the fact that it's difficult to restrain the arm solidly so the energy from the impact of the slide hammer is all transferred to the bearing. Docc had the theory right but I'm still surprised the webbing wasn't too stretchy. Ciao -

Rear drive needle bearing and swing arm restoration
Lucky Phil replied to Bjorn's topic in Technical Topics
I didn't want to say that Pete. No way would mine come out with a slide hammer only. Ciao -
I have also used aluminium fasteners in the past but only in non critical items like clutch covers and engine valve covers etc. I havent used them now for years since Titanium became affordable. I source mine from Toronto Cycles in Canada and Chinese ebay ones. Ciao
-
SS is a terrible material for fasteners, simply not enough elasticity. The majority of bolts on all my bikes are now Titanium which is a great fastener material and stays looking like new forever. Ciao
-
I dont thinks it's just happenstance that the section that always fails is also the section with the closest pitched retaining bolts and is on the low side. A combination of more local clamping force and the natural subconscious "this is the place where it's most likely to leak" results in overtorque. Once the gasket deforms around the bolt hole the bolt threads then grab on the gasket and distort or tear it from the bolt hole and then the cyclic expansion and contraction due to heat and crankcase pressure continue the process. Looking at the larger image of the green gasket you can plainly see the distortion of the gasket hole. Even if you reposition the gasket break the hole will still be distorted because as the bolts been torqued its grabbed the inside of the gasket in the mount hole and started the tearing process. If you positioned the gasket on the head or cover with some Hylomar to hold the gaskets mount holes in the correct position during the fitment process it would also go a way to preventing the occurrence. Or you can just move into the 21st Century and use a metal based gasket which is a lot more robust all around and can tolerate any mount hole misalignment stresses during fitment. Ciao
-
It comes out with a fingernail sometimes. No need for a tool. Ciao
-
Ha, ok I was imagining it was used from the other direction,Doh. Thats why the knurling is where it is. Sometimes my dumbness amazes even me. Ciao
-

Oil on engine case....?cylinder head gasket replacement
Lucky Phil replied to plexiform's topic in Technical Topics
Ha, yes I've had a few interesting discussions with Boeing "We didn't think of that solution so it can't be right" design engineers a few times. Ciao -

Oil on engine case....?cylinder head gasket replacement
Lucky Phil replied to plexiform's topic in Technical Topics
Yep, not bad. I've looked at a dozen or more of these charts over the last few months and whats frustrating is they can vary wildly in their application criterion. I was primarily looking at Petrol compatibility and as this chart shows FKM is very good but I've seen charts that says Nitrile is good with petrol which it isn't in my experience. It's acceptable in fuel for a captured joint with no relative movement where the significant swelling can work to improve the seal but if you want a seal that wont swell in fuel you need FKM. An example. The link you sent indicates Nitrile is "poor" for gasoline but if you go to their complete compatibility guide it's rated as a "1" "satisfactory" ! There are so many seal material compositions that it gets complicated and identifying what a seal is actually made from can be next to impossible if it's not labeled. Viton/FKM all the way for me, you can't go wrong in the majority of applications. We actually had a major issue with Leading Edge slat actuators leaking on 737's a few years ago. They changed the seal material and the new material wasn't as good at low temps. On a flight of around 3-4 hrs of cruize@ 42,000' when the actuators had cold soaked they used to leak everywhere to the extent the passengers could see a trail of skydrol coming off the trailing edge of the wing. Shorter flights were ok and once it landed the seals in the actuators had warmed up again and stopped leaking. Even the designers get it wrong sometimes. Ciao -
Over torquing and old obsolete technology is the issue. Ciao
-

Oil on engine case....?cylinder head gasket replacement
Lucky Phil replied to plexiform's topic in Technical Topics
You know docc I wouldn't use those ebay ones or any Buna-N or Nitrile o-rings anymore unless I was desperate. The Viton or FKM are the only way to go I think. Buna and Nitrile have an upper temp limit of 100deg C and even the crankcase oil can easily achieve that under the right conditions. Viton and FKM are around 240 dec C from memory and are fuel proof as well. Some of the Guzzi orings that have been superseded have been done so because they have been changed to Viton. Thats why the Nitrile o-ring leak with age because they are operating up to and over their upper temp limit and they harden. Ciao -
I dont understand what surface the depth tool rests on with regards to the crankcase surface. It appears to have a tapered shoulder that rests against the edge of the oring opening, is this correct. If so what flat face do you measure against to get the depth? I would have a flat face on the body of the tool that sat flush against the crankcase face that the sensor plate and shims bolts to then after setting the depth measure from that face to the end of the body and and from the depth projection to the end of the body and subtract the difference to get the reading. Ciao
-
Nice cam sensor tool. I assume the projection slides in and out of the body and is held by a lock screw to get the depth? Although how do you get the depth measurement? Even using a vernier is tricky with the engine on the bench and impossible with it in the frame. Might need to make me one of those in aluminium. I also made an Ohlins fork cap toll about 25 years ago, I'll dig out the image. Here it is. Ciao
-

Oil on engine case....?cylinder head gasket replacement
Lucky Phil replied to plexiform's topic in Technical Topics
Highly unlikely. Personally I'd be doing a simple compression test before I got into a head removal. Ciao -
My suggestion is tighten up the valve clearances, .007 and .009 is too much. Even going from .10/.15 to .15/.20 made starting harder. Just a suggestion. I'd actually go back to the factory settings of .1 and .15 just to compare and then if the difference is profound you can either stick with it or go .15/.20 again. When chasing issues it's always best to revert to factory settings and at least get a baseline again. You can always revert if you wnat to. Ciao
-
Yes I thought as much but asked the question anyway as someone may have come up with a miracle. FWIW your strategy is perfectly reasonable but not practical insitu. There is I believe a better way. Your burner doesn't produce enough high intensity concentrated heat.What you need for maximum effect is a fine tip in an Oxy torch. I'm going to machine up a cylindrical shroud so I dont burn anything around the throttle body and hit it with the fine tip of my Oxy set right on the head of the fastener. But before that I'll test my process on the other set I have coming and see how long I need to apply the heat to get the desired result. I mentioned once before it's best to avoid separating these things but sometimes you don't have a choice. Ciao
-
Dont know i'd need to measure both to be 100% sure. I'd be happy to buy one and physically compare if I could go to the local auto shop or buy off Amazon as a US local. I just thought after years of oil filter debates someone in the states that can get the best filter available ( most likely) for an outlay of 10-15 bucks might like to check one out and confirm the fit and function and then we could all know for sure if arguably the best filter on the market worked for the Guzzi V11. It's a modest cost outlay for American compared to us over here. Ciao
-
Thanks for that, I can measure a Hiflo and compare. I was wondering if someone would risk the 10 bucks or so and try one on the next change and confirm fit and function before I waste the multi purchase and shipping from the US Ciao
-
The factory settings are .1 and .15 and most run .15 and .2 which is within reason. Running .25 on the inlet is +150% of the factory specs. It's all very well talking about CO readings and how well it runs but I'm also concerned about mechanical issues as well and I doubt Meinolf has done a 120,000 miles with these valve settings. It's like tuning a race engine, a lot of the time you need to sacrifice the last few % of performance to aid rideability and reliability. Ciao
-
Will somebody here buy/test a Purolator PL14476 and see what it's like for fit, function and quality? I'd need to import one and it's only worth it if I order a few. Just like to confirm the fit more than anything else. I know Purolator are probably the best filter around. http://motorcycleinfo.calsci.com/FilterXRef.html Ciao
-
Just watched a Youtube comparo between some filters and the Hiflow came out well compared to a K&N a Wix and a Fram for what thats worth. Pretty basic comparo I must admit. Ciao
-
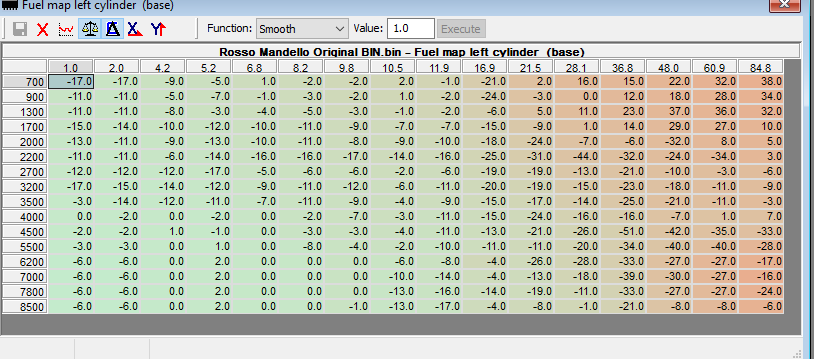
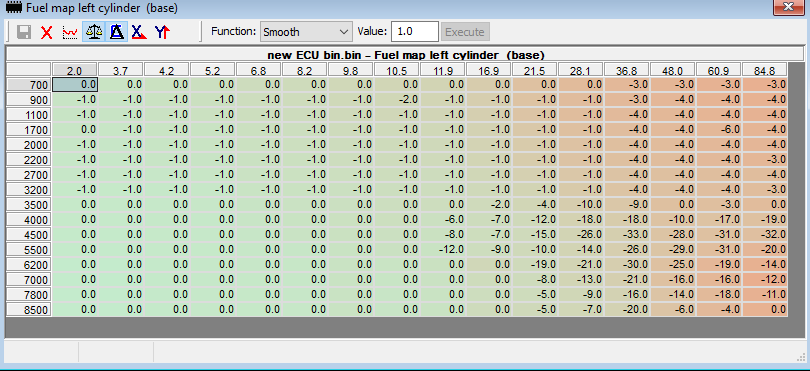
You just cant load a map without doing the basic work. From memory Meinolfs maps are set up with 150mv and the bypass screws closed and 0.25 valve clearances. I'm not a fan of his clearance figures but that's what he runs. The info is here somewhere on his base settings. Here's the delta fuel map between a Titanium map and a 2002 std V11 map. Both are Delta maps remember in percentages. Here's the delta fuel map between a Titanium map and a Rosso Mandello map. Note the different throttle brake points on this one.. Ciao
-
Ones a black colour and ones white? Not really sure to be honest. I read a lot about car oil filters a few years ago and have an opinion there but not the bike ones. Maybe I should do some research as I'm about to change out my filter on the new engine from a UFI to a HiFlo. Ciao
-
There are two styles of the metal gaskets at least for the front cover. The Valpolini style is metal core with a slightly coarse black surface finish. The other style has the metal core but a smooth black finish. This is the Ducati style and the same as later 1100 head gaskets which BTW fit the earlier bikes and give you a little increase in compression and a useful reduction/improvement in the squish. I have a set of these for my 2 valve engine as well for the next time the heads are off. Ciao
-
It doesn't matter they fit the V11. My 2 valve motor has 1100 Griso valve covers. Ciao


