Lucky Phil
-
Posts
5,221 -
Joined
-
Last visited
-
Days Won
268
Content Type
Profiles
Forums
Events
Gallery
Community Map
Everything posted by Lucky Phil
-
From the album: V10 Engine
-
From the album: V10 Engine
-
From the album: V10 Engine
-
Yes docc when I change the fluid in my wifes car 6 or so months ago I was struggling to get uncontaminated fluid indication on my tester until I actually checked the fluid out of the new bottle and found it to be 1% already!!! I had some old fluid in a sealed bottle I had had for years and checked it and it was zero. I'll be opening any new stuff I buy at the store in future and testing it before I lay down my money thats for sure. Ciao
-
Thanks man I see how I go! Ciao
-
Sounds like a good excuse to me whether the timing issue is true or not. Ciao
-
Yes that would be confusing, how did it run? I would like to get the lift measurements for the C kit cam but no one seems to have the lift figures. Guzziology has the timing specs but not the lift. If you ever come across one I can borrow Pete I might be interested in using my spare cams to see if I can get some C kit ones ground off them. Ciao
-
I dont have a CAD file Chuck, but I'm a little IT challenged. Guzzi diag is going to be interesting for me although I can work the program for the 1198's Microteck ecu so we'll see. Ciao
-
Sorry docc I may have got you worrying for nothing. I went down and had a good look at my spare gearbox and the ring nut looks to be bi-directional IE it had a taper on both faces. If you look carefully at the back side of the nut you will see its equally tapered. There is no part number difference between any of the V11 6 speed gearbox ring nuts either. Ducati bevel drive countershaft ring nuts were also similar to this but one face was totally flat and the and the other tapered. It seemed natural to fit the flat face inwards but I later read that this was incorrect and when you thought about it although counter intuitive it made sense from an engineering point of view. With the one sided flat faced nut it fouled slightly the tabs on the lock washer with the flat face against it and also presented a larger surface area to the washer which created more friction during tighteneing and a different torque so they regularly came loose. So looks like I'm wrong about this and sorry again. The image of the Guzzi ring nut had me automatically visualizing a Ducati one. It looks like the Guzzi one can be fitted either way. Rest easy, I feel really bad. Ciao
-

From the album: lucky phils V11
-
A breach of hammer and engineering etiquette. Ciao
-
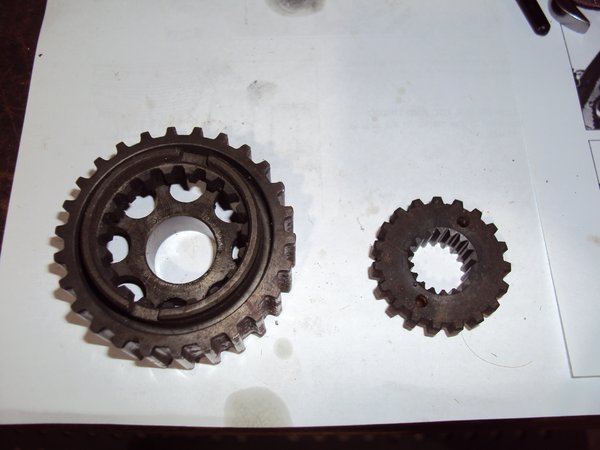
Your ring gear looks identical to my RAM unit fitted to the Daytona engine on my bench. Ciao
-
Yep thats what I meant you to do. Why have you removed the ring gear bolts? You could even use your original gearbox input hub if its not worn. BTW the image of the gearbox input hub ring nut in doccs post is shown fitted the wrong way around. The tapered face goes towards the gearbox side. Ciao
-
^^^ Same here Ciao
-
Just knock out the supplied hub and use your 6 speed one. You might need to turn the fitted one to get the splines to line up if the're out and then pull/tap it out from the engine side. Looks to me like they have just slid it in there for packaging and transport purposes. Ciao
-
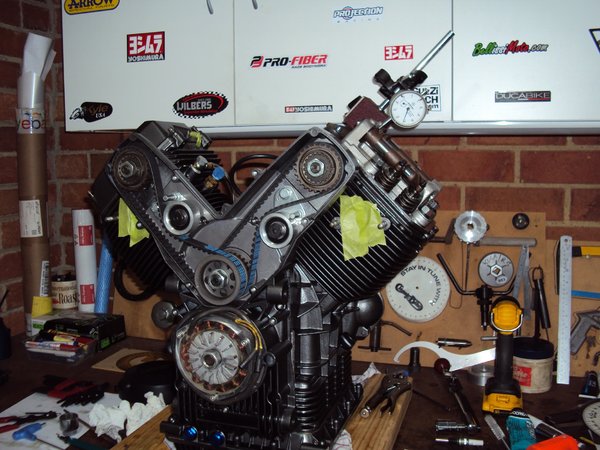
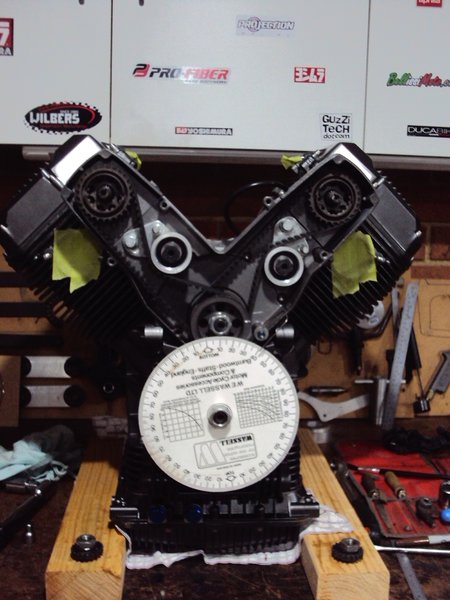
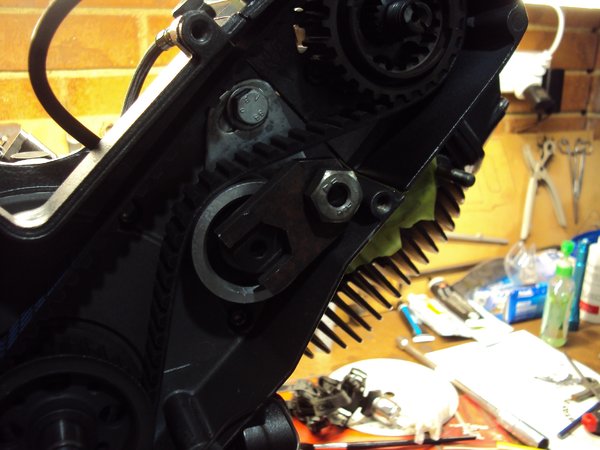
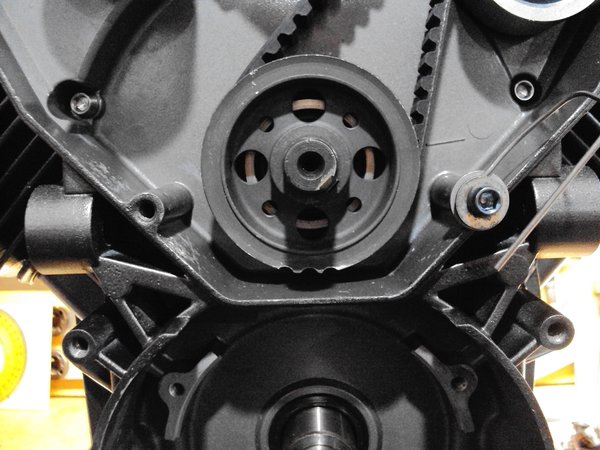
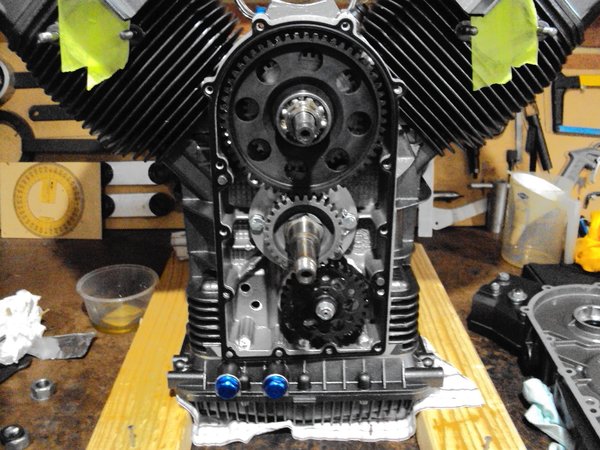
Plugging away at this. Oil pump is in and front cover on. I've made up a cam belt tensioning tool which looks a bit ordinary but works ok. Chuck sent me a file of its dimensions but I couldnt open it because I didnt have the software but when you see an image of one its so simple and you cant get it wrong anyway. Thanks anyway Chuck, just avert your eyes as its ahem....rustic. Turns out it gives you about what I thought the belt tension would be so I'll set it by feel like I do a Ducati belt. I also modified the pulley flanges so you can change the belts with the pulleys still fitted. Basically just the cam timing to do. The "tool" Pulley mod so you can replace the belts. Standard you struggle to get the belts out as they fowl on the casing. The r/h belt pulley inner flange had to be done also and line up with this one. Cam timing to go.
-
From the album: V10 Engine
-
From the album: V10 Engine
-
From the album: V10 Engine
-
From the album: V10 Engine
-
Good to know, glad you got it sorted. Ciao
-
Yes docc dont bother going inside the drive unit. There's a lot of stuff going on in there, and one of the reasons I consider that these days shaft drive is a waste of time. I'd rather turn the drive through 90 deg in the gearbox and run an oring chain and live with a bit of simple lubrication every 6-800klms. Just think, you can renew your whole final drive assembly when its worn out in a few hours on a Saturday afternoon having a couple of beers and watching the game of your choice for maybe $200 odd bucks. Ciao
-
Yes docc all the bearing should have pretty much identical dimensions as they are made to a standard. I was a little perplexed when you mentioned they were different. The calipers are accurate enough for this type of measuring. The mission is at the end of the day to minimize the lateral clamping force by the axle nut on the inner races as much as is possible. Ball bearings can tolerate some lateral load but its not their primary load path. Ducati main bearings on my engines for example are ball bearings BUT they are Angular contact type to cope with the lateral loads caused by the clamping effect of the crankcases when the engine is cold and the side thrust form those engines fitted with helical primary gears. My advise is to either machine up a new spacer which to someone like Chuck for instance would be a doddle or do as I did and add a shim to the spacer to bring it up to the correct dimension. I went the shim route because I could do it with a single shim I had on hand and I didnt have any raw stock that would be suitable at the time. I also rarely remove my wheel so the spacer falling out wouldnt be an issue. I bonded it to the spacer. When the bearings are fitted and the spacer is the correct length it also doesnt float around when the wheel is out like a short spacer. The sleeve on the right side always tends to corrode anyway but any spacer in this application and the one on the other side of the rear drive thats made of steel ( which is all of them from memory) shouldn't really suffer from any crush by whats produced from the axle being torqued up. Ciao
-
Docc all the other stack ups wont really affect or mitigate the short wheel bearing spacer. If I understand your post the spacer is 1mm too short. What are the actual differences between the bearing widths? The place you usually find C3 bearings are fitted in engines. Ducati's always used C3's in their head bearings although I dont know its totally necessary as plenty have run std clearance bearings in them. I've seen this issue of short spacer enough times for me to measure them whenever I have wheel bearing out. Its quite common, dont know why though. Maybe the bearing widths vary enough to make it an issue although I've seen plenty of original wheels and bearings with short spacers. If you look at the new bearings you will find they have a slight bit of lateral play so a tiny bit of lateral preload they can tolerate but you're aiming for zero. Maybe a combination of wider bearings and using all the lateral play reduced the issue of the short spacer on the original wheel bearings.I'd be surprised though if it mitigated 1mm too short. In general I dont worry about where anything is made if its actually a "name" product. I am wary if its a product say its a Chinese product from a Chinese company. The known big brands like Timkin etc have their own quality management and monitoring structures so are generally high quality. I've bought a few Chinese engineering things from Chinese companies over the years and the simple stuff like Titanium bolts etc are generally fine but the more complex stuff is risky. Ciao
-
Yes, on the surface of it I dont know why you'd bother really for a Brembo rear master. I mean they are only $55US to buy new, or 80 Australian Peso's Ciao