

Lucky Phil
-
Posts
5,216 -
Joined
-
Last visited
-
Days Won
268
Content Type
Profiles
Forums
Events
Gallery
Community Map
Everything posted by Lucky Phil
-
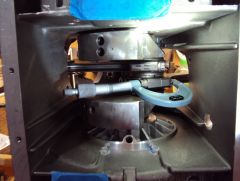
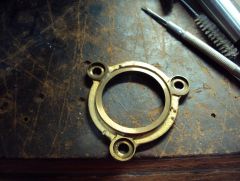
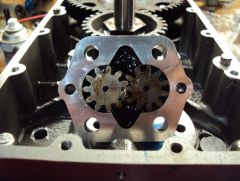
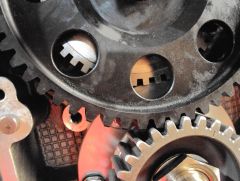
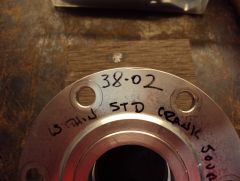
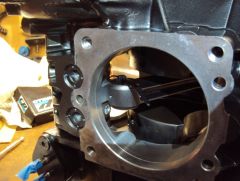
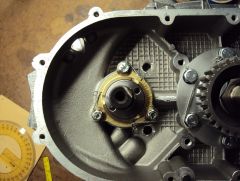
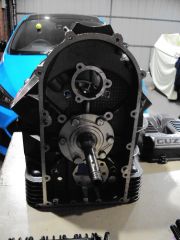
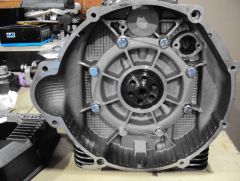
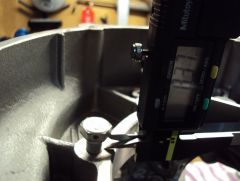
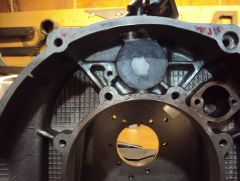
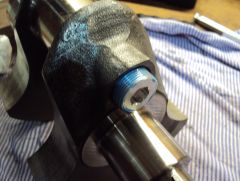
So some progress today. I managed to fit the rods and jackshaft, jackshaft gears and oil pump. My methodology with the rods was to fit the clutch assy temporarily so I could lock the crank with the pin in the position nearest the open sump and then fit the rods and cable tie the small ends together to stop them rotating about as I torqued the big and bolts. I had already torqued the bolts to 50ft/lbs and measured the stretch at between 0.005" and 0.007" so I knew what to set the wrench to to achieve the desired stretch. All worked out fine and I managed to get the mike in there and confirmed the stretch figures anyway. I have a Summit racing big end bolt stretch tool so you can pull the bolts up without the torque wrench and watch the stretch as you pull them up but it wont fit in the Guzzi cases so I did it the painful way. One interesting thing was that I noted when fitting the jackshaft ignition trigger phonic wheel that it comes quite close to the front main bearing flange. I pulled out the old front main and sure enough it had been shaving material off it. This is what happens when you run the old style jackshaft front bronze retainer without the oil reliefs. They wear quit badly then the shaft can move rearwards and the phonic wheel starts to contact the main bearing flange. Mine has around 0.9mm clearance and the new jackshaft retainer so I'm expecting it not to wear as badly as the original which had around 1.2mm of wear. I've seen people refit these with this amount of wear funnily enough. Here's what the phonic wheel does to the front main flange when the cam/jackshaft flange wears. 1200, oclock shaving of the flange. Here is the point of interference. Not a massive issue but it will start making metal when the jackshaft/camshaft front flange starts to wear. Its aluminium though so its not so bad. If you're in the front timing area and your engine has some yards on it it would be wise to replace the cam front flange with the newer type. Packed the pump. Here's what a badly worn front cam retainer looks like. Ignore my lock wiring hole drilling practice. Note the recessed thrust face. Its not supposed to be like this although I've seen many people refit these not realizing they are badly worn. You can get the mike in there but for some bolts you need to read it with a mirror.
-
From the album: V10 Engine
-
From the album: V10 Engine
-

From the album: V10 Engine
-
From the album: V10 Engine
-
From the album: V10 Engine
-
From the album: V10 Engine
-
From the album: V10 Engine
-
From the album: V10 Engine
-
He says he replaced the battery in his initial post? ( "I was tested about"... with battery at the top of the list). Ciao
-
Welcome aboard Kevin, and thanks. This is Joes email and he lives in Britain and speaks English better I think than Italian. joe.caruso@ntlworld.com He can take a day or 2 to respond, mention my name and this board so he can keep abreast of his reach. We need guys like him and scudd and Chuck with the skills to make well engineered stuff to keep the Guzzi's running and improving. Joes getting ready to make his own pumps that will be even better the the DAS pump so I'd wait for his to become available. I should be fitting his jackshaft and oil pump gears to the Daytona engine very soon. Ciao
-
Yes Chuck, Valpollini gaskets I have them on my bike. From an engineering perspective they appear to be far superior to the originals and so far zero leaks. Mind you I havent done many miles on them yet but Pete says they are the go. https://www.v11lemans.com/forums/index.php?showtopic=20295&hl=gaskets Ciao
-
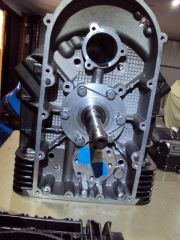
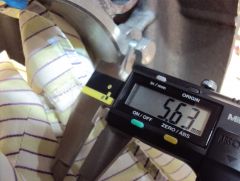
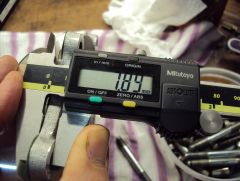
Managed a little more progress today. Crank installed. One thing I noticed while checking yesterday and returned to today was the rear main bearing mounting bolt protrusion. They all looked to be bottoming a little too early for mine so I measured and did a calculation. So the main bearing carrier flange together with the gasket and the wave washer measure at 8.65 mm thickness give or take and the bolt under head face to flange with the bolt bottomed out in the threads measured 8.37 mm. That's about 0.3mm or 0.012" or 1/4 turn from thread bound. Not so great. I managed to extend the tapped threads another 1.5 mm or so and get the bolt threaded depth somewhere back to comfortable. Because both the main bearing carriers were a snug fit I decided to heat the cases in the oven to 100 deg C and the front and rear both just dropped in with a few studs fitted for alignment. Better than trying to crank them down with studs and nuts I think. Better First round of the 2019 WSB at Phillip Island this weekend so I'll get back to this next week. Ciao
-
From the album: V10 Engine
-
From the album: V10 Engine
-
From the album: V10 Engine
-
From the album: V10 Engine
-
From the album: V10 Engine
-
From the album: V10 Engine
-
Ha,excellent. Will do thanks. Ciao
-
Thought you already had that covered Pete, along with me Ciao
-
Well after doing the priority task (installing 2 600 liter water tanks for the wifes gardening) I managed to sneak an hour or so on the Daytona engine. I cleaned out the crank and oil galleries and fitted the new plug. Here's a tip...when you trial fit the plug and tighten it up re check the interior of the crank pin again for aluminium particles off the plug. The last thread or so of the plug can get shaved by the end threads in the crank and the shavings end up inside the pin bore. Happened in this case to me. Re cleaned the bore of the pin and loctited the plug in place. I'll give it a couple of punch marks tomorrow when the loctite has cured. I also roughed up the rear cam bearing blank and applied some hi temp JB weld as has been suggested by some. Belts and braces I guess. Hmm.....doesn't look quite this horrid in the flesh thank goodness. Ciao
-
From the album: lucky phils V11
-
From the album: lucky phils V11
-
Thanks for the image, the guard seems to compliment the style of the bike nicely. Ciao

