

Lucky Phil
-
Posts
5,221 -
Joined
-
Last visited
-
Days Won
268
Everything posted by Lucky Phil
-
So you rushed it then Chuck:) That would take me a lifetime and I'd still mess it up. Ciao
-

Motratech (or other) dropped pegs likes/dislikes
Lucky Phil replied to Gmc28's topic in Technical Topics
Frank, if those pegs were any further forward they would qualify as footboards:) Ciao -
Joey, Yer marn. I met him at the TT in 86. Although a Factory Honda rider he also competed the smaller classes on his own privateer bike and was wandering around the paddock looking to borrow a fuel funnel. He approached me, and well what are you going to do? Say no to a legend? Had a quick chat, lovely modest down to earth man. Still made me go and ask for it back though,LOL. I think that was the year that the fishing boat he and another racer transported their privateer bikes over on from Ireland sank and they managed to salvage the bikes and still make the TT. Sadly missed. Ciao
-
Half the swingarm counts as unsprung weight, as does half the drive shaft and chain. Just thought I'd keep the comparison and example simple. I'm sure if you went with a light weight rear wheel it would be a really noticeable improvement. Cant see any reason for such a weighty rear wheel, its almost as if they went out of their way to make it extra heavy. You cant really do much about the bevel box of course except machine off the outer flange as some have done. Ciao
-
That was me docc, I guessed/estimated 25KG's. Pretty close considering my bike has the 5.5" rear wheel I'd say i was spot on:) So after we have established my amazing ability to estimate these things, I would say my 1198 rear wheel/tire/ sprocket combo would weight around 10KG's. So you see the massive work the V11 shock has to do even before you load it up and ride on shite roads. No point skimping on a repalcement rear shock, you need a high quality unit. Ciao
-
I think I recall guzzimoto's fork rework with pictures from a few years ago now, might be worth considering or a second hand set of Ohlins production forks would be a lot better than the std V11. Others have used USD forks off a GSXR750 I think it was and the swap wasnt that hard from memory. I have never seen any aftermarket gold valve kit or anything for the std early V11 fork and as I said in my earlier post there is a bespoke manufacturer in the states who's name escapes me at present that can completely replace the internals with their own adjustable cartridges. Ciao
-
Well it just means that if you spill a little fuel when pulling the nozzle out filling the tank and when the tank cap breather vents that fuel and vapor will go straight onto the frame spine and probably between the cylinders and sit on the crankcases. Did someone say fire risk? The hoses are designed to route this onto the ground when the inevitable occurs. Ciao That was my thinking and that's why I have exiting behind the engine. My question, is there a specific place where it supposed to be fastened? I've got it wedged beside the engine and to the back towards the swingarm. Sorry thought you hadnt connected the hoses at the tank. My bad. Ciao
-
Well it just means that if you spill a little fuel when pulling the nozzle out filling the tank and when the tank cap breather vents that fuel and vapor will go straight onto the frame spine and probably between the cylinders and sit on the crankcases. Did someone say fire risk? The hoses are designed to route this onto the ground when the inevitable occurs. Ciao
-
I think you paid a fairish price, my Wilbers rear shock custom built for me and my riding style with adjustable high and low speed damping and hyd preload adjuster cost me around $800USD about 4 years ago and is better quality than the "production" Ohlins. My GSXR1000 track bike is also fitted with a Wilbers.I've worked on the Wilbers, Ohlins ( production shock and forks and TTX/FGRT shock/forks) Penski, the std Jap and italian stuff Marzzocchi over the years and the std production Ohlins is pretty over rated. It was better than the std stuff on the V11 when it came out but its nothing to get excited about. Its the name as much as anything. My 1198 is fitted with the road and track Ohlins stuff (TTX shock and FGRT 8030 forks) and they are light years ahead of the road stuff. The rear shock on a V11 has a real man sized job to do, just pull the rear wheel and bevel box and feel the weight of that combination. The poor shock has all that mass to try and control plus the road conditions and rider and pillion weight. The rear wheel and bevel box must weigh 25KG on their own. Its rear shock shocker:) The forks on the V11 are pretty rubbish and the only option I found a few years ago was a place in the US that make bespoke internals for just about everything but the cost was going to be around $1200US plus shipping.I passed on that one....its on my win the lottery list:) The std production Ohlins would certainly be a better option here. Personally For anyone out there with the dollars I'd go for a Wilbers again even if its not the all singing dancing version mine is. The quality is very nice and they work. Ciao
-
Depends how easy it slides through the bearing inner races docc. Its hand fitting, if it needs to be hammered in with a soft faced hammer then its too tight. It should slide through with the hand and no play. Its the stack up clamping action on the bearing inner races that stops the inner races from rotating on the axle not some tight semi interfearance fit. I think the axle is painfull enough to fit anyway without the extra impost of a tight fit in the inner races. The method I would use if its too tight docc would be to chuck it up in the lathe and with some WD40 and 400 wet and dry in a 2 inch strip just polish it down until the through the bearings is "nice" Without the lathe then its vertically in the vice and the same method wrapping the paper as far around the axle as you can and reposition to do the bit you missed. Take is slowly with as many fit and trys as you need. Its old school hand fit engineering. Ciao
-
Well if it's got a layer of paint on it docc then it's going to be a right front bottom (as Pete would say) to slide through the inner bearing races. Ciao
-
So . . . yep, the new axle is "stepped" as well. Maybe not as deeply as my well-used one, but in all the same places. Well then, replacing it is not likely to contribute to any solution. Still waiting on the drive shaft pinch bolts . . . The new axle is driven by a 14mm hex. The original is 10mm. Is that new axle painted docc? Ciao
-
Try Gowanlochs in Sydney Australia. The only thing that you will need to have someone else do is the crank rebuild, the rest is doable by a capable home mechanic that isnt a knuckle dragger. The crank not only requires a 20 ton press but also some technique in getting it to run true after the big end pin and bearing replacement. Yes parts are very expensive:( I've owned a GT from that era, mine was a 71 I believe and had an engine number ending in 907 from memory, so an early one with the sharply bent kickstarter, Scarab brakes, fibreglass fuel tank and side covers etc. Its all about shimming on these engines, crank,gearbox shafts and bevel gears. I also know a guy that does a very good plain bearing big end conversion on these engines so if you dont mind spending a dollar let me know and I'll give you contact details. Ciao
-
Uhh, yeah. Early on in this project, I think Scud was talking around $300 to get 25 made. I'm guessing the world demand is somewhere between 50-100. There's not a lot of money to be made on Guzzi parts.. MGCycle wants $8.63 for it. Well I'll take 3, one for my fitted gearbox, 1 for my spare gearbox and 1 as a spare. I love spares. So thats 97 for the rest of the world:) Ciao
-
Thanks Chuck for the lesson in springs. I recently moved house and decided to let go of a lot of stuff I had accumulated over the years the most painful of which was my grandfathers American Machinists handbook, the addition I cant remember but from the 50's I believe. Seeing you refer to it made me regret the decision even more. Ciao
-
16mm. Ciao
-
Hey docc I'm pretty sure my rear axle is stepped like yours. I just assumed it was like that. I noticed my bevel box has a slight leak about 3 weeks ago ( oil drop on the rim,bit of oil at the 6 oclock position reaching over the seat and feeing with the finger) and ordered the large seal from MGcycles at some horrendous postage cost then revisited this thread. Went back and looked at the bike....doh, its the small internal seal leaking just like yours. Looks like the box needs to come apart and another order from MG:( I think I'm at a point in life where all my accumulated experience and knowledge is leaking out and disappearing, like oil in a Guzzi bevel box. Ciao
-
this engine is amazing. When I bought the project, it had the original engine. 1800 hours since new, 300 since a top overhaul, and had been sitting for years. Because of the cam sitting high in the case, they rust cams and lifters when not in use. It was of practically no value. cheap. (Guzzi content) I pulled it apart, cleaned light surface rust off the cam and lifters, reassembled with all new gaskets, put an oil filter mod on it, and it runs like new. Burns a quart in 14 hours. Doesn't leak. (!) Sometimes, you get the bear.. Sound like you got a good one there Chuck, unlike the old P&W radials I worked on as an apprentice. They used to leak more oil than they burnt. If they weren't leaking you got worried:) Ciao
-
Yea, extra points for surfing, I can see that. Same as points for playing Guitar and speaking a second language:) None of which I can do, or the surfing for that matter. Ciao
-
Chuck, check the engine oil qty, there's none on the floor, must have run out:) Ciao
-
Thats not a bad srike rate Scud, 2 out of 3. Mechanical engineer,entertained, you can work on the missing piece:) I've said more than once that I dont need to be the smartest guy around because I know smart people to ask. This thread proves it. Ciao
-
If you can Jim just wait for Chuck and Scuds spring. Knowing Chucks magic fingers work it will be a first class solution and unbreakable. Ciao
-
It was the boss on the ratchet arm that was too big on earlier models and caused the spring binding on the coils. The sharp edge on the selector arm plate where it engages the spring tab can cause a stress raiser on the tab which may cause it to fail. I rounded off the selector shaft plate edge to help alleviate this. but Chuck may have found another solution. I took my bike for a little blast yesterday for the first time in about 5 months ( been very busy) and reminded myself about how well this thing shifts from 2nd gear upwards without using the clutch. Its every bit as good as my GSXR1000 track bike, just snick, snick, snick really nice. I recommend it, just load the lever a little and flick the throttle under accelleration and it clicks right in there. Ciao
-
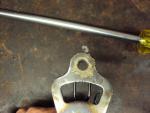
Hey Chuck excellent work, Skud too of course. Re the stress raiser on the selector stop assembly where the spring tang goes.I thought the same as you so rounded this edge off when I did my selector mod to make life easier on the spring. Heres a photo of mine, maybe I didnt cover this in the mod post. Ciao
-
^^^^^ me too please. Ciao


