Lucky Phil
-
Posts
5,223 -
Joined
-
Last visited
-
Days Won
268
Content Type
Profiles
Forums
Events
Gallery
Community Map
Everything posted by Lucky Phil
-
You might need to wait until you have them apart docc and measure them up. Forks are a PITA because although certain forks are used across certain manufacturers at the time they aren't necessarily identical. Guzzi V11 forks for example are quite a bit longer in overall length to say Ducati forks and the V11 Sport triple clamps are around 10-15mm wider than most bikes so using a different front wheel from a Ducati for example or Aprilia is difficult because although the wheel size and brake disks and mount holes are identical the width of the front hub on a Guzzi is a lot wider so disk spacing for the callipers is too narrow. Ciao
-
Yep, go into your bathroom and look in the mirror and you'll see him. I've just dealt with a Ford dealership service department and I can tell you they exceeded my previously help poor opinion of dealership techs. it's a disgrace when you talk to a dealer tech and you know 10 times more about the issue and the options to fix it then they do.
-
I bought a full set (4) Pyramid parts bushes for my 43mm forks for around $50ua. These bushes are nothing special in the scheme of things and if the low friction coating has worn off them then you need to replace them or they will start tearing up the chrome sliders. The ones in my second hand 43mm forks were actually fine but I'm not sure how many miles were on them. Ciao
-
From the manual it is home doeable docc. No special tooling required. Page 34 of the shop manual.
-
Better to source replacement fork bushes docc. Pyramid parts make them for the 43mm forks and they are somewhat standard to a degree. You may need to measure them up to source the size. The come in ID X width X thickness from memory. Ciao
-
Steel bushes often split style with various coatings. I used them for the throttle body bush repairs and are the std fitment from Weber. The fork bushes are the same. http://www.thyssing.com.au/products/glacier-garlock-bearings-ggb-bearings/du-bush/
-
Docc reading the manual for the early forks it appears you can get away without having a seal driver. Unlike the later forks you can remove the inner slider without disturbing the bushes or the oil seal. The later forks are more like modern forks where the upper fork bush is retained on the end of the slider and so to disassemble the slider from the stanchion you need to use the slider like a slide hammer because the upper bush retained on the slider won't allow removal unless the lower bush and seal which is retained in the stanchion is out of the way. So the upper bush acts like a shoulder to push out the lower bush and seal. The early forks retain both the upper and lower bushers as well as the seals in the stanchion with the bushes separated by a sleeve. So you undo the fork cap and nut and slide the slider out of the stanchion and the bushes and seals stay in place. This means you can replace the seals in the stanchion and then fit the slider back in so all you need is the correct dia drift such as a piece of PVC of the correct dia as someone mentioned because you dont have the slider in the way. The later forks you must fit the dust seal, the oil seal the retaining clip and spacer and lower bush and upper bush all onto the slider in the correct order then insert the slider and upper bush into the stanchion and then use the instillation tool to hammer first the lower bush into the stanchion followed by the oil seal then fit the seal retaining clip and finally push the dust seal into place then split the tool to remove it from the slider. This is why the later modern design forks need the sliding hammer seal and lower bush instillation tool and the earlier forks almost certainly don't and you can get away with a simple home made sleeve of the correct OD to just tap the seal into place. At your mileage I would check the bushes for wear though as well. The bushes in the later forks are DU style coated bushes so check the teflon like grey coating hasn't worn away to the base metal. New bushes aren't that expensive. Ciao
-
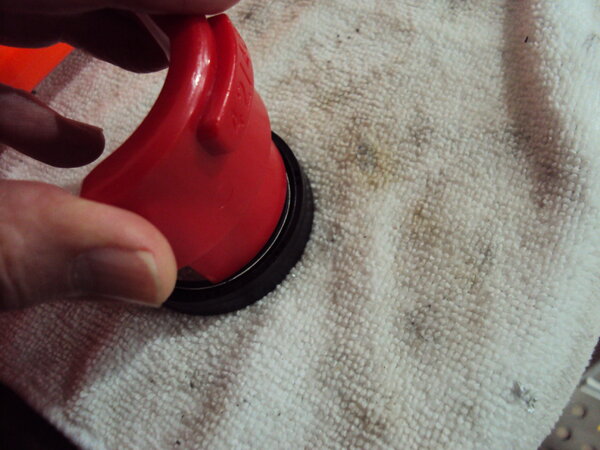
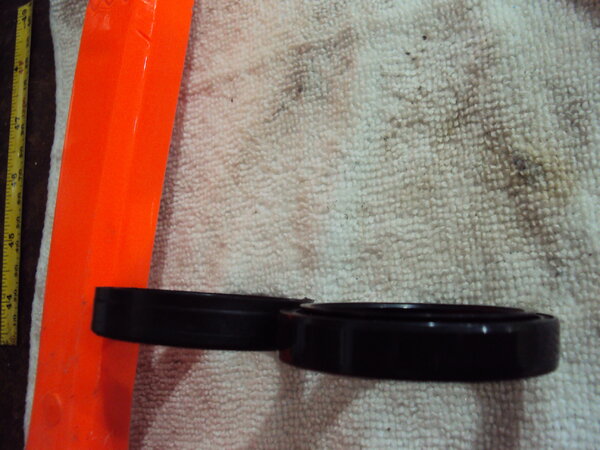
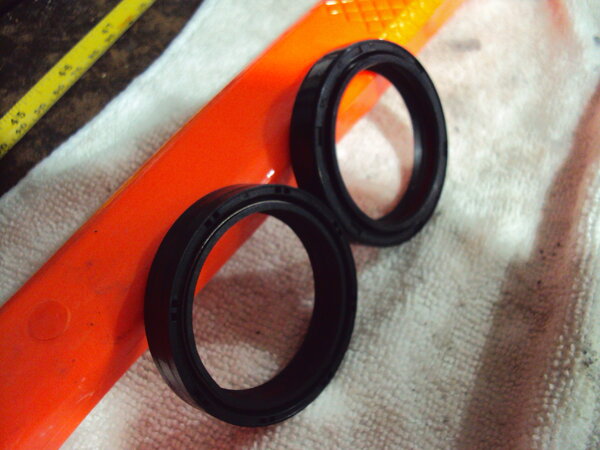
Poor images I know but here is the difference between DCY and DC seals. The DC seal has a raised outer sealing lip and the DCY it's flush with the surface. The other image is of my 42/43 seal driver and shows somewhat how it sits almost in the sealing lip spring recess when in use. Not good and will ruin the seal. I didn't even attempt to use it. So the driver needs to impact the seal as close to the OD as possible and still fit inside the fork leg ID. The seals I pulled out of my 43mm forks had been damaged on instillation by the seal driver. This might also be an option. I've seen a Youtube video where the guy used one. https://de.aliexpress.com/item/33007086461.html?gatewayAdapt=glo2deu
-
From the album: lucky phils V11
-
From the album: lucky phils V11
-
Try this docc. I just bought this type for my 43mm forks but haven't used it yet. Whats important on my 43mm forks is they use a DCY style seal which is a style that requires the driver impacts the seal as close as possible to the seal OD or the seal will get damaged on install. In my case this driver for mine has an OD of 53mm which is good for my seal OD of 54mm. The other seal driver kit I have would have damaged the seal as the OD wasn't big enought and would have impacted the seal lip area . I don't know what the seal OD is on the 40mm forks, probably the same 54mm so the seals are "probably" 40x54x11DCY seals, probably! Ariete ARI 118 seals for the 43mm forks. They look decent but can't really comments as yet on their performance. https://www.ebay.com.au/itm/333761384556?chn=ps&_ul=AU&norover=1&mkevt=1&mkrid=705-139619-5960-0&mkcid=2&itemid=333761384556&targetid=&device=c&mktype=pla&googleloc=9071372&poi=&campaignid=15791083372&mkgroupid=&rlsatarget=&abcId=9300816&merchantid=494522638&gclid=CjwKCAjw7cGUBhA9EiwArBAvojbdH8n1XK_zaFD6k-C4YLSxPAqfYRwCYmooK3wPRD69nteFt0XV-xoCOd8QAvD_BwE
-
No canbus on a v11 Sport. It's basic old tech electronics. Ciao
-
Good question docc, I don't know. I also don't really know why the earlier 40mm lower triples have a different casting number because they look the same dimensionally although mine are still fitted to my bike so I haven't been able to measure them and look in detail at them and the later ones I have on the bench. Interestingly the Cafe sport, Copa Italia and Balabios, IE all the bikes that use traditional handlebars instead of clip ons have a different P/N lower clamp to the Le Mans bikes with Marzocchi forks although they all have black clamps so it's not a colour thing.
-
Well this might be a complicated discussion. The early 40mm forks from what I have seen of them ( and I haven't had them apart unlike the later forks) control the compression and rebound via fixed orifice ports, correct? The damper piston operates in a sleeve that's bolted to the fork slider at the bottom. Further studying of the manual images it appears the early forks are indeed cartridge types and are able to be disassembled. What I dont know is does the damper rod piston and the "foot valve" ( which could be the compression damping valve but could just be a bottoming out snubber) as described in the manual have genuine shim stacks damping control? As soon as I saw and read from years ago the damping was controlled via fixed orifices and people were modifying them by welding up the holes and re drilling them I labelled them in my head as damper rod forks. This combined with no aftermarket replaceable cartridges for them cemented this impression in my mind. They appear from the images to be a cartridge "style" but is the damping controlled by fixed orifices or shim stacks on piston rod and a compression valve assy?
-
-
No it is involved. Here is a calculator for example. https://www.rbracing-rsr.com/rakeandtrail.html
-
Damper rod docc. Ciao
-
 I'm quite amused by all this forensic interpretation of long or short internal or external fuel tank capacities verses an ITALIAN owners manual specification. That of course together with the almost universal degree of tank swelling these tanks suffer on Ethanol fuels and whatever happens dimensionally to a 20 year old nylon fuel tank as it ages. The only way to really know what the "useable fuel" is for a particular bike is to set the bike on a stand upright and drain the fuel out via the fuel tap until it stops running then close it off and add the measured quantity to bring it up to the full level (whatever that is as everyone has a different assessment of what "full" actually is at the petrol pump) Ciao
 -
In the later cartridge style forks docc you can leave the cartridge attached to the lower slider and remove the fork cap, spacer and spring. You don't need a seal remover as you use the upper and lower bush as a driver to remove the seal after you have removed the seal retaining clip. So you use the slider like a slide hammer to drift the seal out and then use a tool to install it. Same pretty much for the early damper rod forks except its the damper rod that stays in the slider and the spring and sleeve and spacer come out. Ciao
-
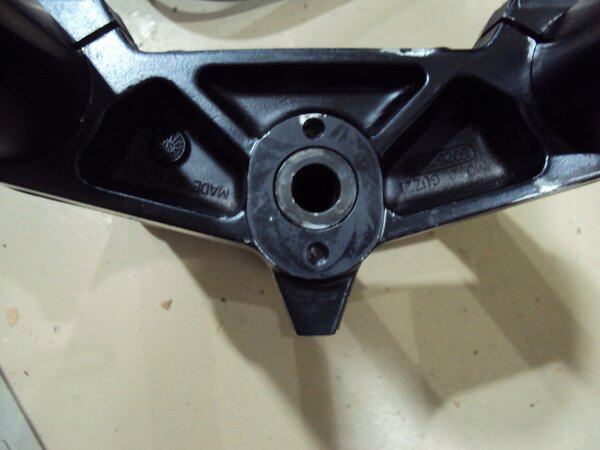
Ok so I've had to delete my last post on this because it was wrong. I have established without doubt that the later V11 sport triple clamps are indeed "canted" or more correctly have a built in negative rake. You can fairly easily check what your bike has by a measurement insitu. I have a new set of the later black triples and you can confirm by measuring the steering stem hole location in the bottom clamp. If you measure from the edge of the stem hole OD to the front and aft edges of the oval flat face the newer raked clamps measure 11mm and 16mm respectively where the older 0 rake forks measure 13mm and 14mm. So Guzzi have moved the stem forward 2mm in the new lower triple clamps effectively steepening the angle in the lower clamp and left the top clamp the same. So 40mm offset on the top clamp and 38mm for the lower. They have of course machined the fork leg bores at a fractional angle to allow for this so you cant mix and match new and old clamps. Here's an image of a later clamp base and you can see the stem hole is obviously off set on the machined flat face. The earlier lower clamps have the stem hole more centred by 2mm. The effect of this negative offset is to give the bike more trail. How much I don't know but it may also clear up some of the wheel base question marks as well between the bikes which I think have been discussed aside from the long/short frame variations.
-
Ok fine, but to anyone out there contemplating this job using a ring spanner to remove the crank and alternator nuts, good luck with it. Ciao
-
Hows it work with a rattle gun The best and least stressful on the machinery way to remove fasteners like this, the rattle gun. Ciao
-
Yes I got an almost identical one when I bought my bike, Damaged paint to the pork chops and dangerous as hell to use, with the bike moving backwards about 6 inches as it rolls onto the stand. You were also unsighted to one of the nut supports when using it and hoped it hadn't moved out of position as you moved the bike upright and got it settled. It was so dodgy I stopped using it. Anyone that wants it can have it for nothing. The beauty of the socket type with wheels is the stand stays captive on the mount nuts so the stand can't disconnect from the bike and the stand rotates safely and controllable under the bike on its own wheels. It also means you can roll the bike into a front wheel chock so it's vertical and lift the rear of the bike while in the chock. For the sake of $150 or so the other type isn't worth the risk. Ciao