-
Posts
2,964 -
Joined
-
Last visited
-
Days Won
76
Content Type
Profiles
Forums
Events
Gallery
Community Map
Everything posted by pete roper
-
Rolf, on the contrary, I mentioned a very low torque for the nut. This is made particularly confusing because the manual, written in usual, rather vague, Guzzi fashion does mention a very high torque for a nut in the CARC but this is in fact not one of the crownwheel or pinion nuts, (They aren't mentioned because the whole reactive bridge is a non repairable item according to them!) that high torque is in fact for the seal holder which also compresses the outer races of the pinion bearings and seats them.
-
Nah, nothing so sophisticated. They're just a strap with a couple of bend down tangs after the buckle. You wind them down with a tightening tool, ($25 at 'Wottalottacrap Auto') bend the end over 180, snip the excess length off with the tool and then use the tangs to hold the end back at 180. If you want them tighter? Just wind the band around the shaft twice before tightening. Hard to explain. Needs a video.
-
Done that too. Actually it is possible to remove the front boot and seal holder, (If you have the correct tool.) without splitting the case and then, in theory, you can do the nut and washer + Loctite trick without splitting the cases. Problem with this is that the boot is retained by a 'Single use' clamp. Now it can be pried out gently and re-used. If you are very careful and smart! This is why Michael has developed a technique that allows him to do it successfully almost without fail when replacing failed pinion seals. Me? Not so much, I always screw it up so I prefer to split the case because then I can clamp the boot with a simple CV joint band when I put it back together. An operation so simple not even I can screw it up! My modus operandi is to use the green Loctite when doing the initial re-torque of the nut and then I dribble a bit of 290 in from the top. Have I said why I don't want that f*cker coming undone again..........
-
V11 bevelbox is completely different. It's a real 'Weird Harold' design where the pinion is supported in a strange '2-Part/Combination Bearing'. It has a big roller bearing to take the rotational loads and then in front of it a caged ball bearing with a split outer race. I've never seen anything like it in any other application, (Perhaps Phil has?). It's a real exemplar of how Guzzi engineers used to approach some things from completely left field. No, this particular issue doesn't occur with V11 boxes. Their major weirdness is the fact the pinion nose bearings always get starved of oil and they have that stupid needle roller in the outside of the box where the spindle goes through that will turn into a filigree of rust in weeks if you ride in the rain!
-
Well yes, and no. The thing is that to tackle it you really need to split the case. Then you need a special peg socket to remove the seal holder and then another peg socket to remove the nut after biffing down the tang on the lock washer. Then you have to replace the lockwasher, apply Loctite to the pinion threads and re-torque the nut to its very low torque figure and lock it. After which you reassemble the CARC. Is it difficult? Not really, but the consequences of getting it wrong will be horribly expensive and there is no published torque figure, (That I know of.) so I just use the industry standard for these sorts of applications. If you don't know what they are and don't have prior experience it can all be a bit fraught and daunting. Put it this way. If you feel you are technically competent and would have no qualms about tackling a major engine or gearbox rebuild then I'd say probably yes, you could safely do it, (Cue someone to say their four year old does them in his cot at night!). If though you find yourself stressed by doing your valve clearances and changing brake pads? I'd probably advise against trying it. Remember, Piaggio won't sell some parts even to their shops, and suggest that the reactive bridge is 'Non Rebuildable' which would seem to indicate that they think that rebuilding one is beyond the Ken of the average shaved ape employed in a 'Box Shop' dealership. Certainly if anybody does undertake it they do so entirely at their own risk and if the whole thing goes 'Udders Skywards' afterwards they have to be willing to wear the consequences of their own actions.
-
The bevelbox on the CARC system is generally pretty robust. The one Achilles Heel it has is the light preload on the pinion bearings supplied by the nut and the fact that it is held there simply by a lockwasher. For some bizarre reason Guzzi don't Loctite it and if the bearings settle or wear the preload is lost, the nut comes loose and things go pear shaped fairly quickly. First symptom will be noise from the final drive on the over-run. If you notice this stop riding immediately. Not only could it preceed a catastrophic failure but also if you stop it there and then it may well be possible to save your final drive. I can't stress how important catching it early is. If you don't and continue to ride the consequences may be terminal. Michael has just stripped Peter Hughes's box after he continued riding it for a while. Unfortunately it's fed bits of lockwasher all through everything and the results are terminal. Sorry but there's no saving this one. This is the pinion nose bearing. Most of the other bearings in the box and reactive bridge look much the same. Now if you do catch it early and there is no crownwheel or pinion damage it is, despite what the factory may try to tell you, quite possible to rebuild the entire reactive bridge and therefore the bevelbox. My guess though is that very few shops would be willing to try it, either because they don't have anyone with the skills or for liability reasons. It's this sort of numbskull 'Built in obsolescence' that makes my blood boil and we won't have a bar of it. We can at least look at your box and tell if it's salvageable and if we can rebuild it you can bet your arse we'll be Loctiting the living Bejasus out of the pinion nut as it's preloaded so the bastard won't be coming undone again! Oh, and as an indicator that this sort of repair is quite possible my box on my GRiSO played exactly the same trick. I caught it early, cleaned everything thoroughly and didn't even replace any of the support bearings! Just replaced the nut and lockwasher, Loctited and preloaded to about 120 inch pounds on the nut before bending up the tang on the new lockwasher. That was nearly 50,000km ago and it's still running silent and strong.
-
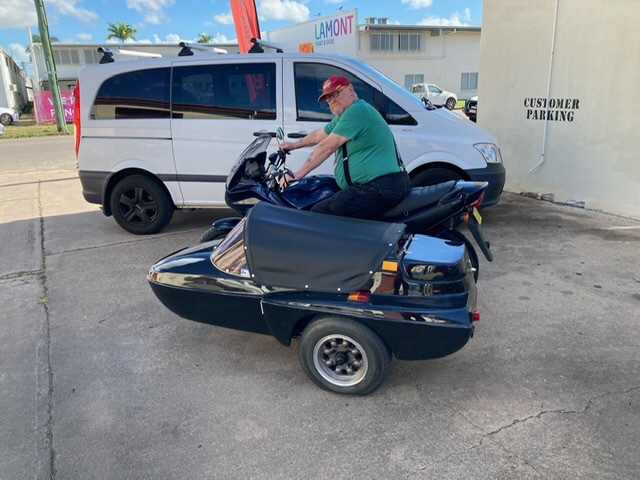
Well, no tyres to be had in Dubbo so I rode it home, gently..... Rear tyre is now as bald as a badger's arse but not down to the cords. so much win! It really was a great trip, (Appart from Greg busting himself up!) I really enjoyed it, even though a lot of the road was boring. I'm sure now that I'll enjoy touring on this rig. It gives me a great incentive to actually fix the carburetion properly!
-
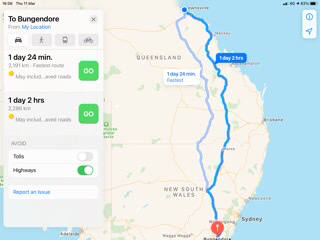
Well sadly things didn't turn out as planned. Greg Trowelled his Griso on pea gravel at the entrance to the Clermont Roadhouse. It was one of those stupid 'Touch the front brake and go down at walking pace' accidents. Griso got a scuffed rocker cover and busted gear lever. Greg rode on in great pain to Emerald but when we got there we had to call the ambulance from the Motel. They hauled him off to A&E and kept him in overnight. Next day x-rays reveal a cracked hip socket in his pelvis! Arse. Peter rode back to Townsville to mount the recovery mission and I pressed on alone. Only problems I've encountered are one vast 'Whoopsie' from subsidence on the Gregory Development Road got the outfit airborne and when it landed it biffed one of the fork legs up through the yoke about an inch! Anyway, fixed that this morning, (And tightened the pinch bolts a bit more! They weren't as tight as I'd of liked.) that fixed that. Only other thing is it's eaten it's rear tyre! It was only about a third worn when I left. Tonight I'm in Dubbo about 1,800km into the trip and it's definitely not legal any more! It would probably get me home but 90% of all punctures occur in the last 10% of tread wear and I don't want to risk that so I'll see if I can hunt down at least a rear but hopefully a pair of hoops tomorrow morning. If I can get some that are made of industrial diamond I'll be fine with that......😆
-
Oh I ve run a load of carby cleaner through it. When we dropped off the float bowls one of the atomisers was lying in one of the bowls. Once that was rectified the vacuum was all over the place. We got the balance good but it's displaying the classic symptoms of worn needles and atomisers. Obviously the needles have been rattling around in the atomisers at 'Cruising' speed and the needles have a ridge and the atomisers have worn out of round so the annulus between needle and atomiser is too big so there is this point as it's just coming on to the needle where it goes all soft and woofly. Once you've ridden through it it's fine but needless to say it's at a very irritating place when you're in traffic.
-
Semantics!🤣 I tend to think of a 'Widget' as something more like a sensor fooler or some other such piece of garbage.
-
Don't get me started on sensor foolers! You'll be wiping spittle off the inside of your device or desktop screen for a week!😂
-
If you just put a 1400 motor in it won't run due to the different phase sensor/phonic wheel set up. You'd also end up with the weedy little 1400 ports in the heads and spare plugs and plug tunnels necessitating the use of the ugly 1400 rocker covers which on the 1400 are hidden by the vast rocker cover 'Covers'. While some people are saying that the 1400 combustion chamber in the head is larger I don't think it is appreciably. The added. Volume to drop the CR, or keep it acceptable, is done by the machining of the pistons. Cant remember offhand how much bigger the bore is but its substantially larger. The biggest difficulty though is the cooling circuits. The 1200 simply uses a series of cross drilling's around the exhaust valve seats to channel oil to take heat away and the feed goes in the inner side of the head. On the 1400 there are substantial galleries cast into the head similar to the water galleries in a conventional liquid cooled engine. The oil is delivered to a gallery in the barrel and then circulates through those chambers in the head to remove heat and the drain and return system is completely different to the 1200 motor.
-
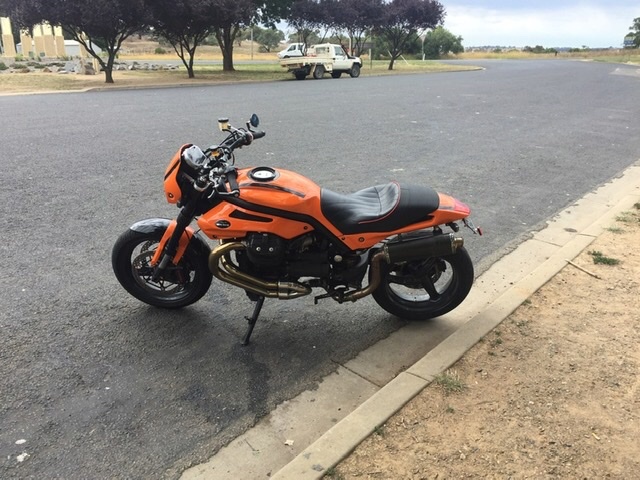
Best idea if you want to get an idea how it all works is to look at the parts diagrams. Oh, and if you wanted to see a 1400 Griso? Here's Mark's bike with the first 1400 motor I built. Compare it to the other two in the next pic and you'll see it's indistinguishable.
-
I think you are confusing remapping with re-setting the self learning parameters, (Fuel trims.) on a machine with closed loop capability. If the system incorporates a narrow band lambda sensor then, at certain throttle openings and engine speeds, the ecu will crudely change the fuel delivery to try and achieve whatever its target AFR is. If you re-set the self learning parameters, (Clear the trims.) it takes the fuel settings back to a factory baseline and from here, (Unless you turn off the lambda input.) it will start to re-trim the fuel again until it achieves that target AFR in the closed loop area. This is one of those things that causes people to think, wrongly, that "Modern engines are mapped up lean to meet emissions regulations." And generally results in many 'Tuners' turning off the lambda input and flinging more fuel at the map. In fact the opposite is generally true. Most of the base maps are almost universally rich and depend on the lambda input pulling fuel out of the map in the closed loop area, (Hence the term 'Trimming' one assumes?). If the lambda input is turned off the base map tends to be overly rich all the way through and it is this that foxes many into believing that the bike is now running optimally and it's just the evil government trying to destroy people's fun. In fact the bike will still be running sub optimally but the last thing you will generally want to do is add MORE fuel. Using wide band sensors and decent logging equipment it is possible to record exactly what is happening to the AFR at all engine speeds and loadings and build a map to suit. Also, unlike a PC, using a programme like Tunerpro allows you access to a lot more than simple fuel and spark, there are numerous correction tables that allow changes to be made to optimise performance in areas like engine temperature, air pressure, air temperature etc. My knowledge and understanding is very basic. I'm lucky enough to know people a lot more talented than I who I can glean assistance from when I need to. The most important thing is not to fall into the trap of believing the old wives tales about mixtures being lean and just flinging more fuel at the map. Do that and you simply end up with a soot-spewing overfuelling munter that will wear itself out in double-quick time.
-
Not even with 'A widget'. With a laptop and some freeware. The Guzzidiag suite of tools and Tunerpro.
-
The ECU's are now an open book. You can upload and download your, or other people's maps and write them accurately rather than relying on a primitive add-on that will only allow you to adjust a couple of parameters, (Fuel and ignition.) PC's are unnecessary and outdated tech. Reach out and learn about alternatives. They're better. The world has moved on.


