Scud
-
Posts
4,033 -
Joined
-
Last visited
-
Days Won
247
Content Type
Profiles
Forums
Events
Gallery
Community Map
Everything posted by Scud
-
Valve stems on Amazon.com for US$25: Here's the item description: 83deg Aluminum 8.3mm Racing Angled Valve Stem - Black - 2 Pack. I hope you can get them in NZ. I put some on recently and am pleased with the function and the look. There's a picture in post #35 of the thread Brand New Scura.
-
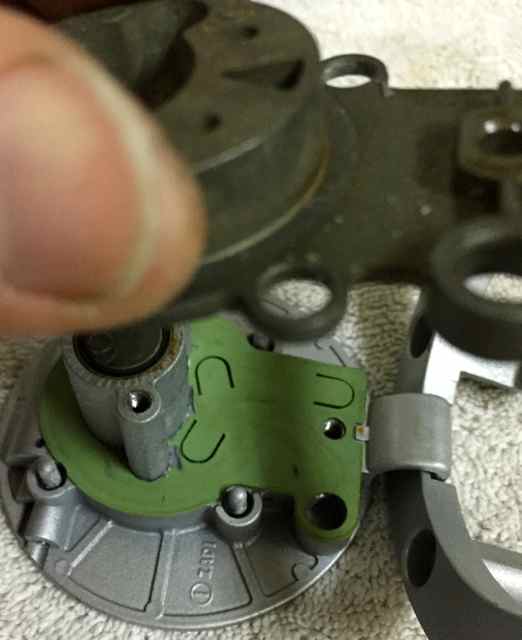
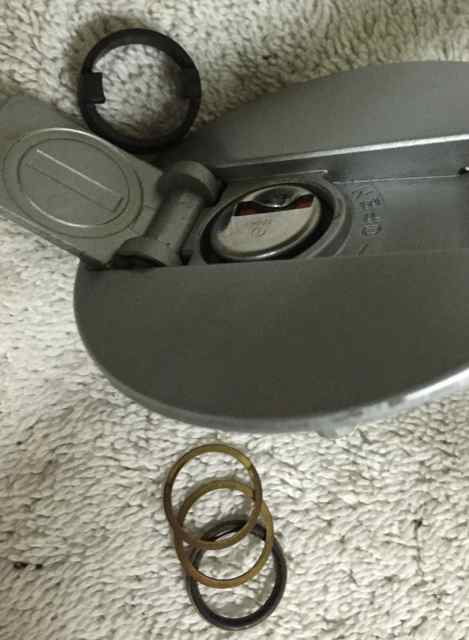
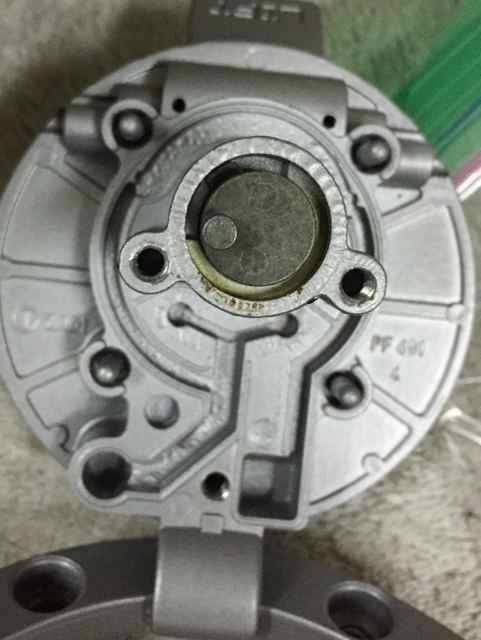
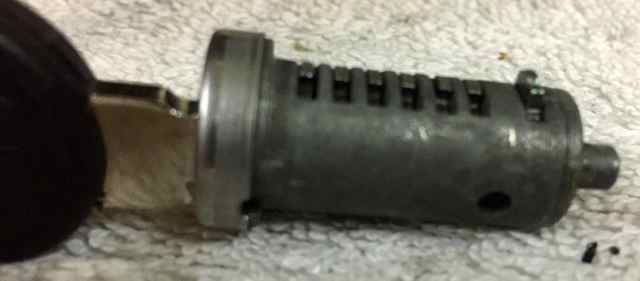
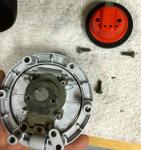
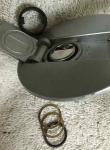
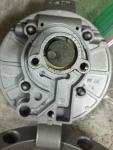
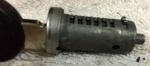
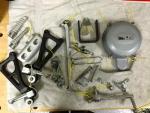
I was motivated to do this for cosmetic reasons. The silver fuel door just seemed wrong on the Scura - and I could not find a black billet replacement. But then I noticed that the paint was peeling pretty badly and got to wondering if those big flakes of paint would be bad for the petcock or fuel pump on the way to the filter. Couldn't find any other info on this, so I took these pics to give myself a chance at putting it back together after powder-coating, where it currently is. The "after" pictures will have to wait a while... To take it apart: 1) Remove 6 outside bolts and one inside bolt. Maybe cover the hole so you don't drop a tool or part in the tank. There is a large base and some gaskets to set aside - nothing tricky (tricks come later.) 2) Take off the latch and seal (red and black bit), revealing more little parts, including 4 tiny springs and a thin plate. (Note that springs and other tiny parts do not roll off towels). 3) Pry up the dark metal piece and remove the rubber gasket beneath it. Here's the part that was tricky to me - getting the lock out. 4) Pry out the O-ring from the bottom and get ready to catch two thin metal washers. Then pry out the top rubber fitting (which has a couple feety-hook-things - a little lube will help ease it out and be sure you don't tear it.) edit: do not remove the top rubber fitting as shown in the photo. It should come out (and go back in) with the lock cylinder. 5) Compress the little retaining tab into the lock cylinder and remove it from the cap. One pic shows where to access it, the other shows it removed. I left three parts assembled for powder coating: the base-ring, the fuel-door, and the flippy-lock-cover-tab (which probably has a real name). There are some retaining pins, and spring-actuated balls holding these three parts together, but I decided not to take them apart.

-
That qualifies as "useful information."
-
If you live in the Southern Hemisphere you're supposed to mount them backwards to account for the difference in gravitational effects of the earth's rotation. This is why water goes the other way around the drain down there too. Seriously - I don't know any useful information. But I figure if there's an arrow for rotation that there must be a valid reason for it. Maybe someone smarter and less sarcastic can help you.
-
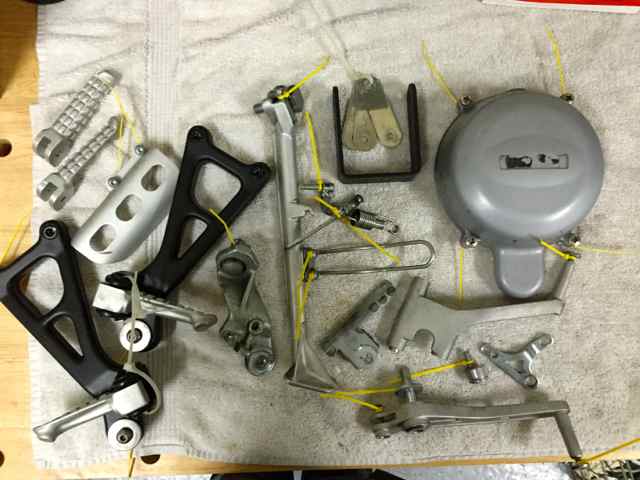
A dark glass of stout, a little dark chocolate, a couple hours of wrenching... and I'm just about ready for a visit to the power-coaters. A few observations: 1) The sidestand has a lot of parts... I mean a LOT, and no two parts require the same size wrench. It's a rather intricate piece of work. 2) Many bolts had started corroding - not just from the parts I removed today, but many of the other silver bolts I replaced or painted earlier). So all this obsessive darkening is helping me catch and clean things before they seize up (also using anti-seize on reassembly throughout). 3) Many moving parts either appeared to have had no grease on assembly, or what was there had dried to a nasty white paste. This is great time to get all the moving parts lubed. 4) Powder coating the fork bottoms is not recommended. Dan Kyle (of Kyle Racing) says they don't even do it any more because it is too much of a PITA and they don't like removing all the seals and valves if they are working. If those guys can't be bothered to do it, that's good enough for me. However, I am stuck on the footpeg bracket. The hex-head bolt was not moving and I could not get a wrench on the big nut behind the porkchop. They're having a good soak in penetrating lube right now. My question(s): How do the footpeg brackets come off? Do I have to remove the porkchops to do it? Edit: answered my own question by more searching. What a great forum. I'm leaving the porkchops on (along with the brackets, which I don't think can be removed otherwise) and will not powedercoat the footpegs (at least for now). I was uncertain about black footpegs anyway... I do like the silver on the red. But the passenger pegs definitely have to be black
-
4 brackets, 4 screws... you're done. It appears that a late 70s or early 80s BMW has wandered into your garage... did it follow you home? Can you keep it?
-
Plate ordered. Thanks.
-
Could somebody drop in a link or other details about how/where the Roper plate can be purchased? I've searched and found plenty of discussion, but I cannot seem to find the "buy it now" button. Not planning any wheelies - but I do enjoy some throttle on the way up the mountains (even steep uphill left-handers, which appear to be the moments of greatest vulnerability). Oil in the sump seems like a good idea; a little extra oil capacity would be fine too.
-
Yes. That IS the lesson.
-

re-balancing the crankshaft: down the rabbit hole, again?
Scud replied to sp838's topic in Technical Topics
Who needs a V-2, when you could have an O-7 (radial)? Seriously - balancing the throttle and timing is one thing, balancing the weight of the reciprocating or rotating internal parts of the engine is another thing entirely - same principle as balancing wheels. IMO - if you've got the parts out, you may as well balance them, but it seems like a lot of extra work for relatively small gain if they are not already out. Could you just balance your new pistons to be sure that you don't introduce any new imbalance? -
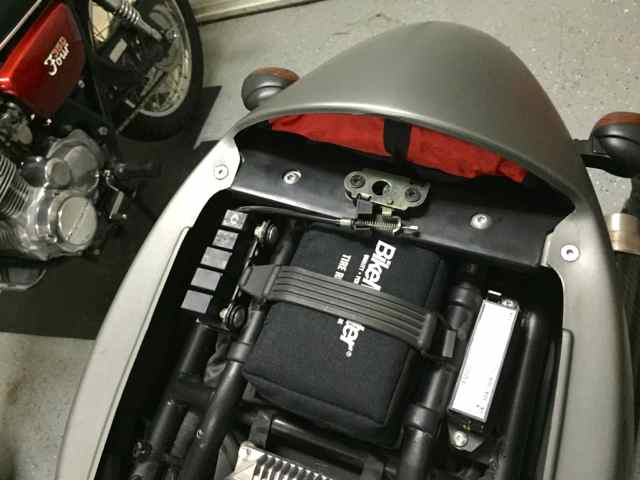
I noticed Docc used a battery strap over the tool tray - and whaddya know? My bike has unused hooks there too. Bonus - the BikeMaster tire repair kit fits perfectly in there - and there's lots of extra room in that zippered case - and the seat still closes. Tail section on mine is different - and the tool roll fits there. I've still got all kinds of room for fuses, towels, shift return spring, multi-tool, etc..... FWIW - I got a great dirt-bike tool kit from themotostop.com for my dirt bike. They sell street tool kits too. Battery strap $14 and spring $10 at MG Cycle.
-
Well, that is ANSWERING the original question with credibility, conviction, and completeness. I'll be traveling sans-luggage, but there are a bunch of things from your post (and others leading up to it) that I will figure out how to squirrel away under-seat. You and your kit remind me of the sweep riders on the dual-sport events that I ride. I imagine that more than one stranded South'n Spine Raid rider has mistaken your silver V11 for an angel.
-
News flash: Docc's secret stash revealed. This is not hijacking... sharing is caring.
-
Forwarned is fore armed as they say. You're almost making me happy they didn't lash out on ohlins for the tenni. Not having ridden a Marzocchi-equipped V11, I can't compare. But I can say that my considerable effort here has only resulted in my restoration of the Öhlins suspension to stock settings (instructions for which were not easy to come by). So all this work was basically just to press "reset" from what appears to have been a totally botched setting by the prior owner. Having done so, it is BY FAR the best handling bike I have ever owned. It just tracks true and grips like a jealous gorilla. (I just love that little sentence...) I am cÖmpletely cÖnverted and spÖiled for life... hence the irrationally exuberant placement of umlauts in my earlier post. Now I can fine-tune to taste... Soon, the darkening will resume...
-
Öh, nÖw I get it. Everything must harmÖnize. AnÖther nÖticeable imprÖvement. For the record (and to complete the treatise for Leon) here is a summary of all the stock settings (thanks to Camn for the Scura manual): Forks FG8470: Position: 2mm (1 ring showing above handle hub) Preload: 13mm (13 full turns from open) Compression: 13 clicks from closed (per Guzzi Manual) 12 from closed (Öhlins spec sheet) Rebound: 13 clicks from closed (per Guzzi Manual) 12 from closed (Öhlins spec sheet) Öil: Öhlins 1309 Öil Level: 105mm Shock MG1271: Preload: 15mm from unloaded spring Compression: 12 clicks from closed (Guzzi Manual and Öhlins spec sheet agree) Rebound: 14 clicks from closed (Guzzi Manual and Öhlins spec sheet agree) Öil: Öhlins 105/1 Damper: 10 clicks from closed I still have 2 fork rings showing (vs 1 spec and vs 3 per Baldini). I also deviated from spec by turning the damper completely open (per GuzziMoto's idea) – loved the quicker steering. Then I turned it in 3 clicks for a little insurance against bumps and holes. From here, more adjustments are just personal preference, but I am so glad that I set it totally within spec before fiddling. Compared to where it was set when I got it (way off target), it feels like my test road (which, ironically, is called Harmony Grove) was resurfaced between tests. I’d write another ride report, but I don’t think it gets any better than this from mo-biker in The Scura Topic (emphasis mine): Begodandbegorra this thing seems to lean forever, sort of, you fly through a series of bends or a roundabout faster than sensibility tells you you should and you barely have to lean it, even when conditions and visibility are excellent and you stuff it into your favourite bends it just tracks true and grips like a jealous gorilla. I got home and expected to find shredded tyres (yeah right) and there are still huge chicken strips, I have to visit the man shop and get me some lean nuts before this bit of late summer passes.
-
I think it applies to the Scura in roughly the same way that a person's parents' health histories apply to that person. If the early V11 Sports did have a problem that was corrected, one should be cautious about making adjustments that could re-create the problem.
-
Also: tire pressure gauge
-
Oh - looks like I didn't use my new words correctly. I can't see the picture you uploaded, but a quick web search turned up this: http://www.sportrider.com/art-science-fun-geometry Executive summary: Rake = angle of the fork. Decreased rake = more vertical. Increased rake = more horizontal (think of a chopper) Trail cannot be directly measured on the bike. It is the distance on the ground between two points: 1) drawn from the steering head to the ground, and 2) drawn from axle center to ground. It's the amount of distance that the contact patch of the tire "trails" the input from the steering head. I think this is what you said - but I'm saying it again in a different way to make sure I get it.
-
Good ideas. Fuses and duct tape will get added to my kit bag - I'll pass on the bulbs. Not sure whether Josh or the multi-meter will fit under the seat. But if they do, maybe I could also squeeze in a spare Scura flywheel. Re the nefarious Pawl spring: As I understand it, this failure gives some warning; it is not a surprise-failure, nor is it the type of repair one could easily do at roadside. I like the idea of seeing Docc's Spine-Raid kit. Always good to learn what people with more saddle-time carry. That's how I learned what to carry on my dirt bike, including Quick Steel (which I have needed). Haven't had to spend the night in the woods yet - but could have without the right kit.
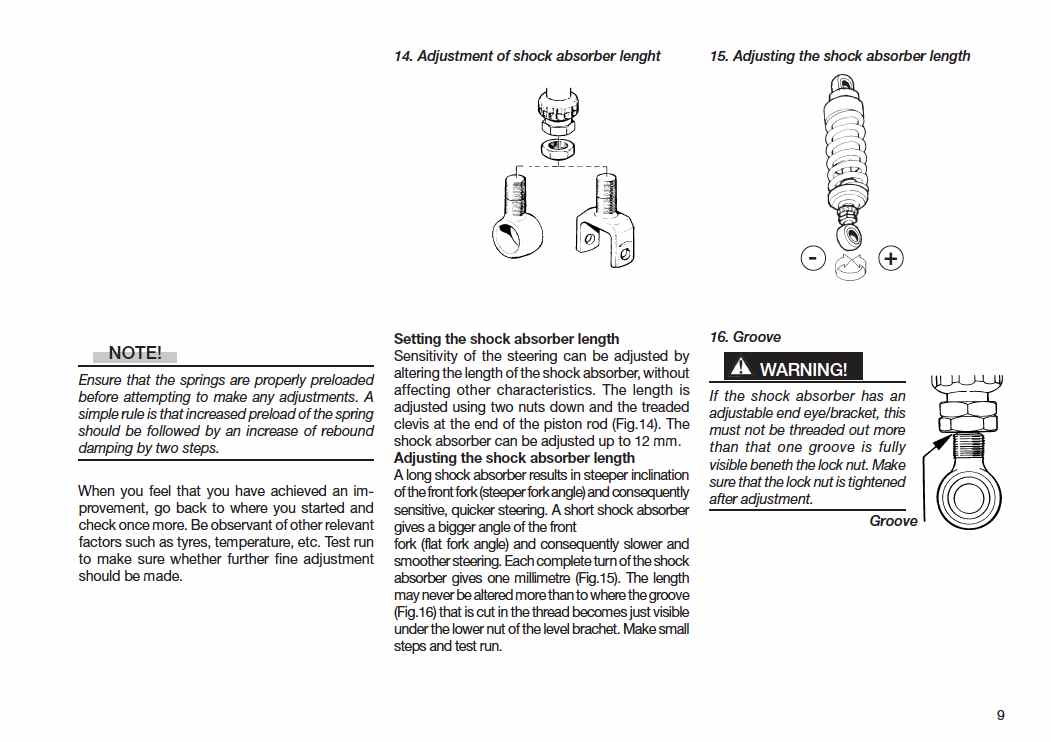
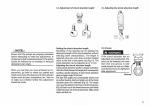
-
@Docc - Wow, there's always another level. I think I'll stick with the oil I already bought. You are right that oil type and oil level (aka air gap), are other adjustments, along with tire size, shape, tread, pressure, total weight of rider(s) and gear, etc... not to mention road conditions and highly subjective opinions about what constitutes "better" handling for various purposes (touring, sport-riding, commuting). Throw in some confusing language and inconsistent use of terms and it's no wonder that the suspension topics go on forever.............. @Baldini - I'm following in your footsteps with the Scura. It's also my first time having such a nice suspension on a street bike (I actually felt a bit obligated to learn how to use it properly). Re factory settings - my intent is not to set them and leave them there, rather, it is first to ride it "as designed" and use that as the base-point for my adjustments. The PO clearly made a lot of adjustments. So far, putting them back to spec has resulted in improvements for me. I think there will be a hex-wrench in my jacket pocket for a while... so I can adjust the compression and rebound settings on the forks (the shock adjustments can be done without tools). Re shock length - the attached page from the manual shows what I was talking about. However, the Scura does not appear to have an "adjustable end eye/bracket." If it did (I am speculating and trying use my new vocabulary words in sentences) it would appear to increase rake (same as lowering the forks in the triple clamp) without decreasing trail (because rear is lengthened, rather than front shortened). Anyway, there's the difference between theory (reading books) and practice (turning wrenches); I can imagine adjusting the shock length while reading the book, but when I looked again (just now) there was no nut to turn. Re riding style - during a spirited romp through the twisties, I do tend to get forward on the seat and put more weight on the bars - I also generally use light brake pressure on the front through the corners (a trick I learned on my old BMW boxer that has served me well). I don't go "fast" either, but 90mph is frequently just going with the flow of traffic on the freeways. Sometimes I go slow and enjoy and enjoy the scenery. Thanks again (to everyone) for sharing your experience. Between the manuals (as corrected) and what I've learned here, I'm about ready to claim that I am a suspension-tuning amateur - that's good enough for me.
-
What should the knowledgeable V11 owner pack in order to make it home? Of course, the mobile-phone, credit-card, and roadside assistance plan (AAA in the US) offers one type of solution. But how about the fix-it-yourself and ride-it home approach? In addition to the supplied tool kit, I have added: Tire repair kit with rubber plugs, C02 cartridges, etc. (fits in tail section) Some emergency cash A few zip ties and a bit of safety wire Vacuum caps for the throttle-body sync pipes (Docc said those can be damaged by a bad hiccup) I haven’t bothered to look yet, but does fuse box have plenty of spares? If not, maybe somebody has a list of all spares that should be carried. What other supplies or tools have you found essential to carry on the bike?
-
@Leon: I'm glad this is helpful. Apparently, we love suspension talk; why stop now? In fact, today we merge our language and suspension settings topics... @Camn: Thanks for those pages. I would like a scan of the whole thing if you don't mind; I'll send you a PM with my e-mail. I attached the Öhlins Front Fork Specification Card, which I also sent to Jaap. He said he will add it to the file-share section next time he does an update. Ohlins fork FG8470_Factory Spec Card.pdf Now that sag is correct, I was curious to see where everything else was set. I have let go of my assumption that my Scura's suspension was untouched and remained at factory settings. Now my assumption is that the PO adjusted everything (and he didn't even ride it more than 200 miles ). Therefore, my new task is to restore all suspension settings to factory specifications. I further assume that all Öhlins adjusters should be turned clockwise to close - and counter clockwise to open. That is what the manuals say, but I am being extra careful about my assumptions given recent experience. Forks: Compression (bottom adjusters) were set at 14 of 20. I set them to 12. Rebound (top adjusters) were set at 7 of 20. I set them to 12. I will return the forks height to factory spec (one ring showing) after I do the oil change. Steering Damper: It was set at 14 of 20. I turned it to 12. (but I don't know the factory spec) Shock: Compression (adjuster knob on reservoir) was set at 8 of 20. I set it to 12. (but I don't know the factory spec) Rebound (black ring adjuster by lower shock mount) was set at 40 of 40 (totally open). I set it to 24. (but I don't know the factory spec) Shock absorber length: I now assume that this has also been adjusted away from spec - so I am hoping to learn the specified length. My guess is that the "lower the front, raise the back" method (that GuzziMoto described) was followed. I think I have now learned every possible adjustment point for the suspension. My assumptions for the damper and shock settings are based on the Swedish concept of "lagom" and the very Swedish-sounding title in one of the Öhlins manuals: "Everything Must Harmonize." Isn't that a great command for a suspension manual? No test-ride today - rain. I'm not expecting any pity from snow-bound members - in fact, California is still in drought, so the rain is welcome. Skål
-
That's funny. I didn't get an Ohlins tool for the oil level, - just a generic one from the local Cycle Gear shop. It looks like you put in a straw (with measurements on it), clamp it at the right depth and use the syringe to draw out everything above that depth. Simple, quick, and precise. I paid someone to do my dirt bike forks last time - and they're probably ready for another change. So I figure this tool will get some use.
-
Suspension update: Springs are in spec for me. Details follow: This was an important lesson for me - to get the spring sag adjusted correctly before doing anything else. This conversation has been really helpful - and so were the guys at Kyle Racing. They even sent me the factory spec sheet for the forks (FG8470), which said the recommended stock setting for the fork spring pre-load is 13 (out of 15). Mine was at 0 (no pre-load) when I got it. I previously increased preload by 11 turns and it made a huge difference. So I turned it 2 more and got these measurements: Rear Shock: R1-R2 = 10mm. This is sag WITHOUT rider. The target is 5-15mm. (it was previously 14 when the front was set to 0 turns - but now it is exactly mid-range) R1-R3 = 32mm. This is sag WITH rider. The target is 30-40mm (previously 30) I made no change to the rear spring - but increasing preload on the front by so much appears to have allowed the back to compress appropriately. Front Fork: F1-F2 = 30mm. This is sag WITHOUT rider. The target is 25-30mm (previously 41) F1-F3 = 41mm. This is sag WITH rider. The target is 35-50mm (previously 52) Forks now at 13 turns pre-load Fork Position: Baldini suggested moving the forks up so three rings are showing. GuzziMoto said that decreases rake, potentially decreasing trail and stability for the sake of quick steering and miniscule weight gain to the front. My forks were already set with a touch over 2 rings showing (not sure what factory spec is). Maybe I'll play with the fork height a bit later - just to see if I can tell the difference or not. Ride Report: I took the same loop as after my last adjustment, still really pleased. I can feel the front and back working, it compresses, unweights, and resettles nicely over crests - and it deals competently with all the irregularities of the bumpy-twisties. As for me, I am happy as can be - and feeling much relieved that all four sag specs are within range. FYI on tools - I have not changed the fork oil yet (getting there...) However, I did get the black cap from Kyle racing, which is a very tight fit. Also picked up a fork oil level tool - this looks like the way to do it. In fact, the Ohlins spec sheet does not even list the oil volume - only the oil level (105mm). FWIW the spec sheet also calls for 12 clicks on both compression and rebound.
-
Fantastic bike - as is. Although there are probably plenty of small things you could do to make it your own if you still want to do something to it - some kind of pricey, some nearly free. If you want a project bike, maybe you should start with one that is not already in such good condition. It's a lot easier to put scratched, faded, or otherwise worn-out parts on the shelf than perfect ones. A conversion project like you're contemplating takes the bike off the road for a while - so you have to factor that in. I'm with stewgnu on at least 2 points - go riding, and "this forum is ace." Like the old Crosby, Stills, & Nash song says: "Love the one you're with." I'm new here too, I recently got got a Scura that I've been tinkering with (and riding as much as possible). If I had your bike (and based on my recent experience), I'd consider some of these mini-projects: Free - chop (and file... and sand) the outer fender behind the license plate Cheap - spray-tint the turn signal lenses Spendy - Ghezzi-Brian carbon fiber inner fender . There are other, easier to install, options, but I am quite happy with the look and function of this one. Of course - make sure all the maintenance is up to date - and if you are unsure about the maintenance history, just do everything and give yourself a fresh start with new fluids, filters, plugs, etc. You may as well introduce yourself to the clutch bleeder... it plays "hard to get." PS - Thumpers are great too!!! ... and so are four-cylinder bikes.... oh, and triples... even some sixes... BUT THERE IS NOTHING LIKE A BIG TWIN.