-
Posts
4,033 -
Joined
-
Last visited
-
Days Won
247
Content Type
Profiles
Forums
Events
Gallery
Community Map
Everything posted by Scud
-
Here is the link to the coater that did the Quat-D: http://www.performancecoatings.com/index2.html I believe the color was just the Satin Grey. Thanks - I've been working with a very helpful guy at Jet-Hot. They have over-choice on colors and two samples are already on the way (2059 Champagne Gold and 2057 Titanium).
-
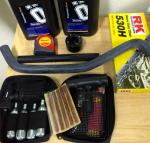
Docc - you've got the California lingo down. FYI to others: When 1960s cars are advertised for sale in California, a "black plate" car generally signifies one that has been continuously registered, and is more "original" than other cars that have had their plates "updated." It's pretty cool that our State government re-released these plates for collectors - and fortuitous timing for Scura-darkeners. Let's see... 20,000 legacy plates times $40 a year extra on the renewal fee... that won't quite balance the California budget, but I'm happy to do my part (because I get a bauble). Meanwhile, supplies arrived in various boxes today. The attentive reader will notice that one of these things may require significant modification to install - or I could put it on the Honda, which has been getting very jealous of all the attention the Scura's been getting. Public Service Announcement If you carry a tire repair kit one of two things will happen: 1) you will never need it, or 2) you will be the hero when your buddy (or a stranger) picks up a nail. If you don't carry said kit... well, that's when you start to see the vultures circling overhead. This one fits (with some persuasion) in the tail section. Four CO2 canisters ought to fill a back tire. Five pieces of beef jerky is more than I can eat during a tire repair; it looks rubbery, but it should keep the vultures distracted.
-
Cool - we've had two Öhlins-oriented sub-topics. One to help us pronounce Swedish correctly, and another to help us get 'em dialed in for the road - I hope something here can help Camn's bike lose the wobbles. Back to our OCD - Obsessive Compulsive Darkening. I am hoping to receive a street-legal black license plate. In the 1960s, California plates were black with yellow lettering. Our DMV recently made "legacy" plates available and I got my application in on time - and the website has changed from "Applications Received" to "Approved Applications". Hopefully, we will see SCURA or MG SCURA on the back soon. Meanwhile, I will try to time the coating of various parts with an upcoming business trip to minimize my perceived down-time.
-
Bummer that yours didn't work out. I wonder if you received Chinese imitations without knowing it. Chamberlin mentioned that he knew his were Chinese; they looked the same as some on Rizoma's website - even had the Rizoma logo (see post 137 of this topic). His bike is drop-dead gorgeous and I thought a pair of these smaller ones would be a nice touch - especially next to the Rizoma mirrors, which I assume have the same finish. Oh - and I want a pipe coating close to that color on my bike.
-
Do you mind explaining why that is a problem? I thought the Rizoma tanks (and the company's products in general) were highly regarded. I think I answered my own question. The vent allows the flexible rubber seal to expand as the parts (brake pads or clutch plate) wear and the fluid moves into the pistons (I knew this already, but I never thought about the fact that there is a vent). My Rizoma tanks are very cleverly and covertly vented. As you can see in the picture, the plastic cap in the metal lid (on left) has a small hole in it. The other side of that cap has a shape that allows free movement of air, which can enter or escape through the two gaps in the threads of the metal cap (at 6 and 12 o'clock positions). Does this address your concern or have I missed something?
-
From the album: Scud's Album
-
Do you mind explaining why that is a problem? I thought the Rizoma tanks (and the company's products in general) were highly regarded.
-
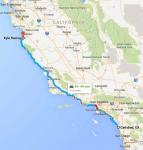
I talked with some very helpful (and tolerant of newbies) people at Kyle Racing (Öhlins specialist near Laguna Seca Raceway). FWIW - they said they would not bother with changing the oil yet, because it is a closed system and that type of oil does not degrade. But they also recommend a change every few years even with minimal use... so I am just going to do it now, which has the added benefit of helping me learn more about what's going in the forks. Oil and special tools on the way. I could have saved $12 in shipping by picking it up myself. Seriously considered it; they're just up the road a piece... (see map).
-
Update on living with the chin-spoiler: It was buzzing at about 3,000 RPM. I isolated the buzz by sticking a little piece of split vacuum line in various suspect spots. Once I identified the source (right in front of the side-stand bracket) I sanded the edge down so it was far enough away from the bracket. No more buzzing. It's not particularly fond of getting sprayed with rocks. I bought a clear plastic strip that is intended to protect the kick-plates in car door frames. Trimmed to fit the the bottom - I can barely see it - should have put it on before going mudding the other day. There is still no functional reason to put a chin spoiler on a V11. I still like it very much and would do it again.
-
Chamberlin - I just found this thread. OMG IMO - with all the work you've done, this bike DESERVES some authentic Rizoma tanks and brackets. I got the same size tanks for brake and clutch - really like the symmetry. Also like that both tanks are perfectly level when the bike is level. Spendy? Yeah, but they're quality - and they're right in my face. Black ones would be nice... Post another pic when you get the CF chin spoiler on? Also - where did you have the pipes coated? Do you remember the name of the color?
-
The only change I made was to increase the preload by 11 full rotations, because it was (perhaps mistakenly) set at minimum preload. This raised the front and it is more stable (which I called "predictable" earlier, but I think "stable" is a more descriptive word.) I didn't touch the back, and I'm not sure if the previous owner did. I am just in my suspension-tuning infancy here, but I did notice that Camn's front free sag (no rider) was almost identical to my original setting (41 for me and 40 for him). The target range, according to the Ohlins fork manual, is 25-30. I had some high-speed wobbles when mine measured 41, but after adjusting it 11 full rotations (presumably to 30), the wobbles went away (I did not change anything else, not even the damper or tire pressure). Next step for me: try to get all front and rear sag measurements as close to the middle of the factory-spec ranges as possible - and then tinker from there if I still feel the need. If there's ever a trade-off, I prefer stability over quick steering.
-
The change in preload made such a difference in the ride height that I could feel it the second I got underway. Raising the forks would probably put it back close to the original ride-height. I like big, heavy bikes for long rides - and there's nothing else like a big twin powering up a mountain. It's taken me a while to get my sport-bike feel back. The KTM Adventure that I traded for the Scura probably had twice the suspension travel - and huge knobby tires - so even the incorrectly set Scura felt incredibly precise at first. Back to work today - so I need to take a time-out from my holiday Scura-obsession. However, I'll get this all sorted as soon as possible (and after fresh oil). I appreciate your experience and advice.
-
I'd be happy to serve as your twisty-road tour-guide.
-
Our joke in San Diego is that we have four seasons: December, January, February, and Summer. While that's somewhat true for the low-elevation areas, the local mountains get snow every year (see my recent picture in "where the fun starts" thread.) I live at about 50 feet elevation and can be over 5,000 feet within an hour's ride from home. Further North, there are ski resorts in the mountains near Los Angeles. Still further North there is year-round snow and glaciers in the Sierra Nevada mountain range. It's a huge and interesting state. I took a buddy from Stamford, Lincs on a ride here. He nearly wet himself with excitement - and then I told him we were still on the "warm-up" roads. Ocean, desert, and mountains all on the same loop - huge changes in temperature. So - yeah, I'd like some fancy black handguards.
-
Just froze my fingers this morning at the same temperature. I am now looking into a set. How about these stylish and aerodynamic handguards? I think they go nicely with the pink t-shirt.
-
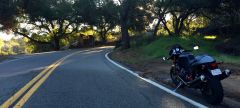
WOW! What an amazing difference. I take back everything I said about my ex BMW. Now I would compare the handling favorably to my ex Ducati Sport 1000. 60 miles - half of it the steepest, twistiest roads within range, and then a freeway ride home. The bike feels way more predictable in corners - especially steep downhill curves, where I was previously feeling very hesitant. At 90mph (145kph) it is still rock-solid, even over the "rain-grooves" that are common on California freeways - I had some unnerving wobbles before, tightened the damper one click and still had them, but they are gone now. Thanks everyone for the help. I will keep learning about the suspension settings and check the sag again properly soon - but this is VERY encouraging and probably the most important thing I've done yet to the bike. It seems the previous owner may have made the same mistake as I did (by believing the Ohlins manual) and had it set at minimum preload (but thought it was maximum). Maybe the stock springs will work for me after all. @Camn - I've been to Helsinki in January; I understand. I hope this picture from this morning helps you feel warmer (although I had to stop there to thaw my fingers on the valve covers).
-
Thanks Zooter and Baldini. I don't have a helper right now - but I measured the height at rest on the sidestand, then turned both nuts 11 turns clockwise and measured again. It increased the height by 12mm - which is enough to bring pre-load within specs. It feels like the front and rear both compress at the same rate when I sit on it - whereas before it was obvious that the front sagged a lot more. I didn't want to believe that the Öhlins manual was incorrect. Time to go for a brisk test ride (40 Degrees Fahrenheit).
-
I just re-read this, from the beginning of this thread. If the stock springs were 9 N/mm, then my options are only 9.5 and 10.0. I'm 25 pounds lighter (with gear) than Camn. Does 0.5 N/mm make enough of a difference for me - or should I go with 10.0 springs and less pre-load than Camn?
-
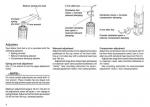
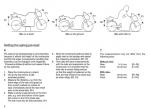
For ease of reference, and to take the guess-work out of the equation, here are the two relevant pages of the owners manual for Öhlins road & track front fork FG 43. This will be my first try at suspension work (other than removal and re-install), but given what I understand so far, I am now concerned that the stock-sprung Scura would be unsafe for two-up riding. In all my reading of various posts on this topic, I've been trying to separate fact from opinion and preference. Now that I have data (which I think are correct) about my own bike, I understand the problem.
-
OK - I'm going to keep riding it, but I'm going to change the fork oil as soon as I get the supplies in (will order ASAP). I plan on keeping this bike for a while, so changing the fluids "by the book" feels right to me. Since I'm going to be in there for the oil, this would be the time to pop in some springs if needed. So I figured I should measure the spring pre-load to see if it's already in spec for me. I used the Ohlins manuals from the Fileshare section of this forum as a guide. Here's what I found: Rear Shock: R1-R2 = 14mm. This is sag WITHOUT rider. The target is 5-15mm R1-R3 = 30mm. This is sag WITH rider. The target is 30-40mm My conclusion: rear spring seems OK for me. Front Fork: F1-F2 = 41mm. This is sag WITHOUT rider. The target is 25-30mm F1-F3 = 56mm. This is sag WITH rider. The target is 35-50mm Action attempted based on my understanding of the Ohlins manual: turn hex nuts on top of forks counter-clockwise 11 full rotations (out of 18 possible) to bring it within range for F1-F2. Intrusion of reality: the nuts were already turned to the stop in that direction - but could be freely turned the other way (and back to the stop). My conclusion: the bike does, as has been stated many times in this forum, need stiffer springs. In fact, it is impossible to set the preload within range WITHOUT the rider. Now, I am not the kind of skilled rider that can tell exactly what is wrong with a bike's suspension, but I do know (and appreciate) better suspension when I feel it. While I am happy enough with this bike as-is for my riding style, it corners kind of like my 1981 BMW R100CS did: it rewards the smooth rider; it likes to be all settled in before the corner; it doesn't like mid-corner changes to front brake pressure. Actually, having just re-read that critique, I now think that I love the motor so much that I've been blind to her other faults... I'm willing to be happier. The Ohlins manual says springs are available in .5 N/mm increments from 8.0 to 10.0. I weigh 185 lbs with all gear. Is this enough information for someone to recommend replacement springs for me? If I'm going that far, may as well put new seals in too... then I can "just ride it" till the engine paint looks like the La Brea Tar Pits.
-
Oh man, that's tempting - although I'd probably rent the Norge to do the whole island. What a great option for snow-bound northern-hemisphere dwellers. It's summer in New Zealand right now and it only costs US$0.77 to get a NZ dollar. Link saved to "bucket list." Thanks for sharing it.
-
I don't have an actual "bucket list" but if I did, touring the South Island of NZ on a bike would be on it. I've been to the North Island a couple times - stunningly beautiful.
-
LOL. Well-played, sir. ...and there's still a big, shiny, gold nut on the other side of it.
-
I was being playful - my gloves are stuffed between the valve covers and the tank. Everything's black, so you have to look closely at the picture. On snow rides on the dirt bike, I always grab the muffler to warm my hands. The valve covers on the Guzzi are perfect for stop-light warm ups and "glove-warmers" when I get off for a moment. Nice tool box!
-
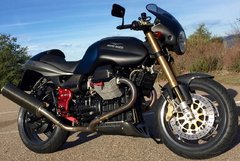
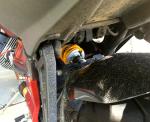
I got the Scura a little muddy today, which turned out to provide a nice spray-test for the fender. This this was the first time the bike got dirty, so you can clearly see how well the fender protects the shock from spray. Other than a little bit of dirt on the lower mount, which must have bounced off the underseat area, the shock is still totally clean. I never got it dirty with the stock fender, but I'm pretty sure that the shock would have been a mess if ridden in the same conditions. I bought it just for the look, and it turns out to be excellent protection for the shock. Cheers to Ghezzi-Brian for a functional and attractive design (although I grant that it was not an easy installation).


