-
Posts
4,003 -
Joined
-
Last visited
-
Days Won
247
Content Type
Profiles
Forums
Events
Gallery
Community Map
Everything posted by Scud
-
Fixed it for ya. That is a CLEAN GREEN MACHINE.
-
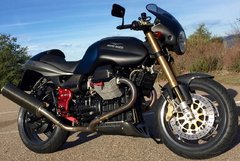
Thanks, she's coming together nicely - and I've noticed quite a few new parts that you installed. How's Germany? Spring must be on it's way... and riding all over Europe must be on your mind. Your earlier post, where you confirmed that it was Redline heavy in the transmission, got deleted in a server-update. I bet you are glad to have missed seeing that mess in person.
-
I'm not sure they're "supposed" to be that tight, but I like 'em like Bob Seger says... "way up firm and high" (no innuendo at all). It took me a few attempts, I think I finally got it when all parts were loose, then, like footgoose said, I snugged up the exhaust hangers first and worked to the heads. After getting it all snug (but not tight) I could still move it a little - then to final tightening.
-
Thanks - maybe I am being a little to playful in the posts here... I do actually read, and follow the instructions on the can. Primer 2 light coats and one medium wet coat - each separated by 10 mins. Wait 30 mins, then apply 3 coats color in same process. I've even been setting a timer between coats. But I have not paid attention to the heat curing instructions in past (I think I probably stopped reading the instructions too soon). So the heat curing is my big recent lesson, thanks to you guys. Good news is... I tested this VHT caliper and case paint on my K75s before I applied it to the Guzzis. I did not do any heat curing on that bike and it's holding up quite well. And now that I've started painting cases again, there are few more to go...
-
This is as high and tight as I could get it without using any innuendo. Look how far the end of the swingarm is from the tire on the right, compared to the left. The Guzzi definitely hangs to the right.
-
Thanks Marty, I see you edited your post to answer my question. I sure appreciate that you read the instructions and offer up ideas. Portable heater on the way, along with a giant seal for a front-load washing machine... apparently, if I can rebuild a motorcycle, I can rebuild a washing machine.
-
That looks like great ride. Last time I had my LeMans in Flagstaff I went for breakfast in Payson, which is almost at the Northermost point of your loop. Those mountain roads in AZ are amazing. Do you ever ride up to Show Low? https://www.google.com/maps/dir/E+McDowell+Rd+%26+N+Ellsworth+Rd,+Mesa,+AZ+85207/Claypool,+AZ/Jakes+Corner+Bar,+Arizona+188,+Payson,+AZ/E+McDowell+Rd+%26+N+Ellsworth+Rd,+Mesa,+AZ+85207/@33.2961421,-111.8043702,7.82z/data=!4m31!4m30!1m5!1m1!1s0x872bbaed486a351f:0x6b5e672bacdee5c0!2m2!1d-111.6318033!2d33.4620068!1m10!1m1!1s0x87299d886629ac61:0xdc01d214c86c4a3f!2m2!1d-110.8426113!2d33.4111659!3m4!1m2!1d-110.0624223!2d34.2376923!3s0x872f334f33df7d8b:0x986b4c162b410ed!1m5!1m1!1s0x872bf7bca4358ff7:0xdaca895515f7afdb!2m2!1d-111.3200231!2d34.0103507!1m5!1m1!1s0x872bbaed486a351f:0x12d01bdf3bc29d7a!2m2!1d-111.6316576!2d33.4619726!3e0
-

Enjoy life while you can.
Scud replied to doug m's topic in Special place for banter and conversation
SH - Hell of a week. But great attitude. I'm pulling for you. -
There's directions? No, I didn't cure it, but I was gonna hit with a heat gun before I bolt up anything. I used it on some calipers and forks on my BMW without heating it at all and it's holding up fine on the calipers - although the forks are sitting in the corner now, but that's another story. In fact... you just make out those BMW forks in the top left of the second picture. Not sure how you would otherwise heat assembled forks - maybe a radiant heater aimed at them for a while?
-
Bench full of bits. And it seems the transmission covers jumped in front of some paint. Freshly powdered fairing bracket and top triple clamp - awaiting a new aguila. Thought I'd clean the ignition switch, but broke it trying to take it apart. Luckily, I had another, which was in better shape anyway. But now that I see the picture, it's gonna bug me if the letters are not at the top... easy fix. And the fork bottoms needed some love - courtesy of VHT Brake Caliper paint. But the coolest thing that happened today (at least motorcycle-wise) was when I came out of the hardware store (needed some stainless screws for the TPS). I saw about a 10 year old boy by my LeMans in the parking lot and heard his mom say "don't touch it." Then he sort of went around the whole bike with his hands about 2 inches off it, following the curves. Fun to watch. When I got closer to him, I asked "Do you like it?" His eyes got huge and he just had a love-struck look on his face. He's gonna have a motorcycle someday.
-
Yeah - I figured I'd zip-tie the coil bracket to the frame. It keeps the pressure on the dampers, so even if the glue fails I think it will stay in place. The upper two are easy to zip-tie. The bottom one would be harder to zip-tie, but it already gets pushed forward by the breather hose. They're sitting firm now. And the project is starting to come together. It felt good to get the frame back in order. The candy-apple red felt like a bit of a risk, but I really like it. It looks really different in every kind of light. I know a lot people name their motorcycles (or cars). I've never done that. But IF I were name this one, she'd be Candy-O. https://www.youtube.com/watch?v=MxB8Z7GL6yc
-
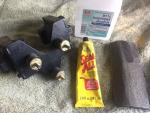
I'm cleaning up after powdercoating and putting sub-assemblies together. Chasing threads, removing overspray, etc. The candy-apple is taking a little more work than the flat black. It's a two-coat process, first a silver flake, then a translucent red. So the masking can loosen in the oven - letting more of the second coat into undesirable places, such as the ultra-fine threads for the swingarm pivot bolts. Here are some post-powder clean-up tips that I've learned: Use a dremel with wire wheels to remove excess around or in threads that you can get to (like the swingarm arm pivot holes on the porkchops). For small holes, put a little aircraft stripper on the tip of a bolt and work it until the powder disssolves and the threads catch. Or run a q-tip with stripper on it into the hole and let it soak a bit. Clean up threads from the back side whenever possible - and let the bolt push through the clean side - especially important if using stripper so you don't mess up the side that shows. Sandpaper, files, etc to remove various lips or edges from the masking. .....and in boring (but useful) news.... here's what you need to re-glue the vibration dampers. All three had come loose.
-
You're perceptive. The downside of project like this is that I get attached... but I don't think she can stay. And I was not planning on filling in the letters. The candy-apple is pretty bold on it's own - especially in direct sunlight.
-
Wait till you see the porkchops and alternator cover... I'm just a tease now...
-
Picked up my powdercoating today - and just had to see how the covers look by the tank... Champagne and Candy-apple Red.
-
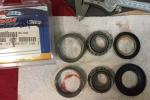
This evening I got the steering bearings installed. I "got a set" from All Balls. I do like their edgy slogan. Appropriate use of heat and cold sure make it easier. I froze the steering stem and heated the inner race of the lower bearing with a torch - the bearing dropped right in by gravity - no pounding needed. And I froze the outer races and heated the steering head - but those still took a little pounding.
-
Well, having lost a few days of shop-talk from this thread, let me try to recap the posts that went missing. I was disturbed by a groove in the bore for the clutch push-rod. I got some good advice and offers to help and Chuck posted a cool video of his shop and airplanes and Guzzis. We all now wish Chuck was our neighbor. We talked about throwout bearings and all the parts that go between the slave cylinder and the pressure plate. And I managed to get the bore honed at a local machine shop. And the inside of the tranny is looking pretty clean after a bath in diesel fuel.
-
OEM Part Name: Front Brake Caliper Pins Moto Guzzi Part Number: couldn't find a part number Replacement Part Brand or Source: Pro-Bolt Part number: TIPINBP012-4 Differences from OEM: These are titanium, and the manufacturer claims they last longer than the original Brembo pins. Other Comments: At first glance I thought they were thinner than the Brembo part, but they measured exactly the same diameter (digital caliper). They look thinner in the picture too, but that is an optical illusion... They are available in different colors, the supplied part number is for a 4-pack.
-
OEM Part Name: Steering Bearings Moto Guzzi Part Number: 92249225 Replacement Part Brand or Source: All Balls Part number: 22-1044 Differences from OEM: The supplied dust seal is not compatible - it looks like it is supposed to fit inside a bore, not cover the top, like the MG dust seal. Other Comments: These come as a set of 2 bearings, with races.
-
Bummer about losing the original thread - but looking forward to seeing these on your bike. Having recently installed a new set on my LeMans, here are a couple things I remember: Don't install the springs between the pipes and cans until you get everything lined up where you want it. I learned this the hard way. The motorcycle is not exactly symmetrical - and it is very difficult to get the pipes to terminate symmetrically in the back - but you can get pretty close. As for the ECU - why not just pop it in with the pipes and see how she runs?
-
Thanks guys. Some answers: It's a little colder than normal - just had an Orca sighting off Carlsbad (they rarely come this far South). Garage is about 55F (13C) - it's been raining all day, on and off last 2 weeks actually, we're having historic snowfall in the mountains and we may be coming out of drought conditions here in California. The Pacific Ocean is kicking our asses right now. Big swell coming... maybe up to 12 foot sets. Took the kids to the beach this afternoon. High wind advisory. The transmission had to be drained at ambient temperature, because the tranny was out of the bike, which has not run for several years. I do have access to compressed air, but I have visions of Gallagher smashing a watermelon with a sledgehammer.... and I was thinking diesel fuel too. I prefer not to work with stuff that can catch on fire or explode. Sometimes diesel is even cheaper than gas. I got all the big sludge out with spoon, towels, and Super Clean. Everything turns well and the shift arms slide freely. I think I will run a little diesel fuel through it next week, and then one more flush with gear oil so it can sit till I'm ready to seal it up again. Gonna get the pushrod and throwout bearing out too (but slave cylinder bolts are not turning yet). I really appreciate the help/advice. I've heard stories about sludge-piles like this, but I've never seen it before and had no idea what to do. Squeamish alert.... And in better news... the 12,000 mile engine from my crashed parts bike is super-clean inside. I got the valve clearances set, new plugs, and I think I will pull the clutch discs out again and do the graphite treatment, along with the spline.
-
I spooned out the blood-pudding. Also disassembled and degreased the pre-selector. But I could use a little more handholding.... I assume I should not be flushing with water (even if I use a water-soluble cleaner). I have some of that purple-stuff, the Super Clean. So do I just wipe the worst of the sludge out, spray it with solvent, turn the gears, and just wipe what I can reach? Then I refill with proper gear oil and go? Sorry if this is too basic, but getting inside a transmission is still pretty new to me.
-
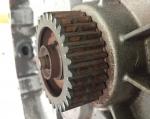
And if don't have a good way to dispose of gasoline... what other solvent would you recommend? So glad I found it now. I would have otherwise just assumed it was empty, then put fresh oil on top of that mess. And is this clutch hub OK for a while longer? I put used clutch internals back in. I know I've seen pictures of worse looking hubs, but I'd like the bike to be in good condition for the future owner. Run or replace?
-
+1 Get yourself a nice pair of ring pliers. I recently got a Craftsman tool that comes with a bunch of different tips. So easy with the right tool. http://www.sears.com/craftsman-professional-retaining-ring-pliers-internal-external/p-00947412000P?plpSellerId=Sears&prdNo=6&blockNo=6&blockType=G6 Also - those half-moon aluminum holders go in way easier if you pull the fuel lines back a little - then snug them up after the injector is in place. And hey - why not just throw in some new high-pressure fuel-injection hoses while you're in there? This would be the time to do it.
-
Now I need some help/advice... I thought I'd do the "Lucky Phil" shift improvement and replace all the springs in the pre-selector. Drained the oil... nothing came out... Joe must have drained it already... no worries. Opened it up and... Warning to the squeamish... What is the appropriate response to this?


